Software localization
A Guide to Internationalizing XCode Storyboards

Storyboards are a somewhat divisive topic among iOS pros. Detractors often mention merge conflicts in teams, slow load times, and having to maintain @IBOutlets manually. Supporters love how fast and easy it is to develop UIs with storyboards, and how they allow us to get an overall view of our app. I'm in the latter camp myself, even though while preparing for this article XCode decided to make my 3-controller Main.storyboard into an 800MB beast that GitHub completely rejected when I attempted to git push 🤦🏽♂️. But in all seriousness, I do believe storyboards have their merits.
And, since you're here, we'll go ahead and assume that you think that internationalizing your iOS app has its merits as well. In this article, we'll walk through some iOS storyboard i18 best practices, shedding some light on some XCode features you may not have checked out before. We hope you enjoy it 😊
Note » I'm assuming that you're familiar with iOS development, storyboards, Auto Layout, and are generally comfortable with XCode.
Note » Our ultimate guide to iOS localization article covers internationalizing code as well, so check it out if you want more of an end-to-end iOS i18n guide. We'll stick to internationalizing storyboards here and dive into them a bit more deeply.
The Starter Project: Open Plant Wiki
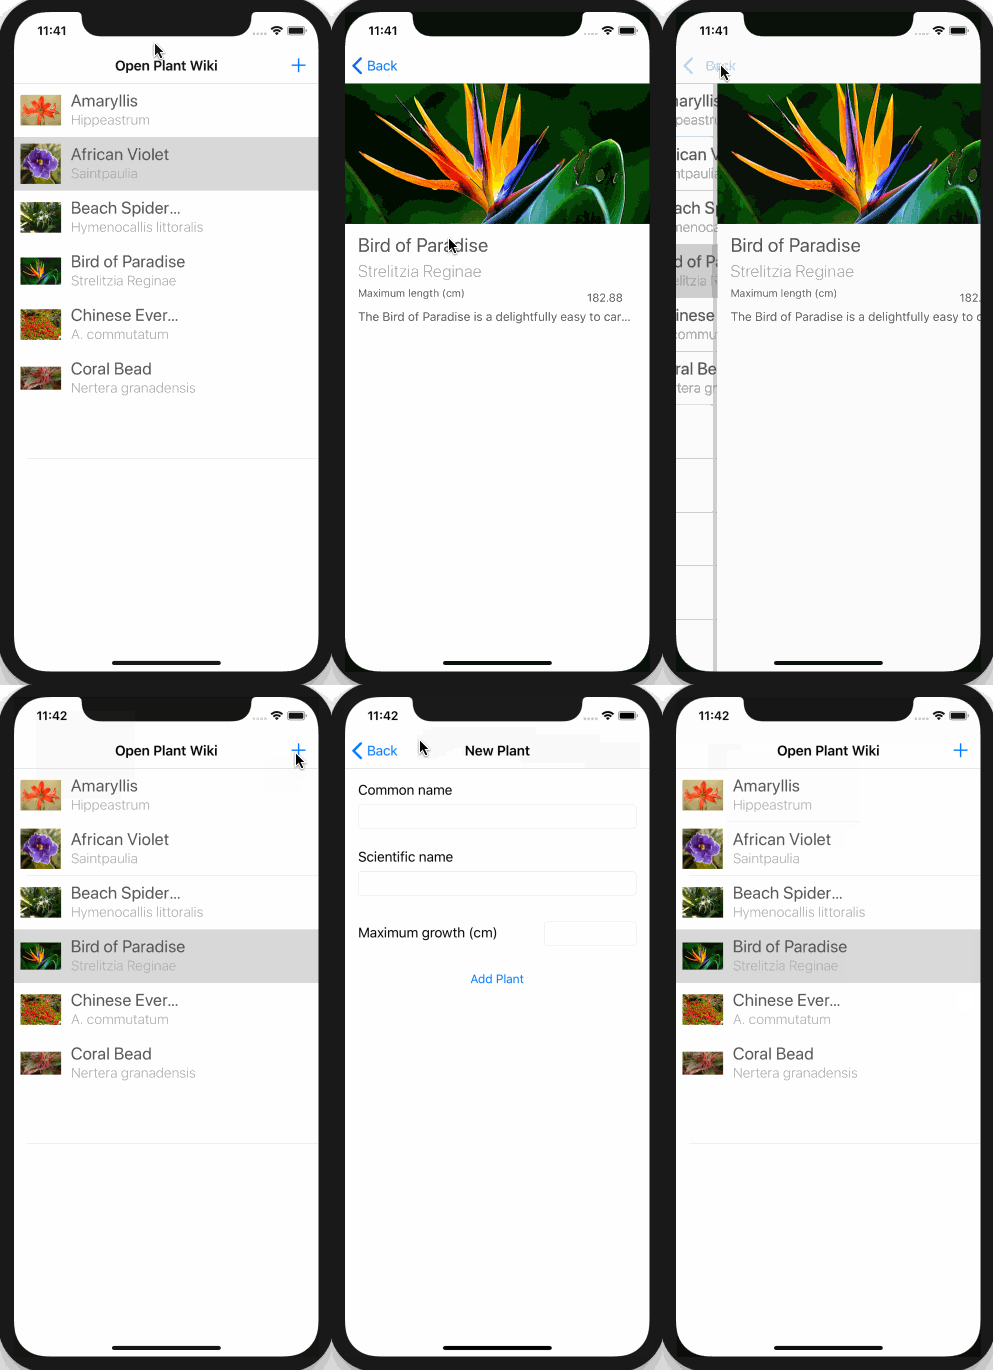
If you want to build along with us, grab the starter project on GitHub. Here's what it looks like.
Note » We're building with XCode 10, with a deployment target of iOS 12, and a Devices project setting of iPhone.
We have a very basic prototype of a fictional plant wiki app, where users can browse plants, look at their details, and add new plants to the wiki. This is a demo, so the content is hard-coded into the app, and the adding functionality is just for show. But it's a good start for us to look at storyboards in XCode and how we can better internationalize them.
Note » If you want the final code for this article, you can find the completed project on GitHub as well.
Demo Content Credits
The plant detail copy in the demo app was obtained from the House Plants Expert website. Plant photos used have a CC0, public domain license, except for the following.
- African Violet by Tim Sackton on Flickr
- Beach Spider Lily by Sanjaybengani on Wikimedia Commons
- Chinese Evergreen by Mokkie on Wikimedia Commons
- Coral Bead by Oldcrookedjaw on Wikimedia Commons
Consider i18n at the Design Phase
One cool thing about XCode storyboards is that they bridge design and development, offering a visual representation of our screens and app flows. And we really should be thinking about i18n during the design phase of our iOS apps. Considerations like label widths and layout direction can have significant effects on our designs, so it's best to address them early and often.
The Development Language
Alright, let's jump into XCode. Working from our starter project, we can see that our Main.storyboard has hard-coded English text in it. This actually isn't a problem, since we can consider English our development language if we like. This is simply the language we developers are using when building our interfaces, and Xcode can treat this is as the source language for our localizations. XCode will generate string files that can translate these strings into our other supported locales. Our app will then adapt to the current locale automatically, showing the translations provided in the translation string files. So we can hard-code our storyboard strings to our heart's content, and XCode will take care of the rest, which is a nice time-saver.
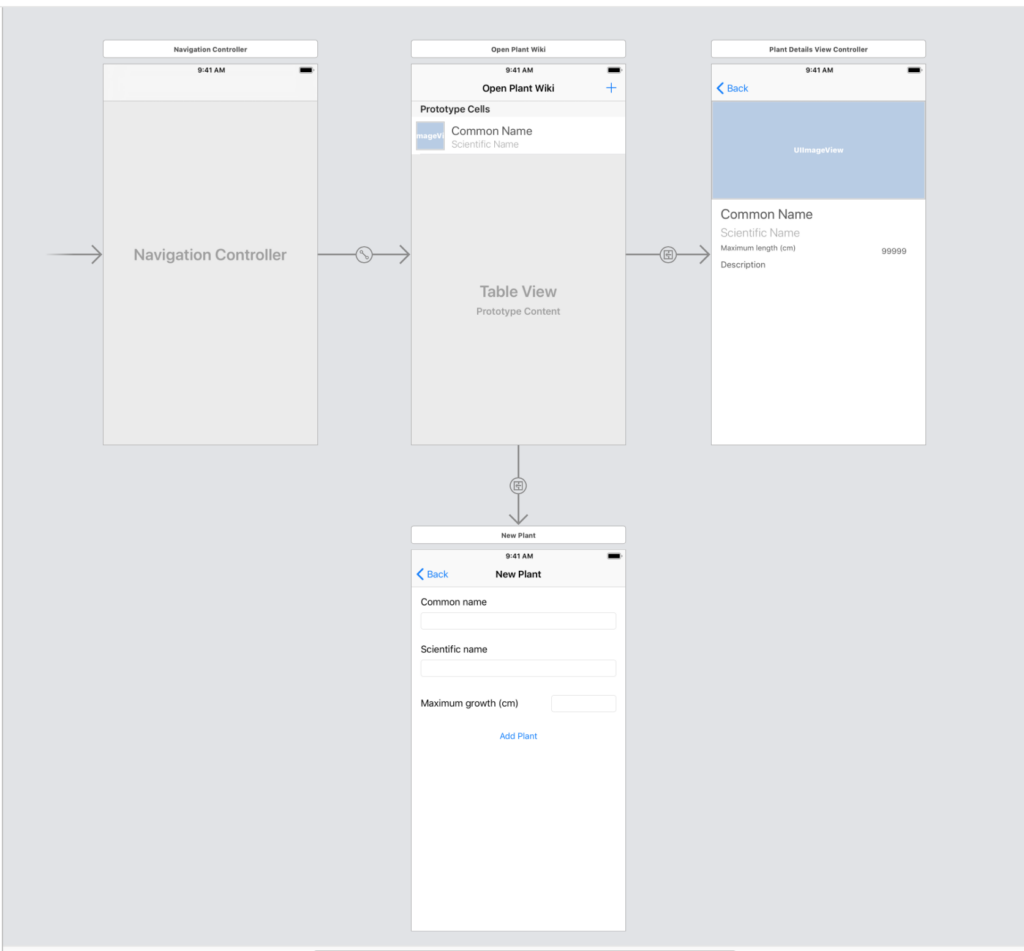
Note » The development language can be changed for your project. It's rare that you'll want to do this. From my experimentation I found that keeping the development language the same as the base locale (see below) helps avoid confusion.
Base Internationalization
Having a base localization means that we don't need to hassle our translators with our storyboards. With Base Internationalization enabled, XCode will know that the strings hard-coded in our storyboards are in the source language for our app. The IDE will provide the source-target mapping in translation files automatically. This saves us from maintaining source localization files, or English files in our case.

Sample of an ar.xliff Arabic translation file exported with Base Internationalization enabled. Notice that XCode added the English text as the source automatically.
Note » If you want to learn more about XLIFF files and their localization workflow, check out our article Localize Your Xcode Application With XLIFF.
We can control base localization under our project settings.
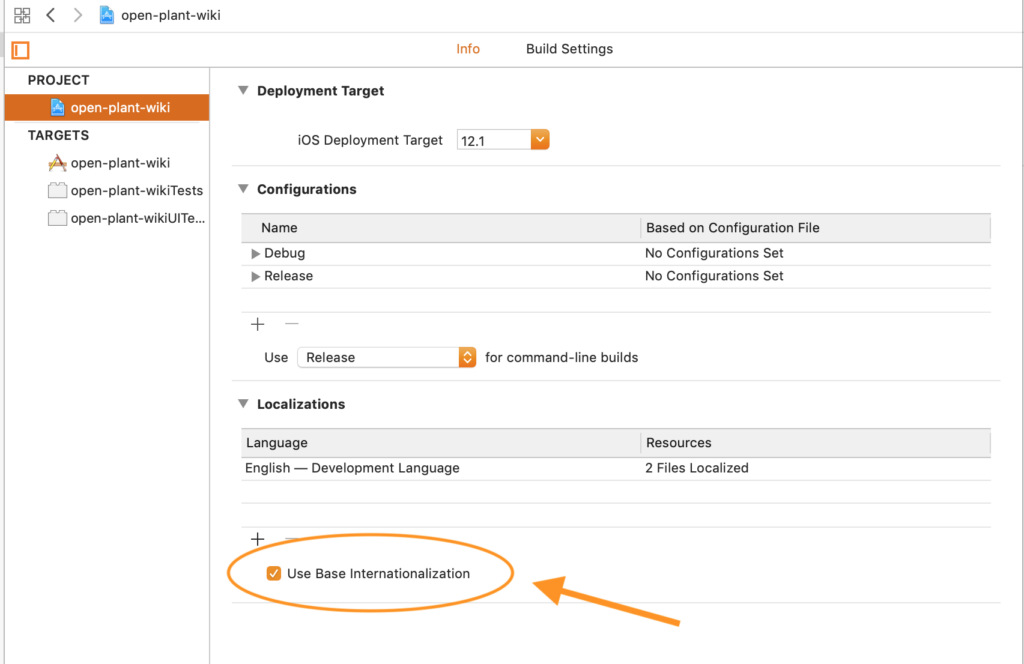
Notice that the Use Base Localization checkbox is checked by default. If we were to uncheck it, XCode would ask us for the specific locale that we wanted to move our localizable files to.
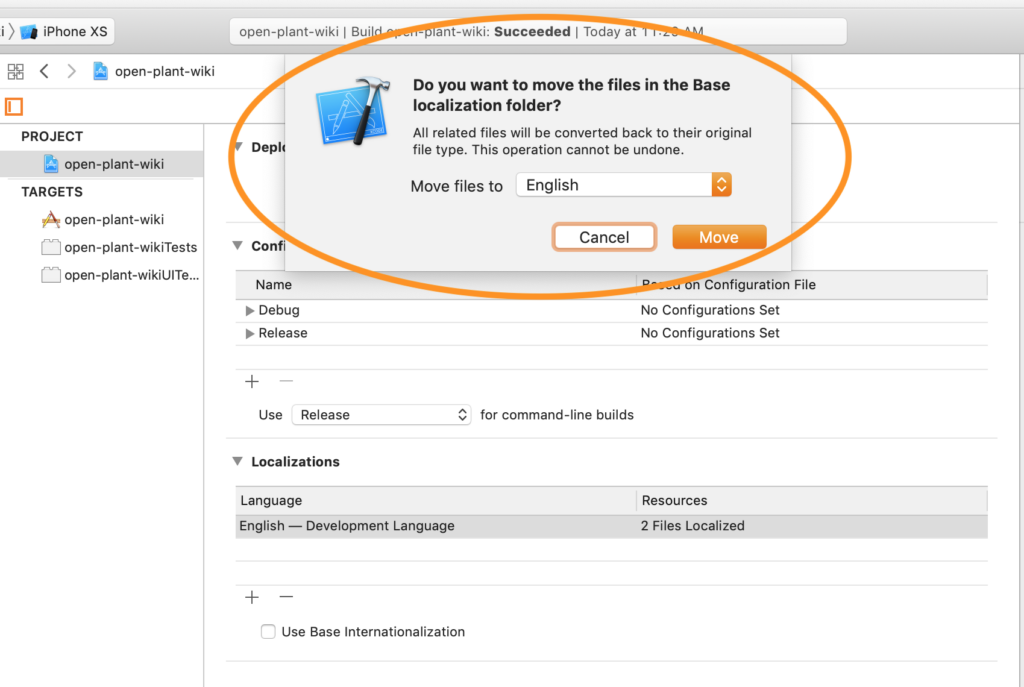
Clicking Move on the dialog shown above would move our storyboards from Base.lproj to en.lproj. This would mean that our translators would have to jump into XCode and translate storyboards directly, instead of simply using string files. I doubt that this is what we want most of the time, so I'll leave Base Internationalization enabled here.
Note » If you disable Base Internationalization and then re-enable it, you may have to go through all your translatable storyboards and change the localization file types for non-base languages. XCode will have switched those to storyboards files. If you want, you can revert those back to string files in the inspector.
Since we're using base internationalization, we don't have to do much to make sure our strings, like label text for example, are internationalized/translatable. We just get that for free from XCode.
Adding Supported Locales
We can add supported locales for our app in our project settings.

We simply navigate to the project settings Info tab, make sure the whole project is selected (not a specific target), and click the ➕ button under Localizations to add a new locale. When we select a locale we'll be asked if we want to use storyboards or string files for the new locale. This will depend on your project needs, but most of the time we'll want string files, and they're selected by default.
Auto Layout and i18n
Auto Layout, XCode's UI layout system, uses constraints to adapt UI views to different screen sizes, orientations, etc. Auto Layout does a lot of the i18n work for us actually. Let's see how.
Leading, Trailing, Left, and Right Constraints
By default, horizontal constraints in XCode are set against the leading and trailing edge of views. The leading edge of a view is the left edge in left-to-right language layouts, and the right edge in right-to-left language layouts. Just by using trailing and leading edges we get a lot of support for right-to-left languages like Arabic and Hebrew.
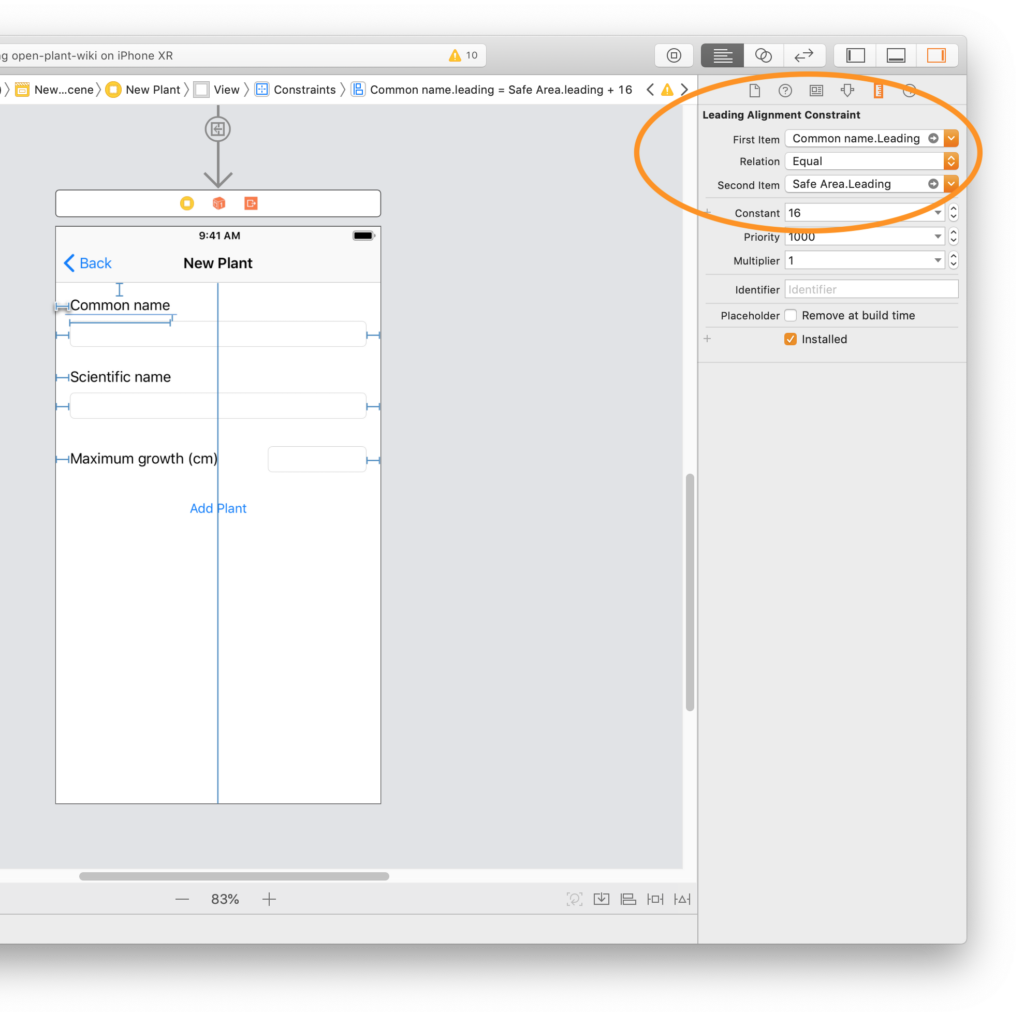
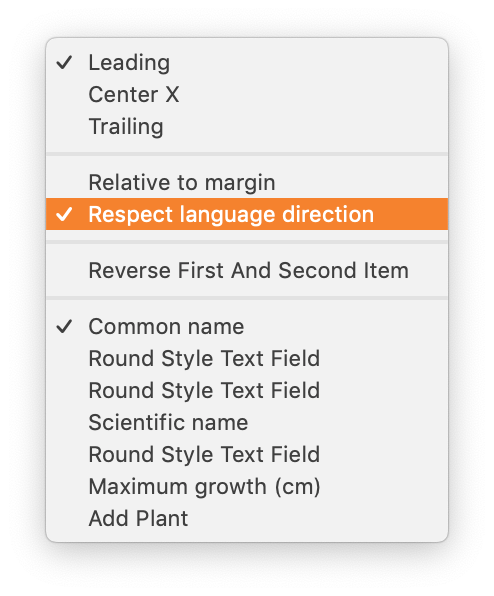
We could turn this off manually in XCode's inspector view. This is helpful when we want a view to be aligned to the left no matter the language direction, for example. We simply select a constraint, open the Size inspector and click the dropdown for either the First item or Second item. We then click the Respect language direction option to disable it for the active constraint.
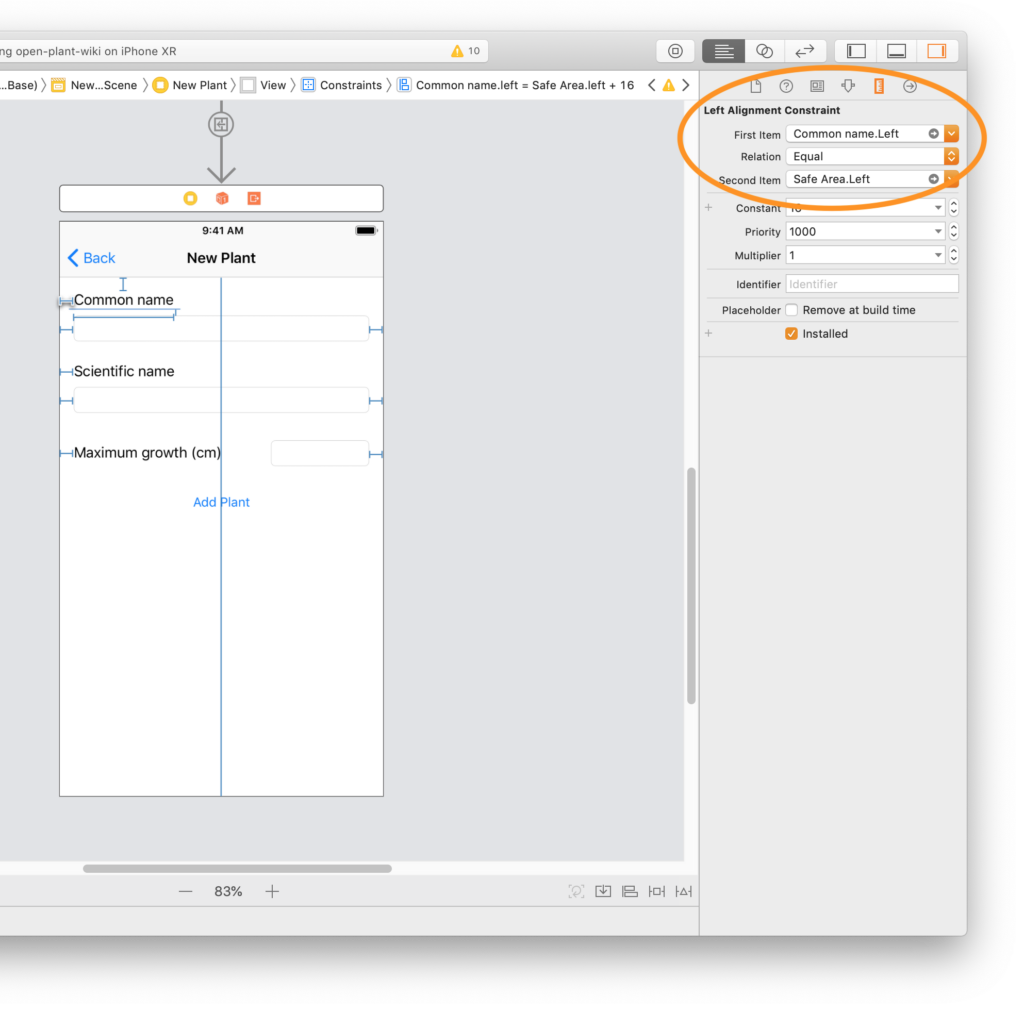
When we do that, we can see that the constraint pertains to the absolute Left edge of the view, regardless of language direction.
Avoid Fixed Width Constraints
Notice that the text is cut off in some of our app's labels.
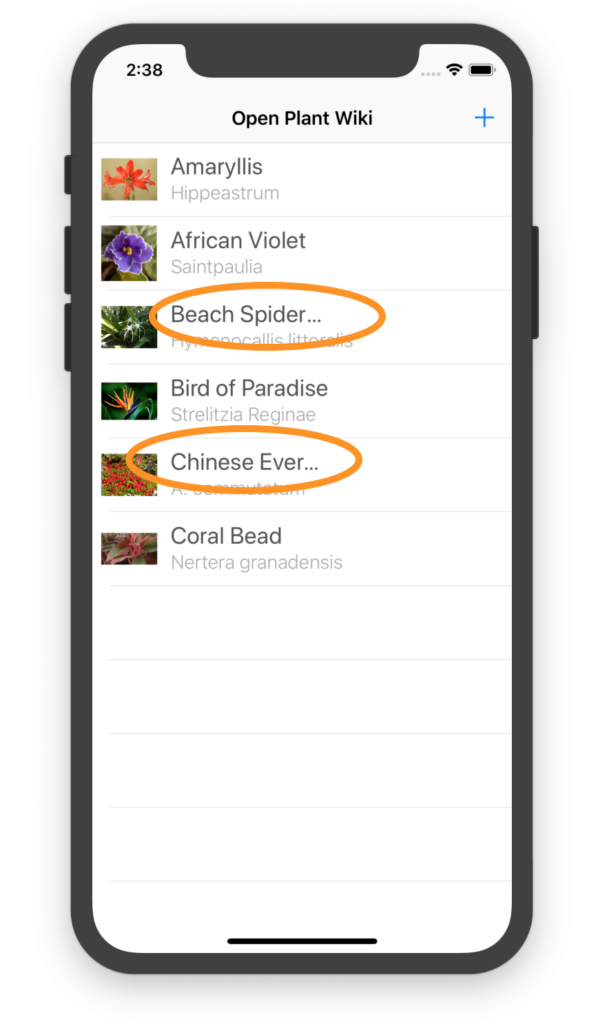
This is especially a problem for i18n. Often label widths can work well for our development language, but not take into account that different languages will have different text sizes for the same label. This could lead to text being truncated and information being lost, potentially confusing or annoying our users.
Text cutoff often happens when we set fixed widths for our labels. We can fix this by removing fixed width constraints and pinning our labels using trailing and leading constraints instead. Let's go through the views in our Open Plant Wiki and do just that.
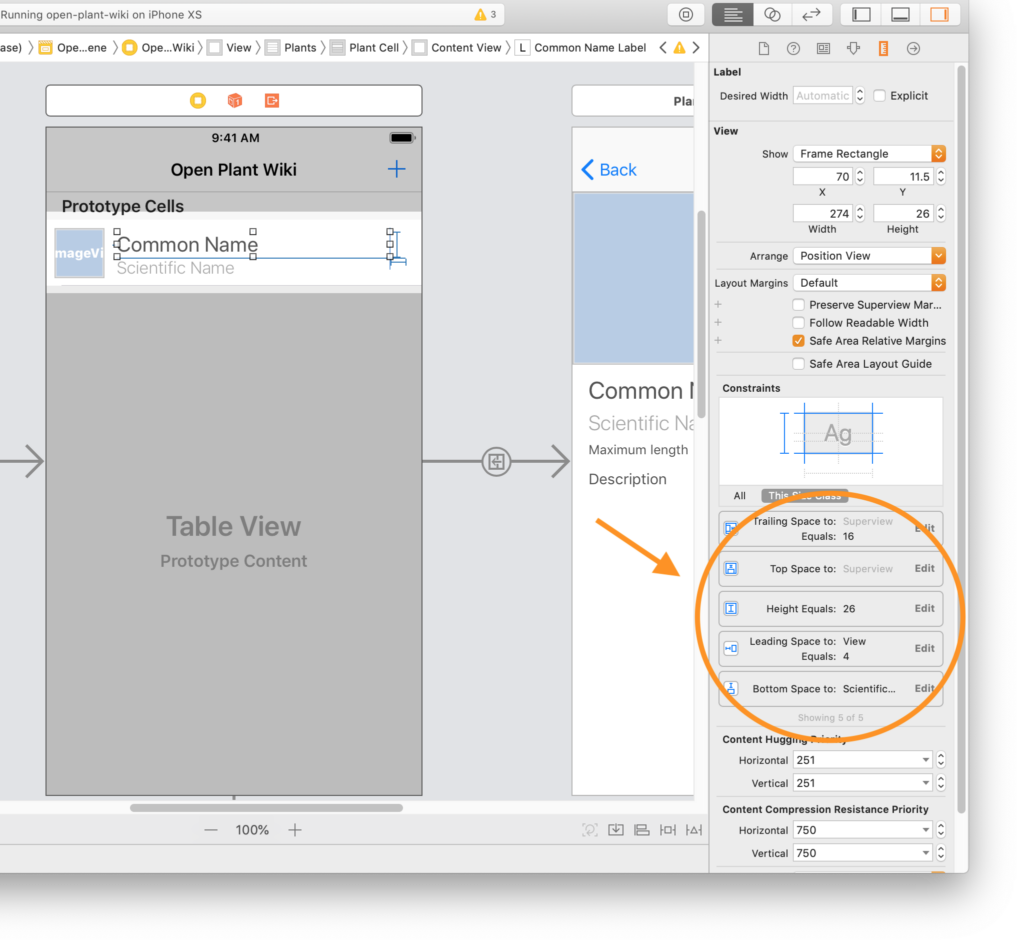
This fixes our truncation problem and accommodates more translations. Try it out and re-run the app to see the effects.
Heed Auto Layout Warnings
The above fixed-width problem could have been avoided if we took the time to look at the Auto Layout warnings that XCode generates for us as we build our interfaces.
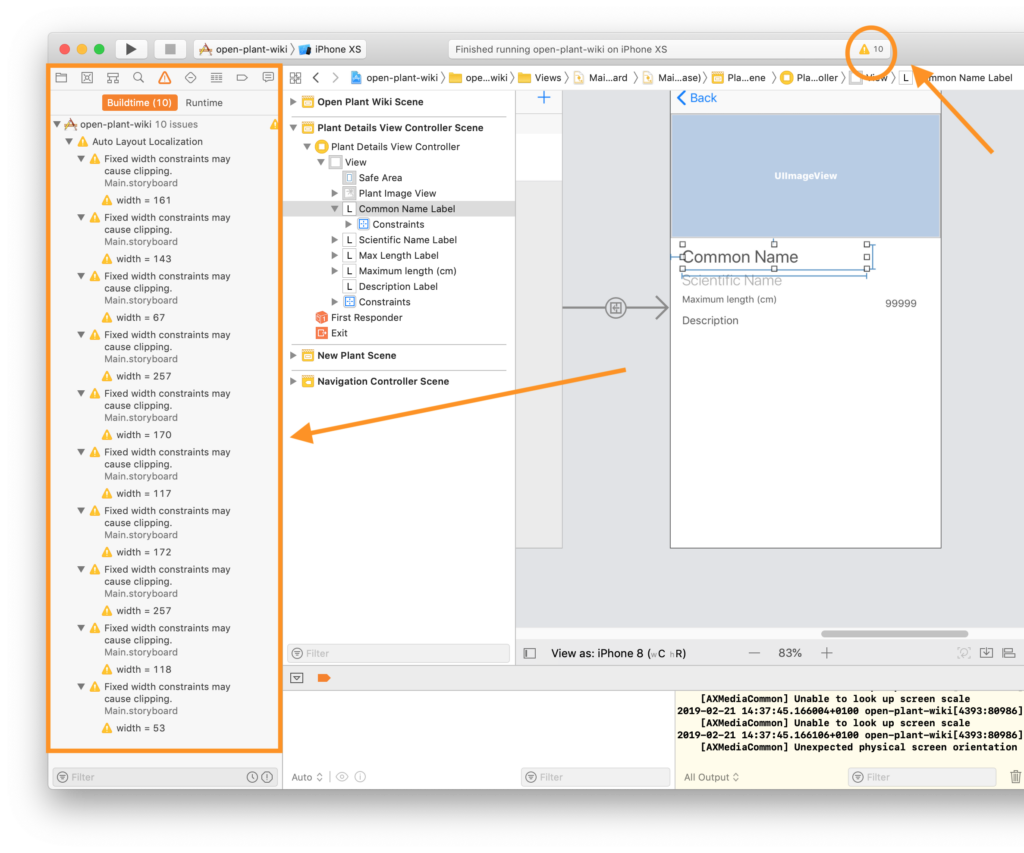
Simply by taking a look at the Issue navigator for warnings in XCode, we can avoid many i18n layout issues.
Use Multi-line Labels
Check out this ugly truncation in our plant details screen.
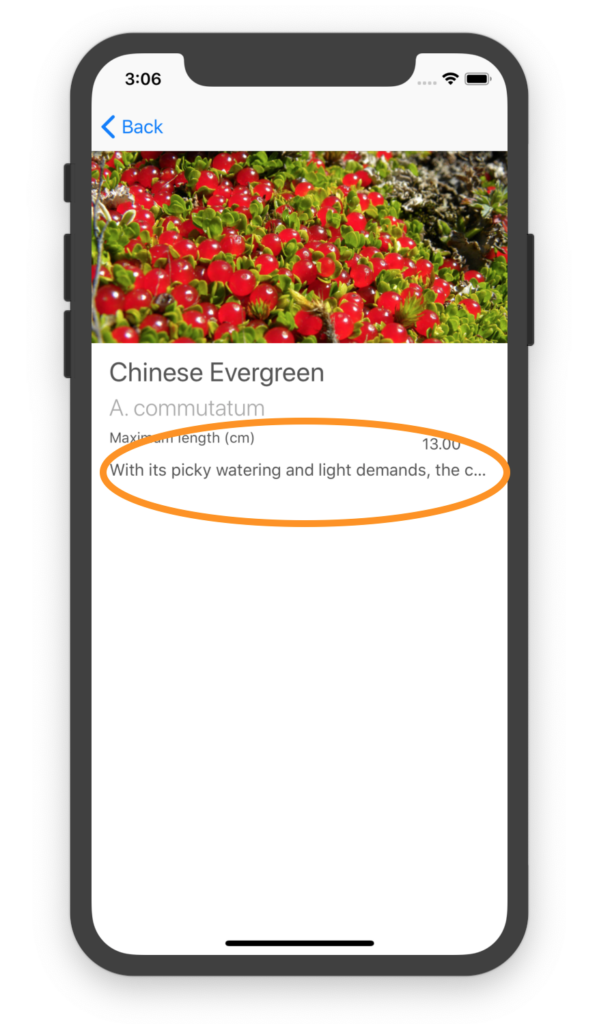
Again we can miss this problem if we're only working in one language. One of our supported locales could have a translation that spills over into the next line or more. And, as you can see, this isn't an issue of fixed width. Our label basically goes to the edge of the screen.
The problem we have here is that our label is set to show only one line of text, which is the default in XCode. To fix this, we can set the label's Lines attribute to 0 (zero).
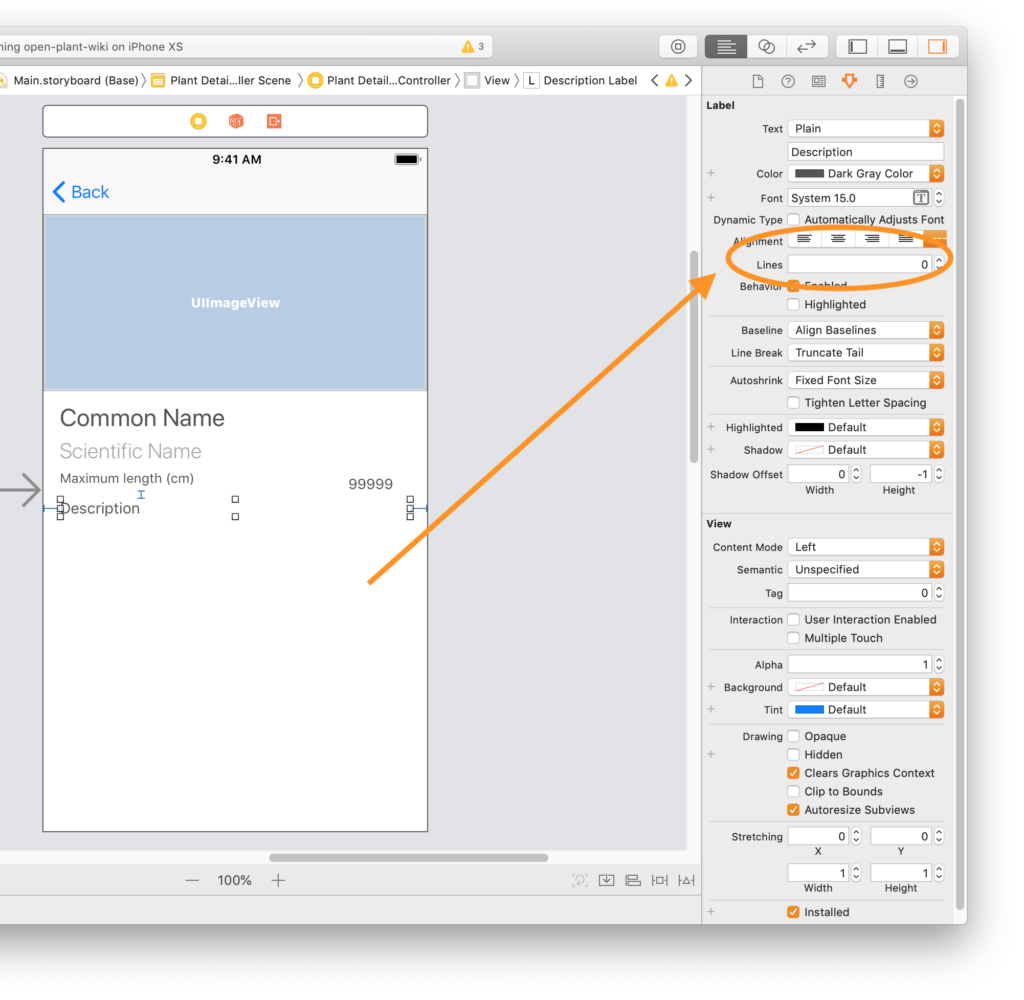
This effectively makes the label height dynamic, and it will grow to accommodate the number of lines needed by its text.
Note » This only works when our label does not have a fixed height constraint.
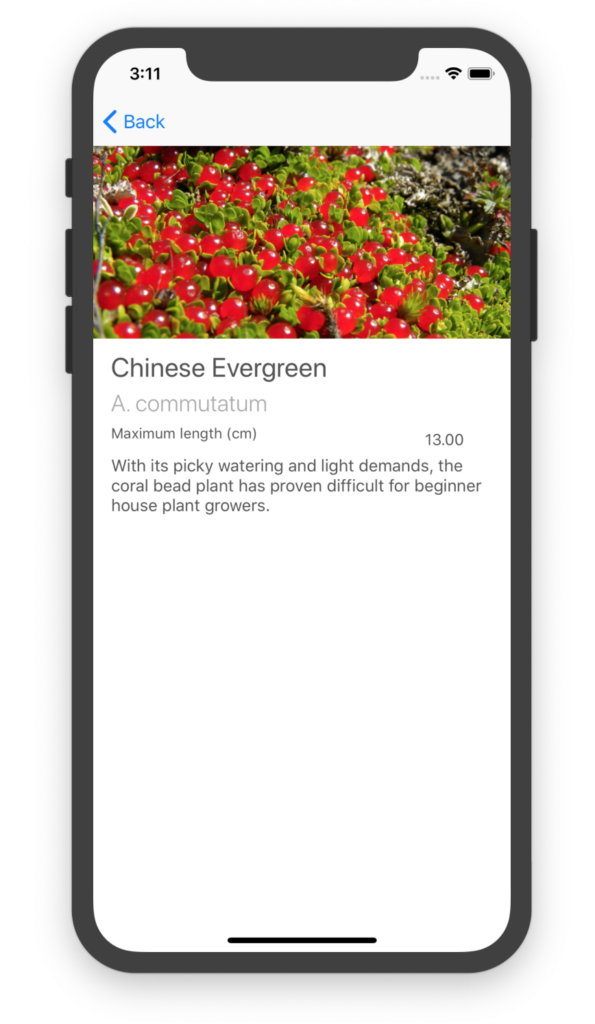
With its Lines attributes set to 0, our description label grows to accommodate as many lines as is needed by its text content.
Pin Views to Each Other
To go along with the previous tip, when using multi-line labels it's often a good idea to pin views to each other. This allows views to move with the ones they're pinned, and to grow and shrink, depending on their locale, without overlapping eachother.
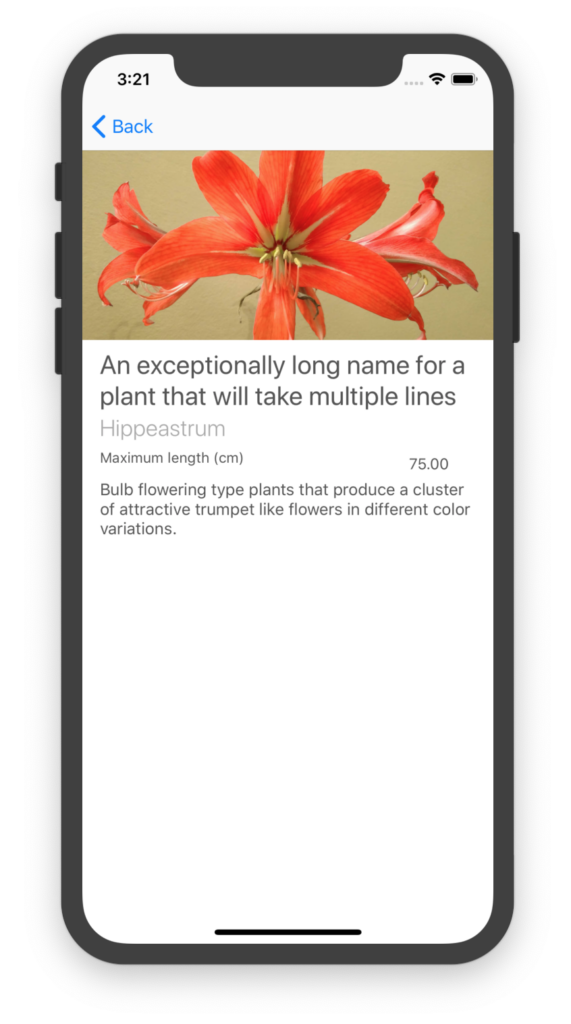
With all labels pinned to each other on the vertical axis, the top label pushes everything beneath it down when it takes up multiple lines.
Note » We may have to be careful when using this technique. For views that are full on the vertical axis, for example, we may consider embedding them in a ScrollView to avoid truncation at the bottom of the screen.
Use Autoshrink for Text Labels
Multi-line labels and pinning views to each other is all good and well when we have room for it. Sometimes, however, we're just stuck in a limited vertical space.
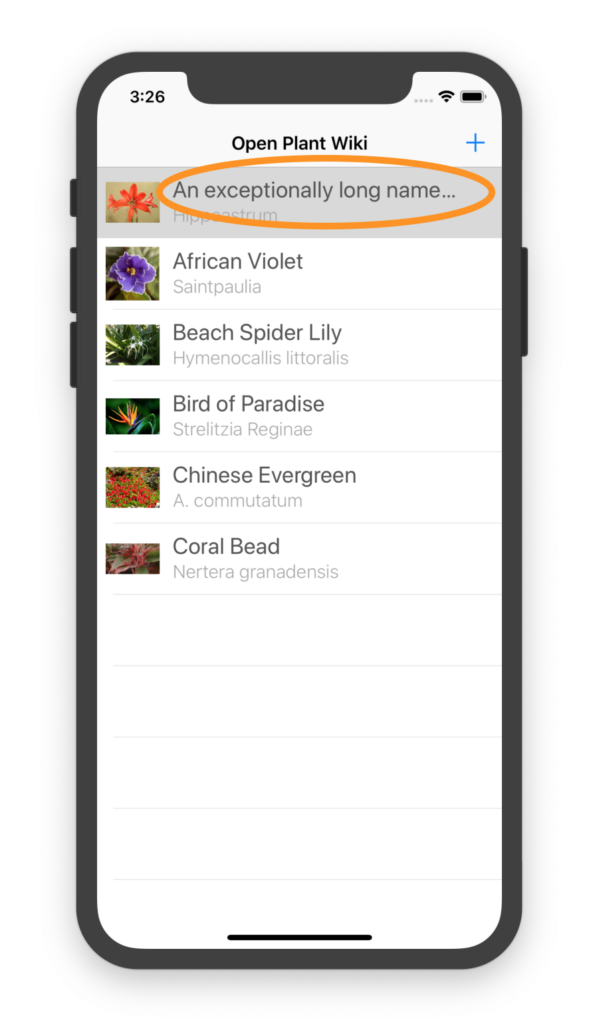
We could give our TableView rows a dynamic height in code to solve this problem. Another option is to use Autoshrink to address the issue.
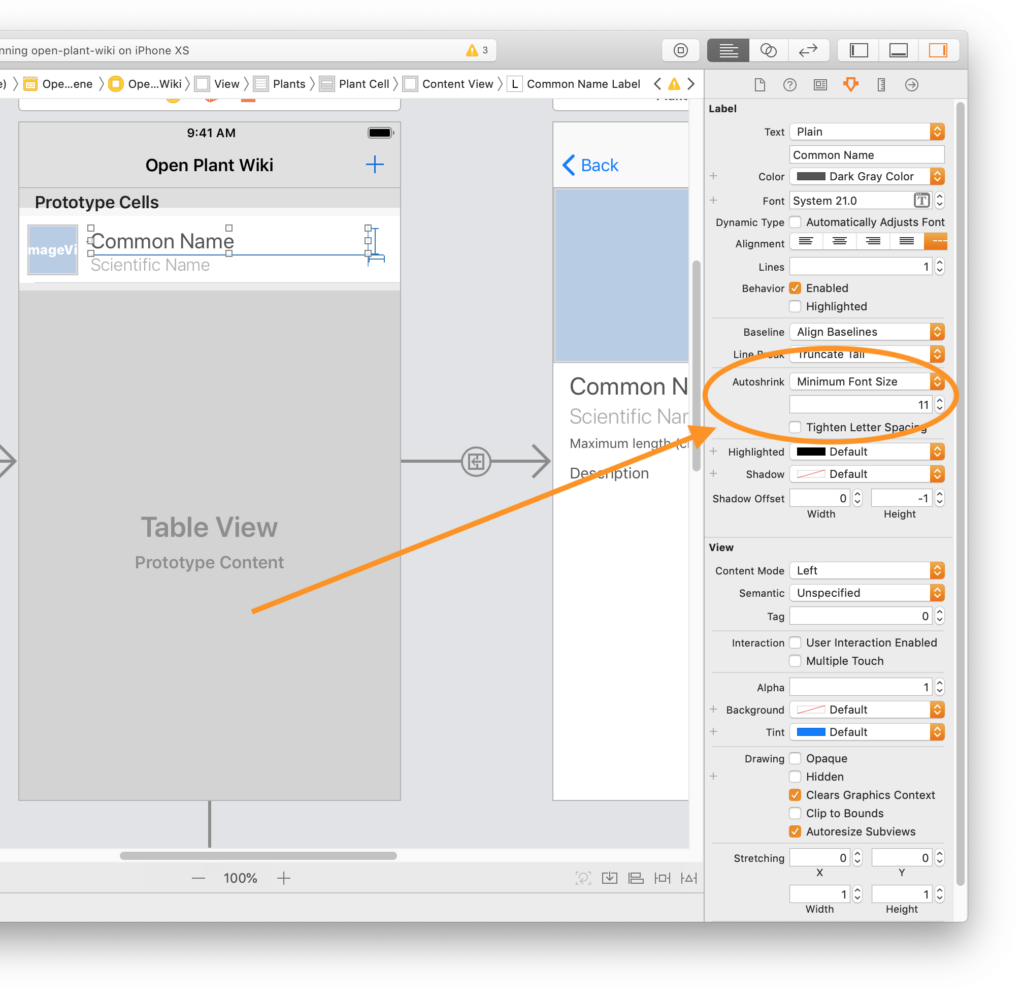
By selecting one of the Minimum options under Autoshrink for a text label and giving it a minimum scale or font size, our label will dynamically shrink down to that size to accommodate long text. The minimum value we choose ensures that the font won't shrink to the point where it becomes illegible.
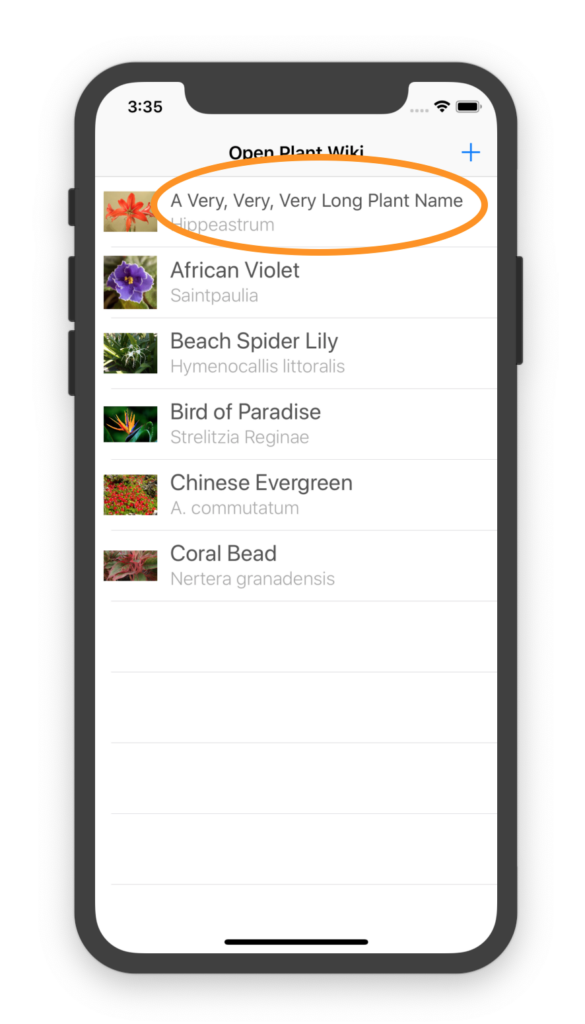
With an Autoshrink minimum font size selected, our label will shrink its font size down to accommodate longer text.
Just by applying these Auto Layout strategies we can go a long way in making sure our apps are ready for multiple languages.
Built-in Containers
The good folks at Apple have given us high-level containers like TableViews and StackViews which have adaptive layout direction built into them. We get this behavior for free just by using these containers.
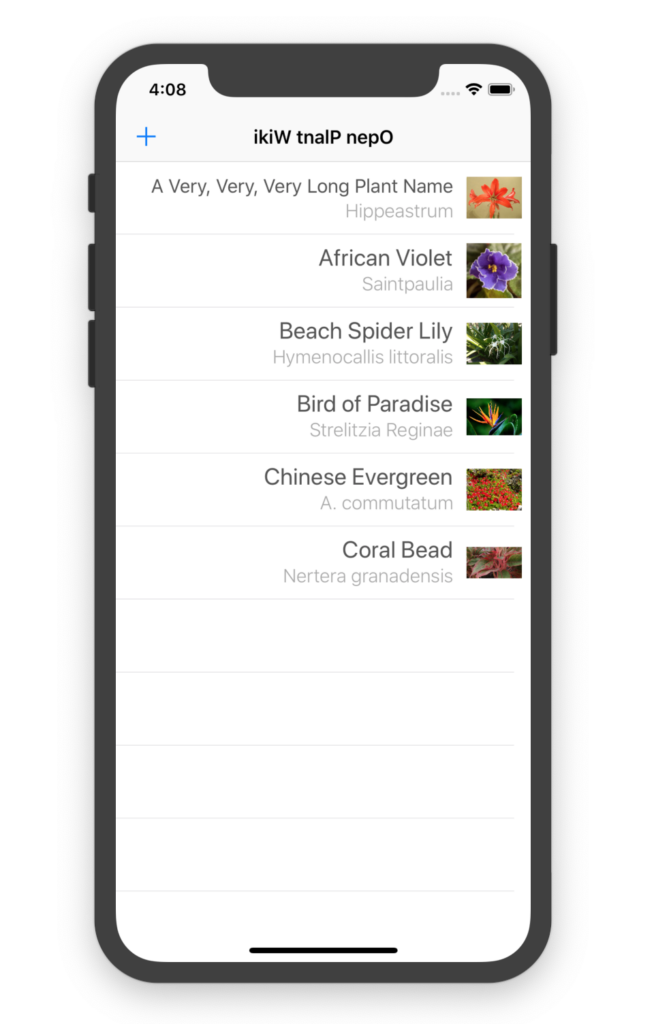
Our app's TableView adapts to a right-to-left direction automatically when the current user language is right-to-left. To get this behaviour, we didn't have to anything other than make sure our cells' contents are using leading and trailing constraints (see above).
Note » The above screenshot was taken using the Right-to-Left Psuedolanguage With Right-to-Left Strings language, which is provided in XCode. We'll get to this and other pseudolanguages a bit later in this article
Use StackViews to Handle Complex Layouts
Take a look at our details view.
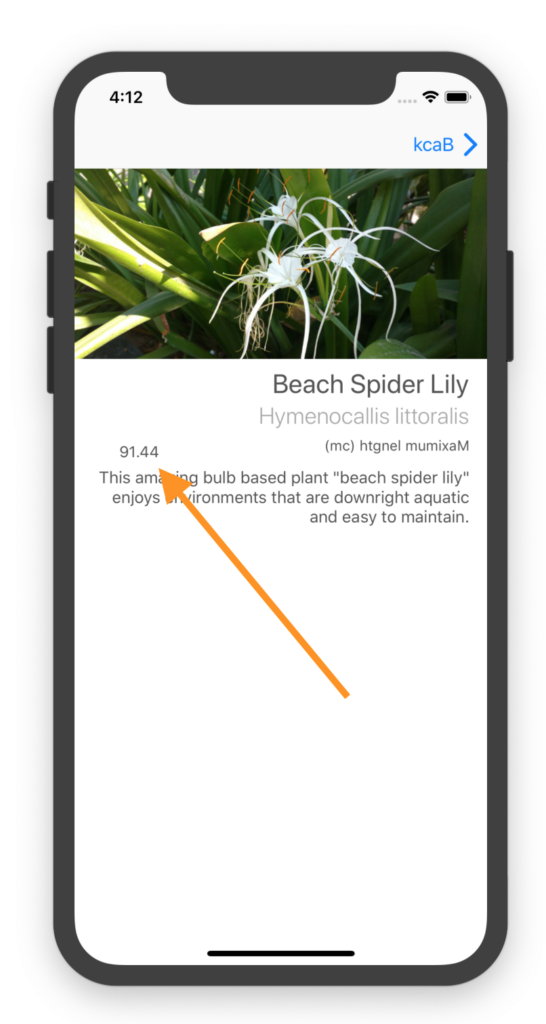
Notice that the Maximum length row looks a bit weird when viewed in a right-to-left language (and I don't mean the flipped text, which is part of an intentional test here). The spacing between the number and the trailing edge of the screen looks off. We can fix this and other problems using StackViews.
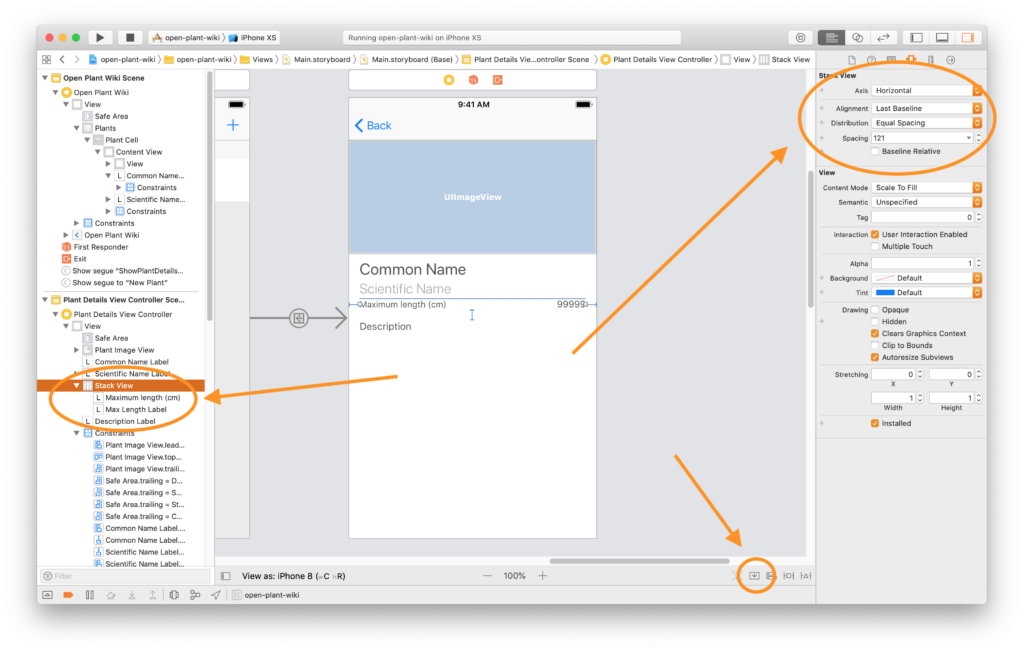
By selecting the two views, clicking the bottom arrow icon near the bottom of the screen, then selecting Stack View, we embed the two views in a parent StackView. We can then control the StackView's alignment and distribution, and put constraints on it. This gives us a lot of flexibility and works exceptionally well with cases where we have a group of views that we want equally spaced, like a line of tabs for example.
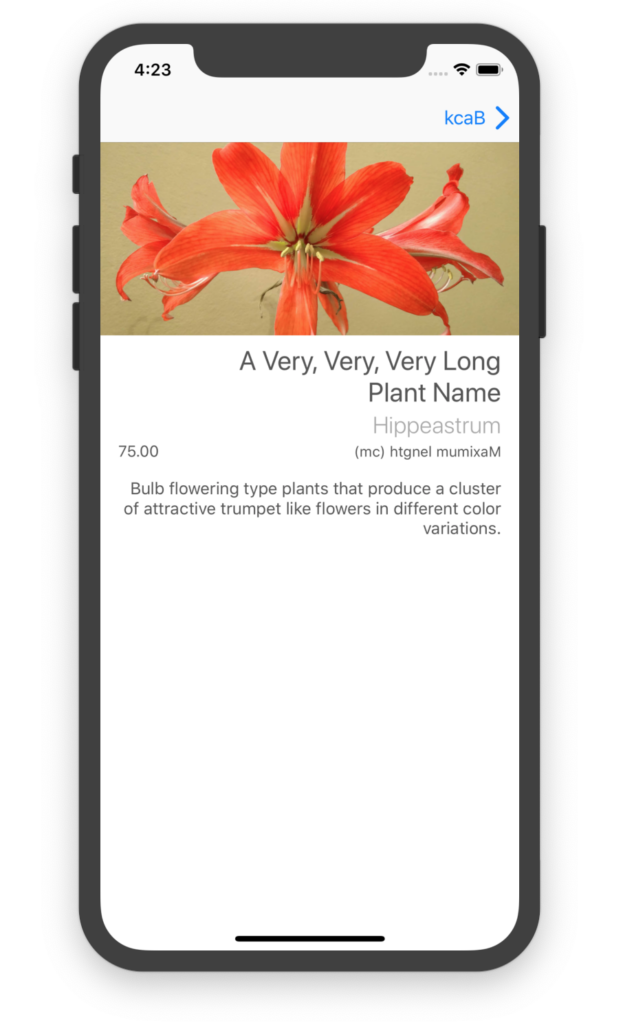
After embedding the views in a StackView, the offending number label behaves well in a right-to-left situation. This is because, like TableViews, StackViews have built-in i18n awareness and adapt to the current language's layout direction.
Testing Localizations
Once we've put our localizations in place, XCode provides several ways to test them. Let's take a look at them.
Assistant Editor Preview
We can open the XCode Assistant editor and select Preview from the dropdown menu to open the preview window. With that in place, selecting any ViewController in our storyboard will show that view with various attributes. For example, we can see the view on different screen sizes or in different languages.
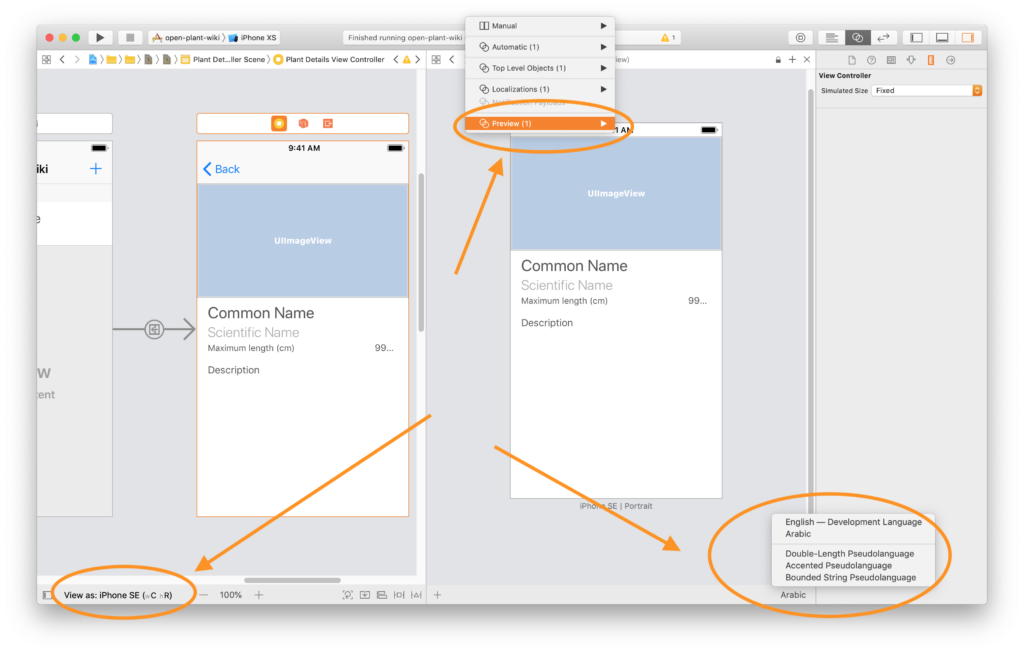
The Double-Length Pseudolanguage can be especially helpful. I encourage you to try all the available language options to help identify problems in your layouts.
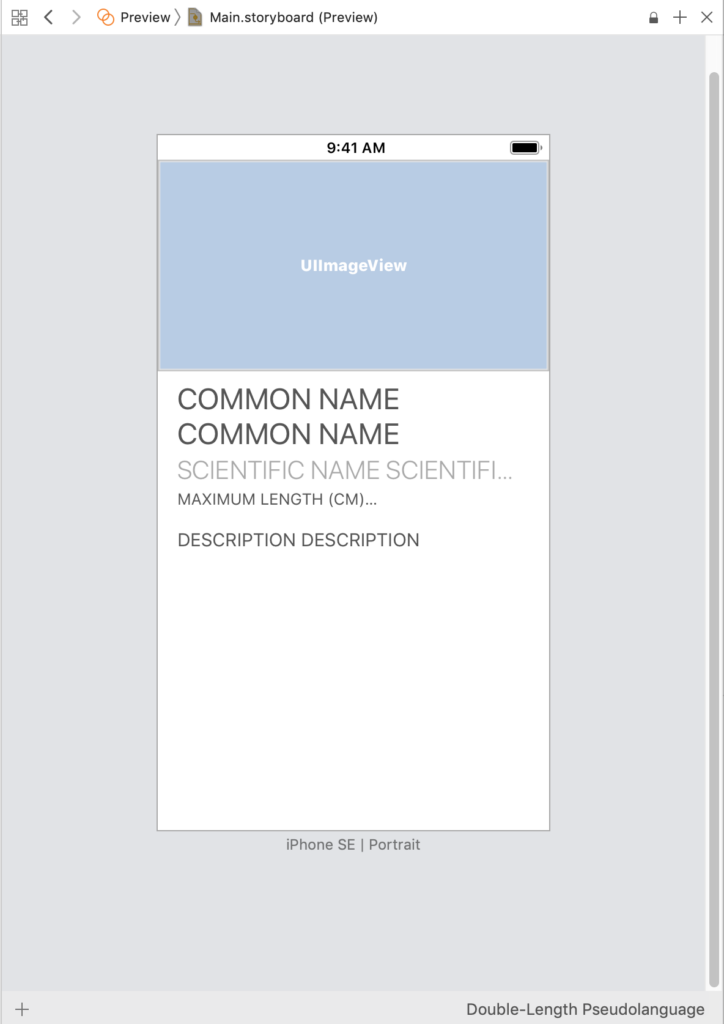
The Double-Length Pseudolanguage view in the Assistant Editor Preview pane has revealed that we could get truncated text for languages that have long translations for our labels.
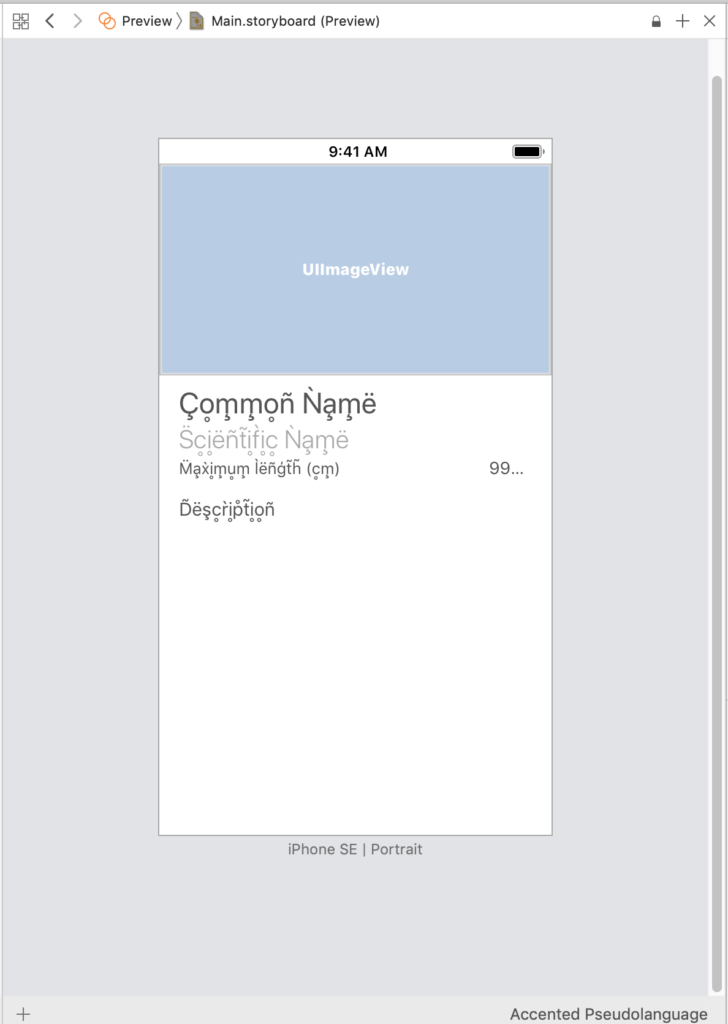
The Accented Pseudolanguage in the Assistant Editor Preview pane has shown that our labels might be a bit close together vertically for languages that have accents above and below their characters.
Using Run Schemes
We can use these pseudolanguages among other options when we edit our run scheme for running on a Simulator.
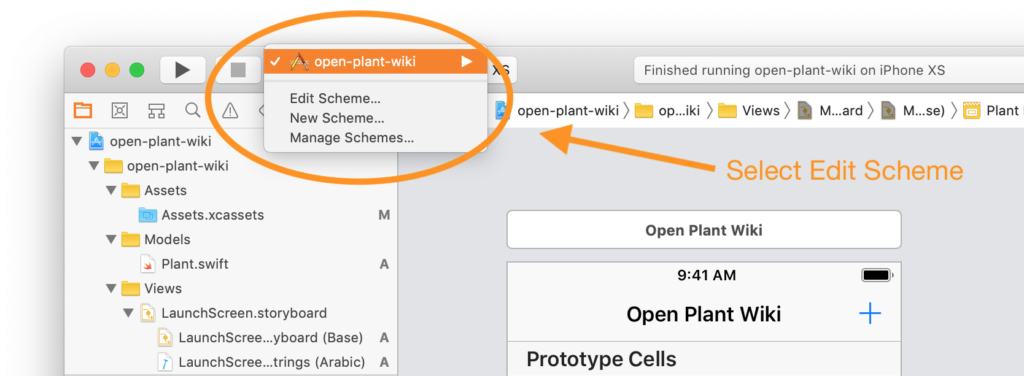
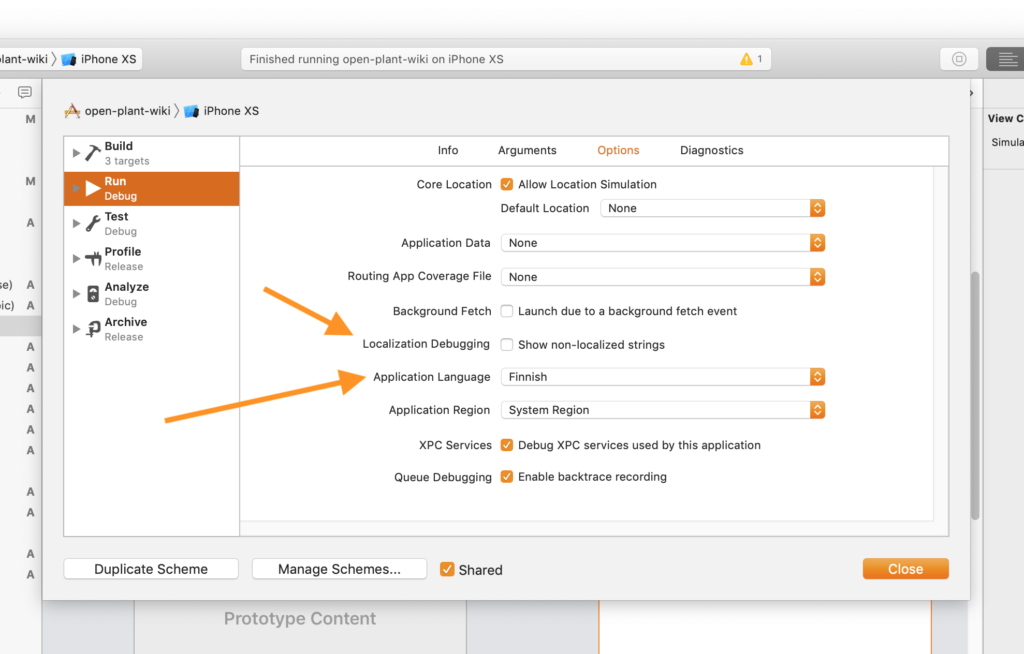
These are quite helpful for testing. Also note the Show non-localized strings option. When testing in the base language, this option will modify strings that are missing localizations, making them all-caps.
Set Language on Device
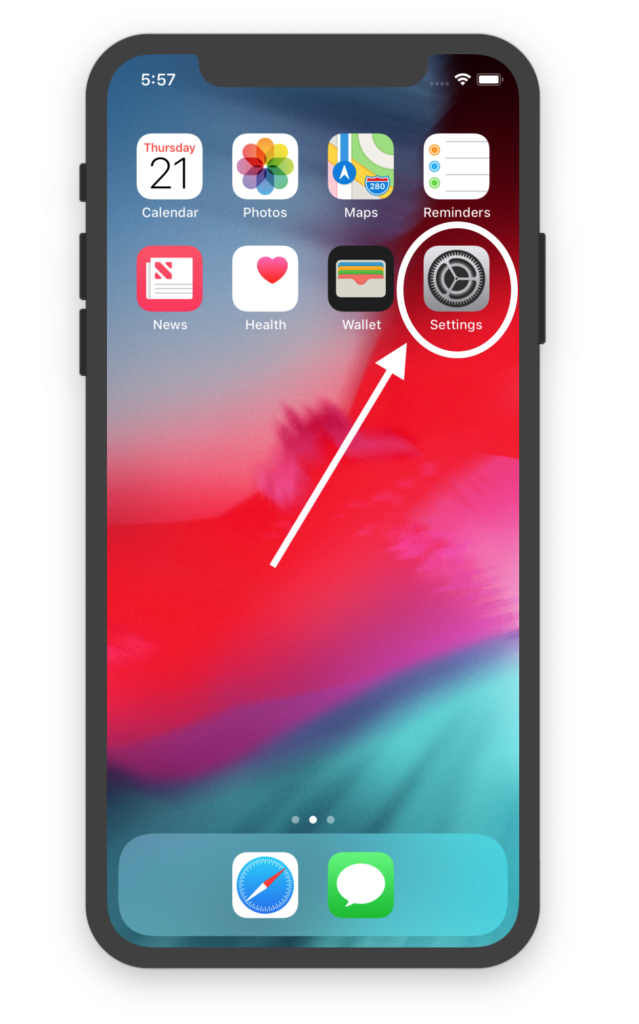
When testing on Simulator or physical devices, we can change the system language to test our localizations in their natural habitat. This is achieved by going to Settings > General > iPhone Language on a physical iPhone or simulator.
Automation
If you're looking to speed up your localization workflow, check out our bite-sized Automate iOS Storyboard Localization. It has a couple of scripts that can save you a good amount of manual work.
Localized
After we apply our storyboard i18n optimizations, send off our string files and get them back translated (in Arabic in my case), we get something that looks like the following.
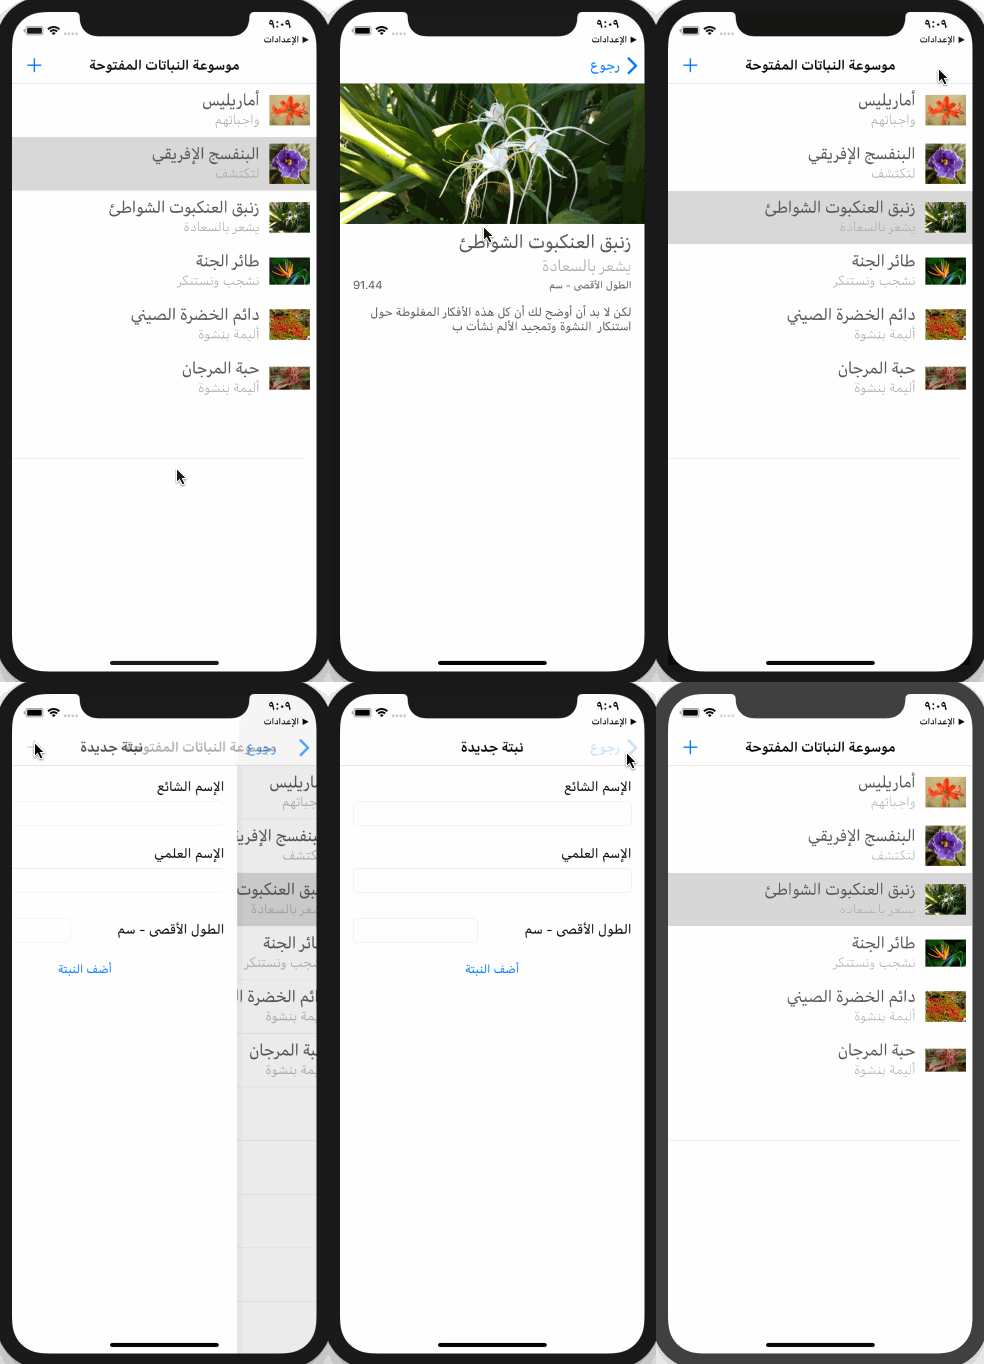
Note » Much of the Arabic text is actually Lorem ipsum. Just being straight up with you.
Note » You can find the completed project on GitHub if you want to peruse it at your leasure or look at the underlying Swift code.
Wrapping Up Our Tutorial on Internationalizing XCode Storyboards
If you're working with a team and want a more organized and efficient workflow for your iOS localization, check out Phrase Strings. As part of the Phrase Localization Platform, Phrase Strings works with iOS localization XLIFF files natively. And not only does it sync with your Git repo, but it also tracks older translations so that your translators can go back to older ones without hassling you to go searching through your code.
Phrase Strings also built with collaboration in mind, allowing you to add unlimited team members to your project and integrate with your Slack team. You can even do over-the-air translation updates with Phrase, so your translations can get to your users immediately without waiting for an app update.
As a visual person, I find storyboards pretty useful to work with. And as someone who cares about i18n and l10n, exposing more people to my technology and making my clients more money in the process, I find that every i18n trick I can add to my tool belt is quite valuable. I hope you've added to your repertoire of XCode storyboard tricks, and that you've enjoyed this article. Happy coding 💻📱


