Last but not least, if you want to take your i18n game to a higher level, check out Phrase. Fast, lean, and reliable, Phrase is a software localization platform featuring a robust CLI and API, GitHub, Bitbucket, and GitLab sync, machine learning translations, and a great web console for translators. Let Phrase do the heavy lifting in your i18n/l10n process, and stay focused on the creative code you love. Check out all of Phrase's products, and sign up for a free 14-day trial!
Software localization
iOS VoiceOver Internationalization

Accessibility in iOS is a set of features and tools provided by Apple to create a strong user experience for everyone. The toolbox includes captioning and audio description, display customization (increase the font size, reduce motion, etc.), speech, VoiceOver, and more.
For an internationalized app, supporting accessibility features could be a great way to extend your app to new users. However, missing a step into this journey could push your users away from your app—that's why it's crucial that accessibility features are aligned with the internationalization 'level' of your app.
This article will be focused on internationalizing VoiceOver, a screen-reading feature in iOS that can read through the screen to help users with visual impairment interact with your app. Shall we start?
Enable VoiceOver
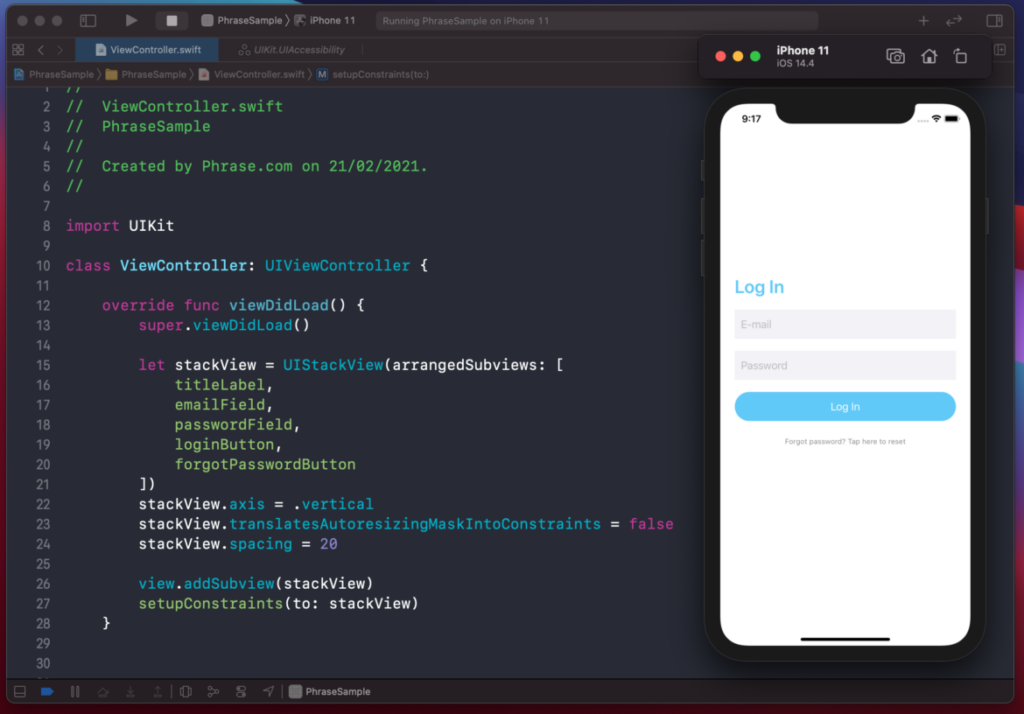
What we'll be doing in this tutorial is extending an existing 'Log in' view to support VoiceOver and make sure the interacting objects read are also localized. The 'Log In' view is based on a simple UIViewController, which contains a title, two text fields, and two buttons.
Our very first step is to enable VoiceOver on the device. We’ll need to go to the 'Settings' app and enable 'VoiceOver' under the 'Accessibility' menu.
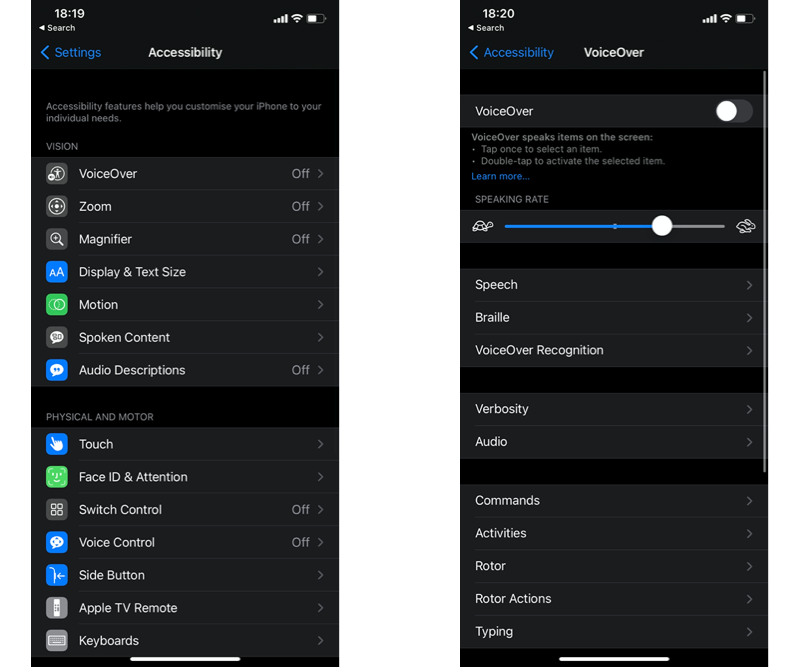
Unfortunately, VoiceOver isn’t available on a simulator at the moment, and only a physical device can support it.
From there, any single-tap gesture will focus on the selected UI component and read its accessibility information. A double-tap gesture will confirm the interaction. Single-swipe left or right will move the focus to the next/previous events.
Having covered the basics of VoiceOver, it's time to try it out, and see what happens when used on the 'Log In' page.
Setting Accessibility Attributes
When landing on the 'Log In' view with VoiceOver enabled, we can test the information read by Apple’s feature. While it gives us minimal information, it isn’t really user-friendly.
Those portions of information rely on the accessibility attributes of the selected view. You might be familiar with the accessibility identifier that is often used for user interface testing of UIKit views. VoiceOver relies on other attributes to describe those components:
- accessibility label—giving the default information of the component (for UILabel, it’s often the text within),
- accessibility traits—describing the state of the component,
- accessibility frame—will give you the position of the component’s frame,
- accessibility hint—can capture extra information to give more context (quite useful since we have two 'Log In' views, a label and a button),
- accessibility value—describing the value of the element (useful for user’s input for a slider or text field).
Now that we know where the pieces of information come from, we can set them up accordingly and eventually test them.
A great tool to inspect those attributes is the Accessibility Inspector (available with Xcode).
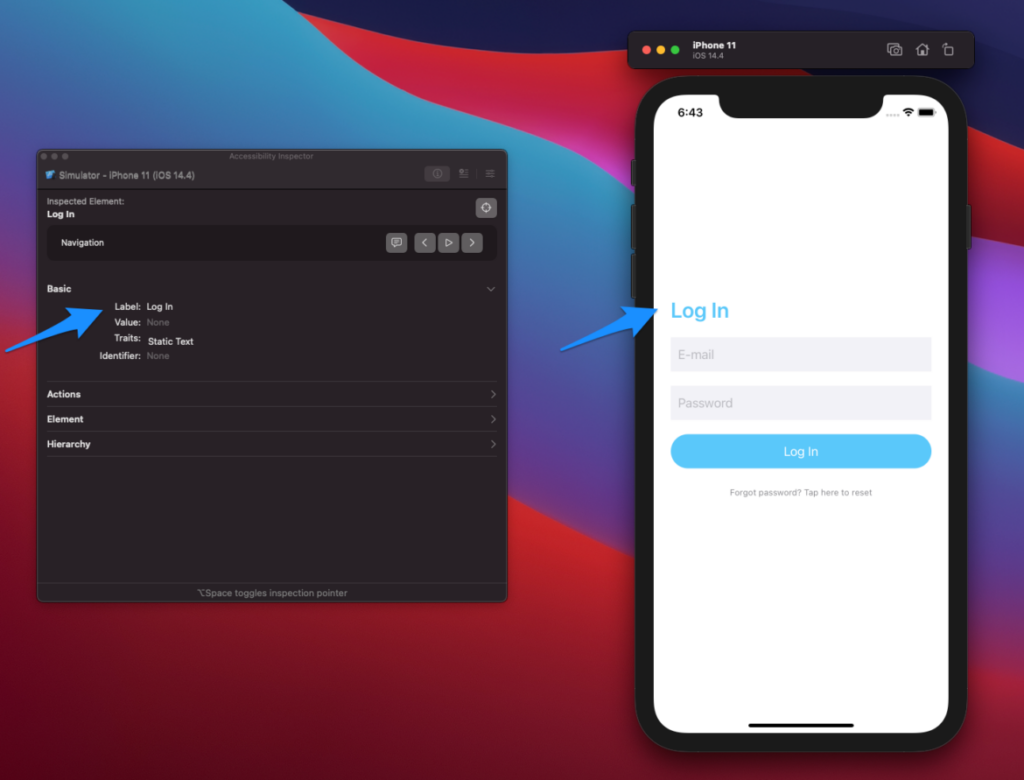
When reading the 'Log In' and 'Forgot Password' buttons, the accessibility attributes rely on the title of the button. The second label could make little sense to someone who can't see the button, let alone tap it. Let’s use the accessibilityLabel and accessibilityHint properties to correct this.
lazy var forgotPasswordButton: UIButton = {

    let button = UIButton()

    button.setTitle("Forgot password? Tap here to reset", for: .normal)

    button.tintColor = .secondaryLabel

    button.setTitleColor(.secondaryLabel, for: .normal)

    button.titleLabel?.font = .systemFont(ofSize: 12)

    button.accessibilityLabel = "Forgot password"

    button.accessibilityHint = "Assist you to reset your password and create a new one"

    return button

}()
Much better, right? We can apply the same logic to other views as well.
lazy var emailField: UITextField = {

    let textField = UITextField()

    textField.placeholder = "E-mail"

    textField.textColor = .secondaryLabel

    textField.font = .systemFont(ofSize: 18)

    textField.keyboardType = .emailAddress

    textField.backgroundColor = .secondarySystemBackground

    textField.accessibilityLabel = "E-mail"

    textField.accessibilityHint = "Email filled is required to login"

    return textField

}()
🗒 Note » When applying similar accessibility attributes to the UITextField, the accessibilityValue seems always overwritten by the value of the text field or its current placeholder. This is why it’s also important to set an accessibilityLabel as well so users can still get the context of the field.
So far so good, we’ve managed to improve the usability of our view by taking advantage of accessibility features, but how to extend to internationalization? That’s our next step.
iOS VoiceOver Internationalization in Action
Before diving deeper into the code part, it’s important to prepare our project for internationalization. We won't cover this in-depth here, but you can get all the details on iOS i18n in our iOS Tutorial on Internationalization and Localization.
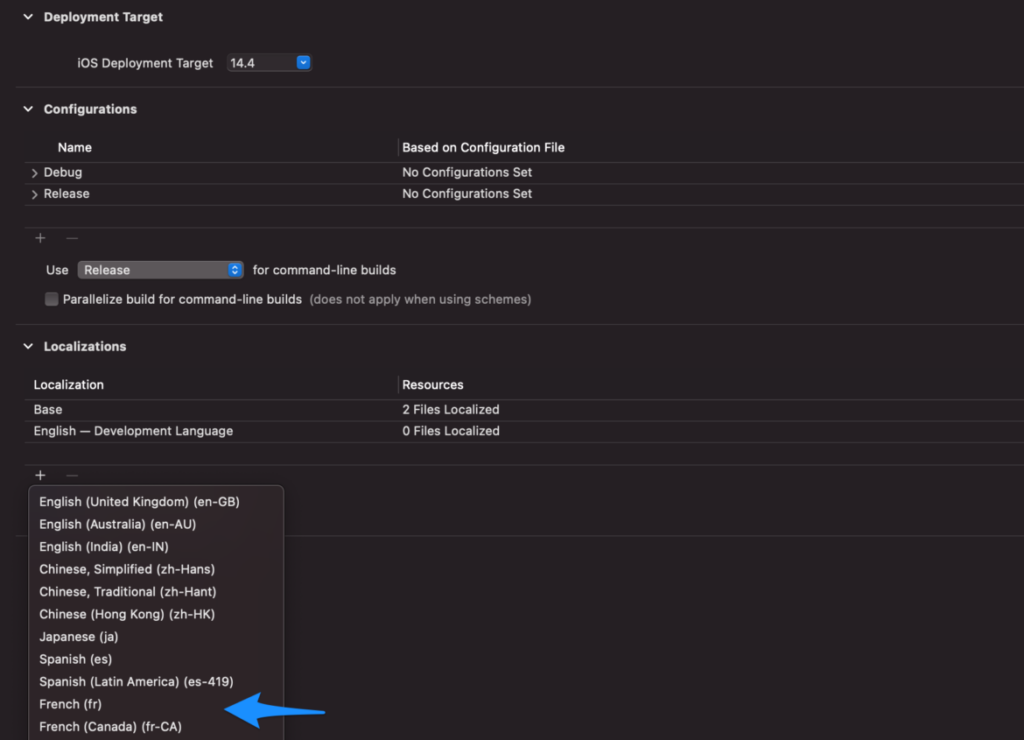
For this example, I’ll add French as a supported language to my project. We’ll use this as a base for the accessibility attributes later on.
I’ll also add a string file to my project and include a version in French and English to support both languages.
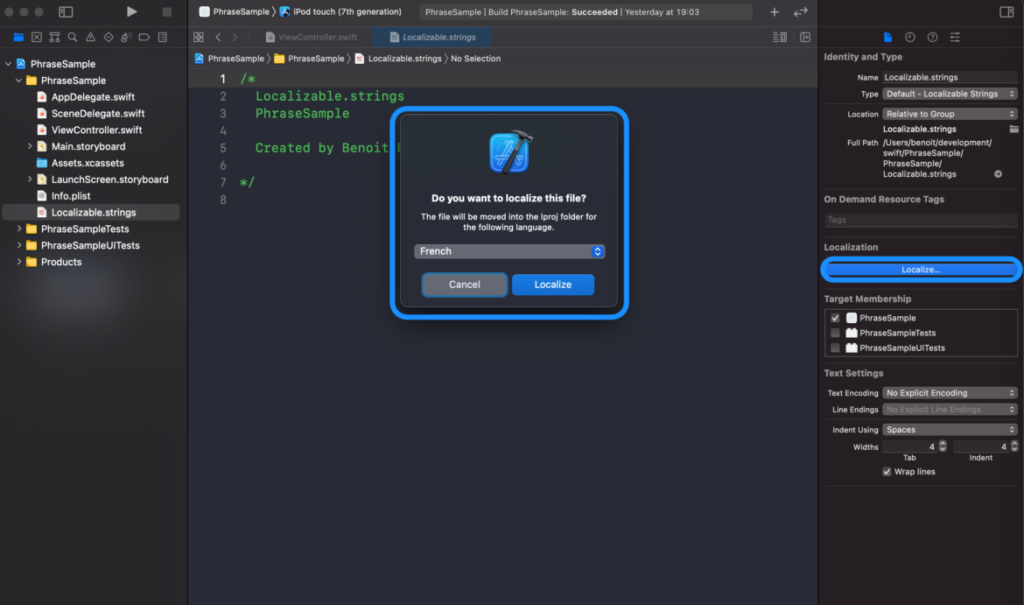
The project is now fully set up so we can finally internationalize our attributes.
Internationalizing Accessibility Attributes
Just like for any required translation, we’ll create keys and values in our Localizable.strings file to support different versions and languages. Let’s get it started with content for buttons and labels!
"E-mail" = "E-mail";

"Log In" = "Log In";

"Password" = "Password";

"Forgot password? Tap here to reset" = "Forgot password? Tap here to reset";
For accessibility attributes, if you want to dissociate them in the rest of the translations (and you might want to do so over time), I'd suggest either create a dedicated file for it or just separate it from the rest via a comment for a smaller project.
One last thing to pay attention to is a naming convention for the key used to identify the value. As a naming convention, I’ve used the a11n prefix to make sure I get the context right when I’ll be looking for it.
// Accessibility

"a11n_email" = "E-mail";

"a11n_email_hint" = "Email filled is required to login";

"a11n_password" = "Password";

"a11n_password_hint" = "Password filled is required to login";

"a11n_login" = "Login";

"a11n_login_hint" = "Log in with the provided email and password to our awesome app";

"a11n_forgot_password" = "Forgot password";

"a11n_forgot_password_hint" = "Assist you to reset your password and create a new one";
I’ll do the same in the French version of the file so we can try both later on.
// Accessibility

"a11n_email" = "E-mail";

"a11n_email_hint" = "Une adresse email est requise pour se connecter";

"a11n_password" = "Mot de passe";

"a11n_password_hint" = "Un mot de passe est requis pour se connecter";

"a11n_login" = "Se connecter";

"a11n_login_hint" = "Se connecter avec une adresse email et un mot de passe à notre super application mobile";

"a11n_forgot_password" = "Mot de passe oublié";

"a11n_forgot_password_hint" = "Aide à réinitialiser votre mot passe en créant un nouveau";
All our copies and accessibility attributes are ready to use, the last part is to update the implementation to reflect those values.
Accessibility Meets Internationalization
Back to our UIViewController, we can update the implementation to use localized accessibility attributes moving forward.
One way is to directly use NSLocalizedString(_ key: String, comment: String) in our code.
lazy var forgotPasswordButton: UIButton = {

    let button = UIButton()

    button.setTitle(NSLocalizedString("Forgot password? Tap here to reset", comment: ""), for: .normal)

    button.tintColor = .secondaryLabel

    button.setTitleColor(.secondaryLabel, for: .normal)

    button.titleLabel?.font = .systemFont(ofSize: 12)

    button.accessibilityLabel = NSLocalizedString("a11n_forgot_password", comment: "")

    button.accessibilityHint = NSLocalizedString("a11n_forgot_password_hint", comment: "")

    return button

}()
Great, now the accessibility attributes are based on the device's locale and can support French or English.
However, this implementation doesn’t allow for reusability and discoverability throughout our project. Let’s try to make small improvements for better readability.
Reusability and Discoverability
Adding a simple enum can easily improve the developer experience in our case. From our previous code, and based on the naming convention, we can define a standard to access our attributes.
enum Accessibility: String {

    case email

    case password

    case login

    case forgotPassowrd = "forgot_password"

    var label: String {

        NSLocalizedString("a11n_\(self.rawValue)", comment: "")

    }

    var hint: String {

        NSLocalizedString("a11n_\(self.rawValue)_hint", comment: "")

    }

}
With this enum, I define the key of the translation, apply the naming convention, and can look for available translation through label or hint. We can now finally tidy up the code!
// old code

button.accessibilityLabel = NSLocalizedString("a11n_forgot_password", comment: "")

button.accessibilityHint = NSLocalizedString("a11n_forgot_password_hint", comment: "")

// new code

button.accessibilityLabel = Accessibility.forgotPassowrd.label

button.accessibilityHint = Accessibility.forgotPassowrd.hint
