Software localization
How to Use Phrase Strings’ Localization Plugin for WordPress

WordPress is absolutely massive: Over 43% of all websites are based on the free content management system (CMS), and over 60% of CMS-based websites have chosen WordPress. Its architecture, ease of use, and massive ecosystem of themes and plugins are all contributors to this great success.
When it comes to making your WordPress site multilingual, if you want a professional workflow that works for your whole team of developers and translators, you’ll do well to localize your site with the WordPress localization plugin for Phrase Strings.
In this tutorial, we’ll build a little demo site to show you how easy it is to spin up a Phrase project, connect it to WordPress, and get to localizing your pages and posts in minutes. We’ll also use the popular Polylang plugin to add a language switcher to our site. Let’s get cooking.
WordPress environment versions
We’re using the following stack and set of plugins to build our demo site (versions between parentheses):
- PHP (7.4)—server-side language/processor
- MySQL (8.0)—database
- WordPress (5.5)—our CMS of choice
- Phrase Strings (1.0)—easily links our WordPress site with Phrase
- Polylang (2.8)—handles URL, menu, and category localization
- Fasciate Theme (1.0) [Optional]—makes it look all saucy and sweet
✋🏽 Heads up » You will need WordPress 5.5 or higher, with the Gutenberg block editor, to use the Phrase Strings localization plugin for WordPress.
Our demo site: Aznomia
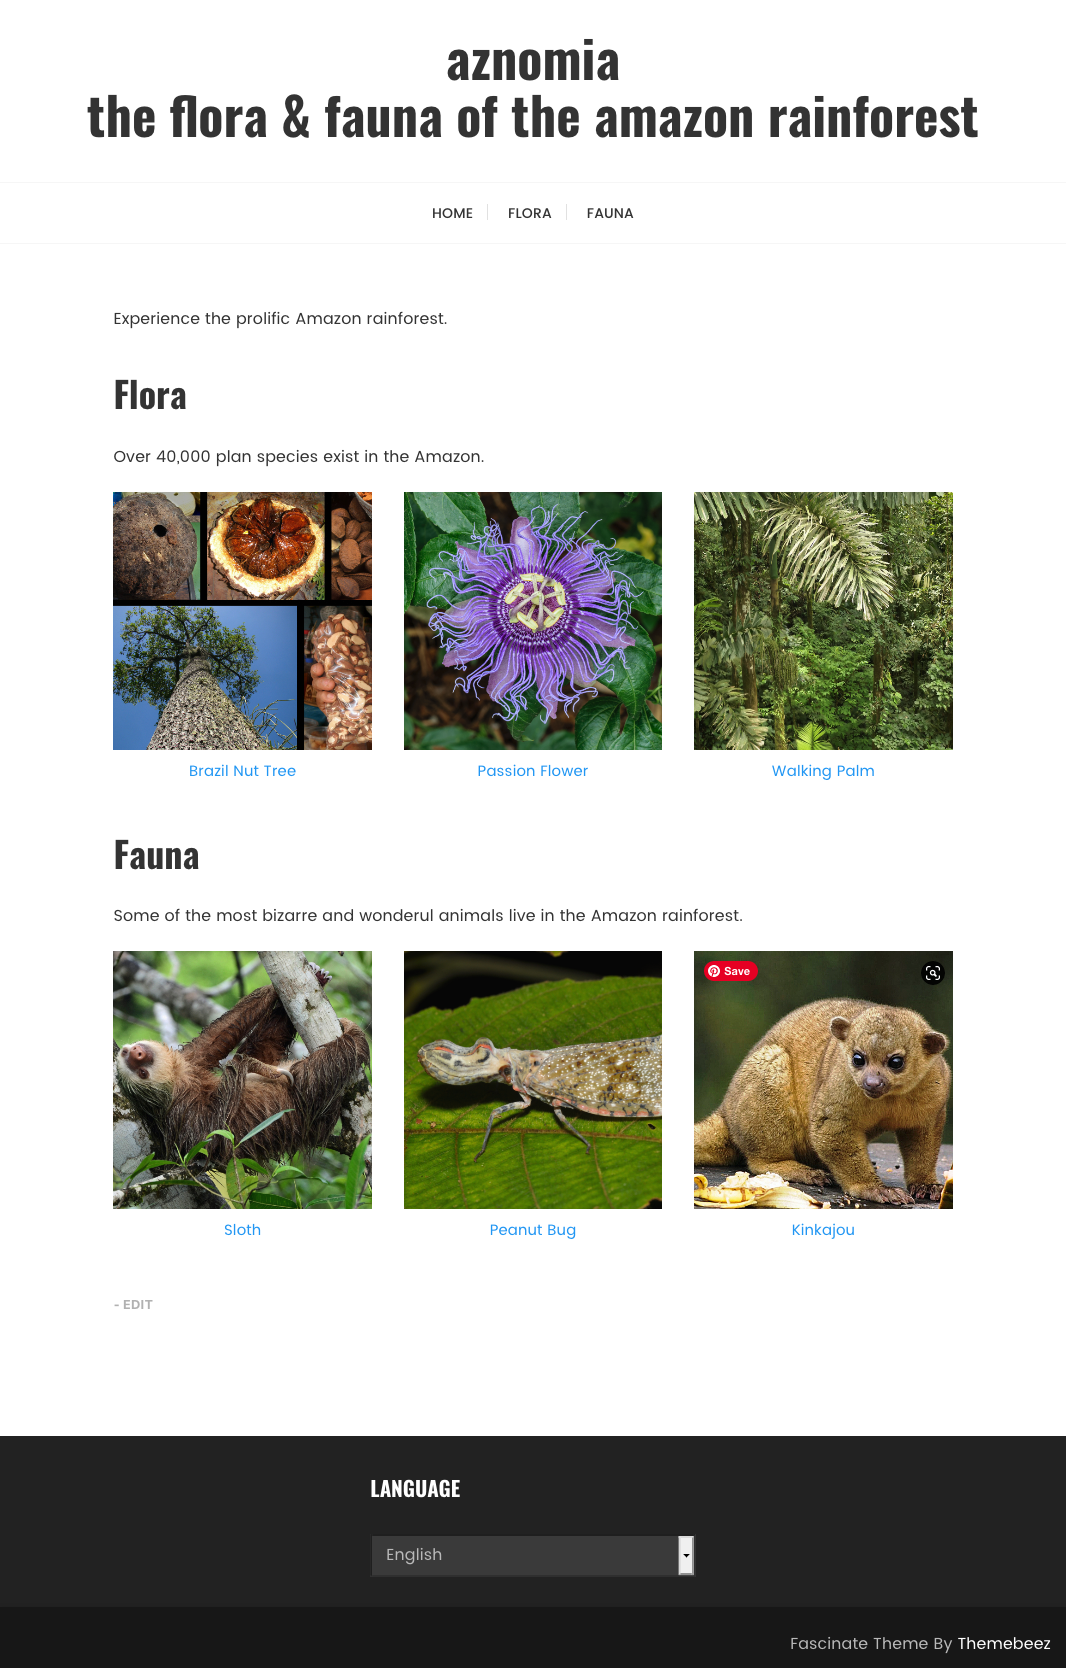
Aznomia is a fictional non-profit showcasing the flora and fauna of the under-threat Amazon rainforest. Here’s what Aznomia’s website will look like when we’re done with it:
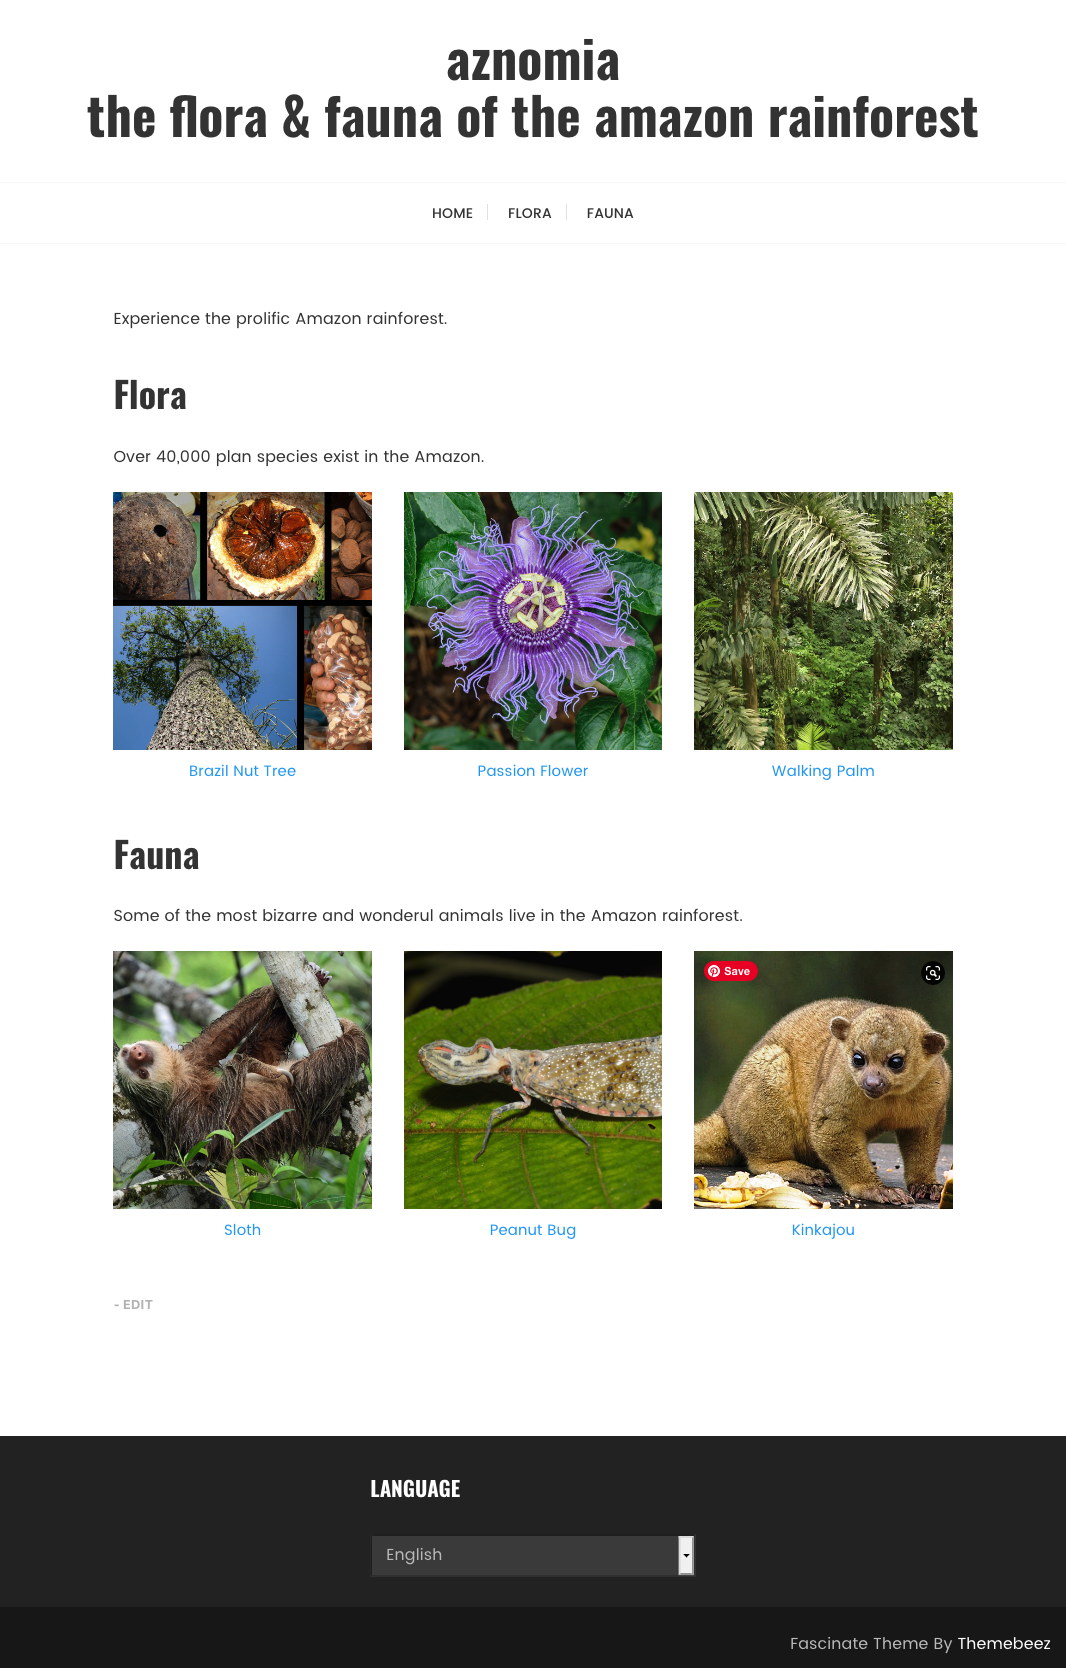
Over 40,000 plant species live in the Amazon
I’ll assume that you know how to install WordPress for development. I personally like to use the simple, managed local dev environment Local for my WordPress dev sites.
🔗 Resource » If you want to build along with us, grab the free Fascinate WordPress theme by themebeez, and install it.
With WordPress installed, we can begin adding our content.
Adding posts
For each species of flora or fauna, we’ll add a post that has a title, a block in its body, and a featured image.
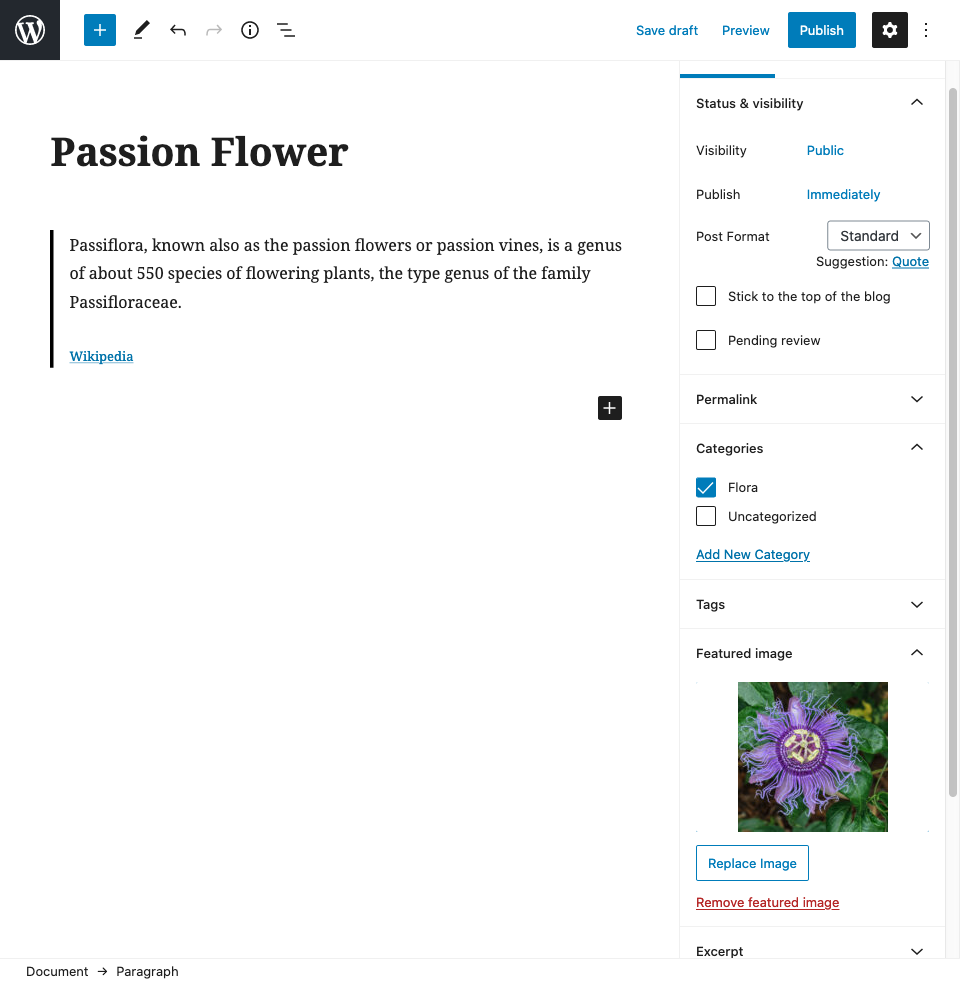
Content and images from Wikipedia
Adding pages
Let’s add a home page for our site. To start, we can add a page titled Home with a bit of lead text.
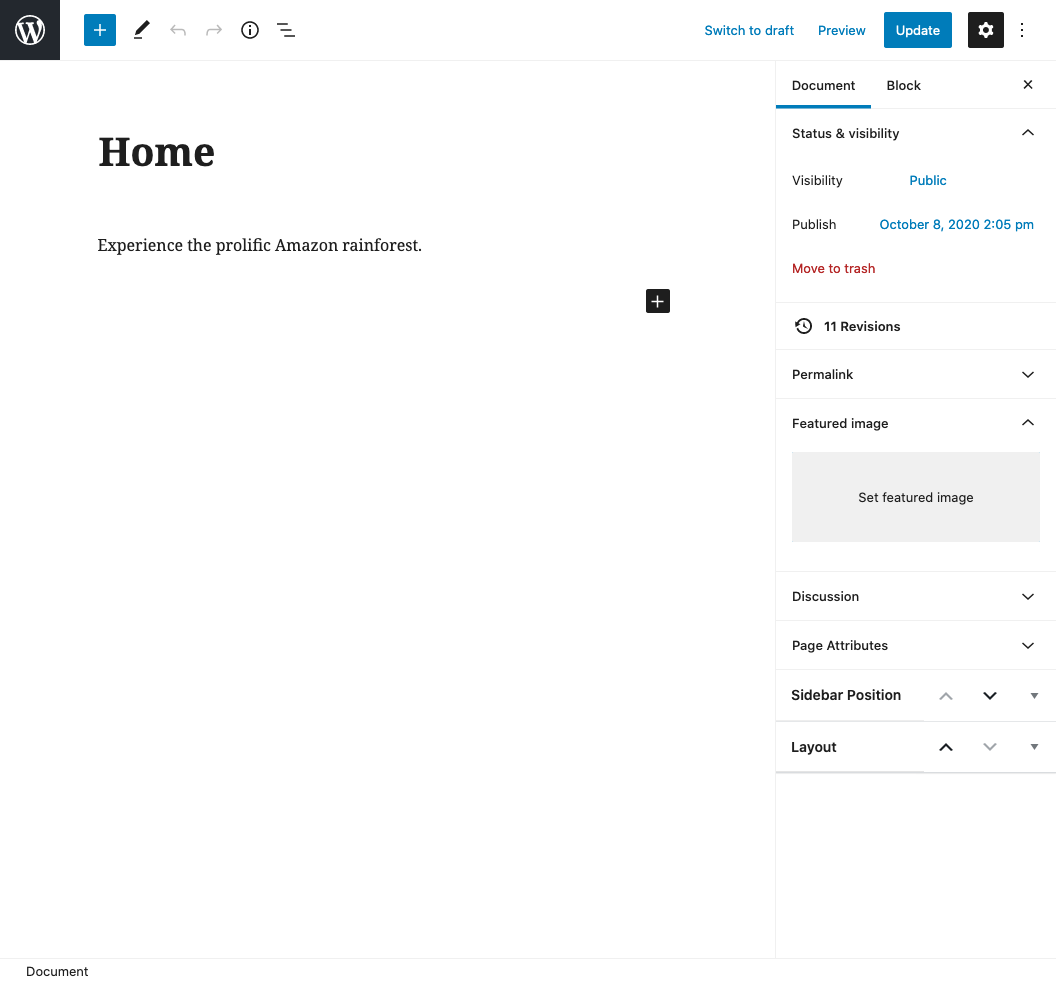
Pretty plain at the moment: we’ll add more to our home page soon
Setting our home page
By default, WordPress will use the theme’s index page, which lists recent posts, as its homepage. We can change that under Settings → Reading so that our home page is used instead.
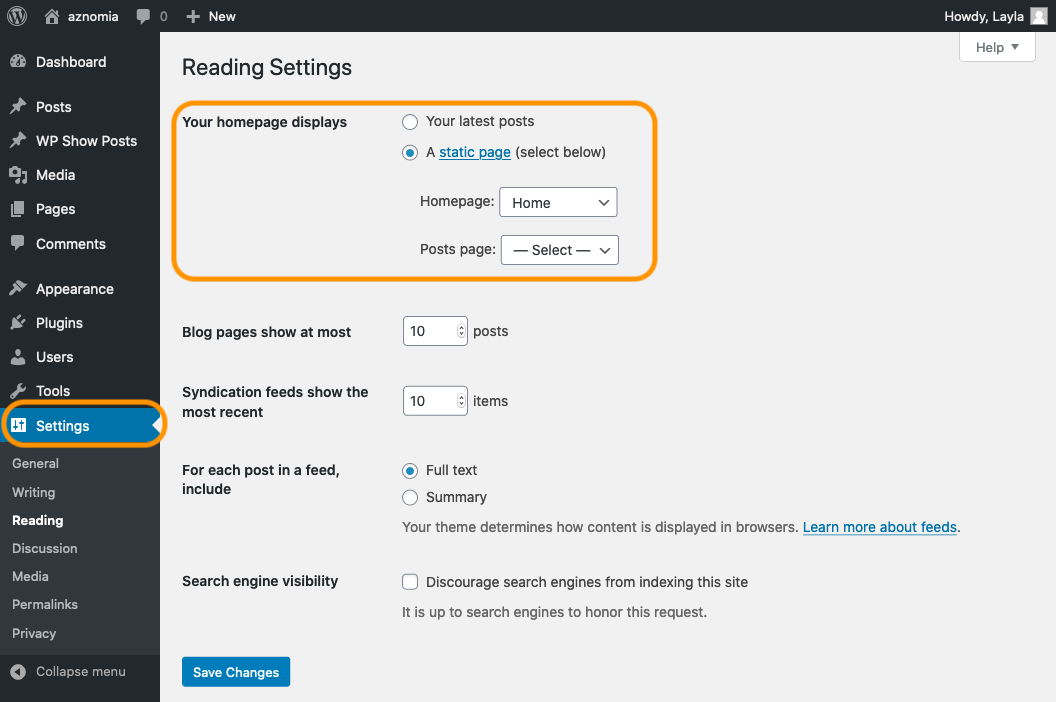
We want to show our home page when our visitor first enters
Adding our posts to our home page
Let’s entice our visitors to explore our content once she’s hit the home page. We’ll add a few links to our flora posts, and a few more to our fauna posts.
Let’s go to Pages → All Pages → Home → Edit, and add a new columns block to our home page to house our post images and links.
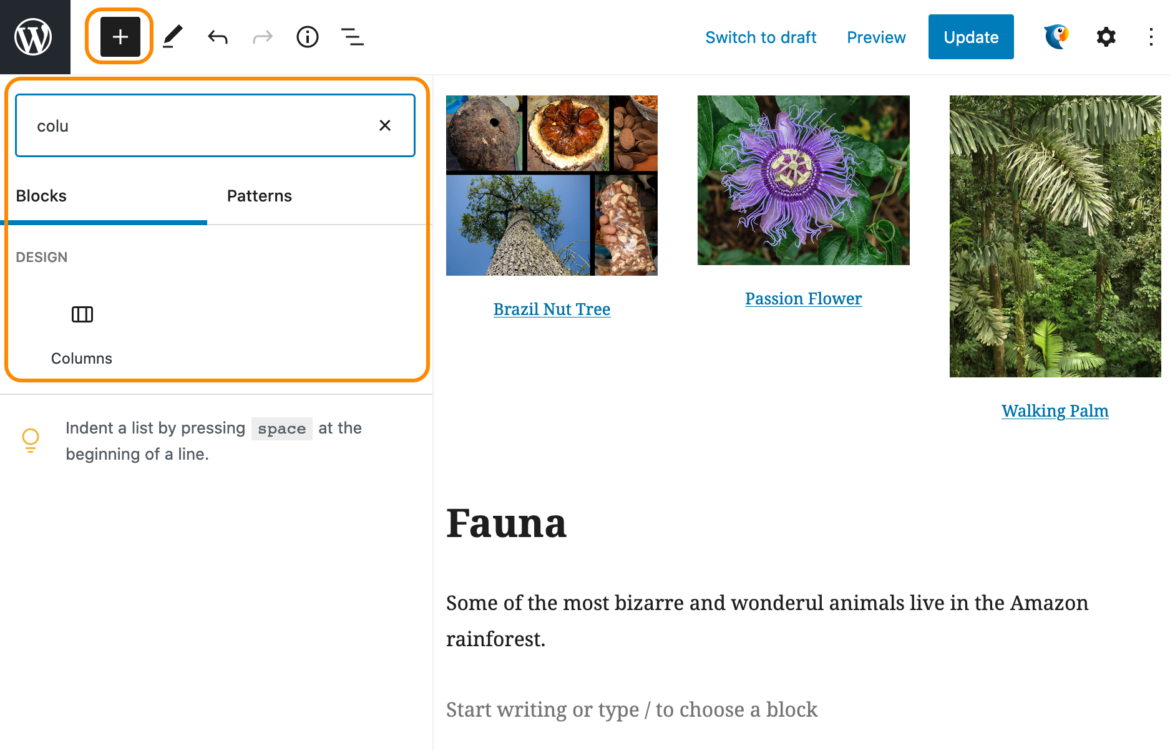
We’ll select the 33/33/33 layout to add three columns side-by-side. In each column, we’ll click the +to add a block within the column and select the image column. Under each image, we can add some text linked to the respective post.
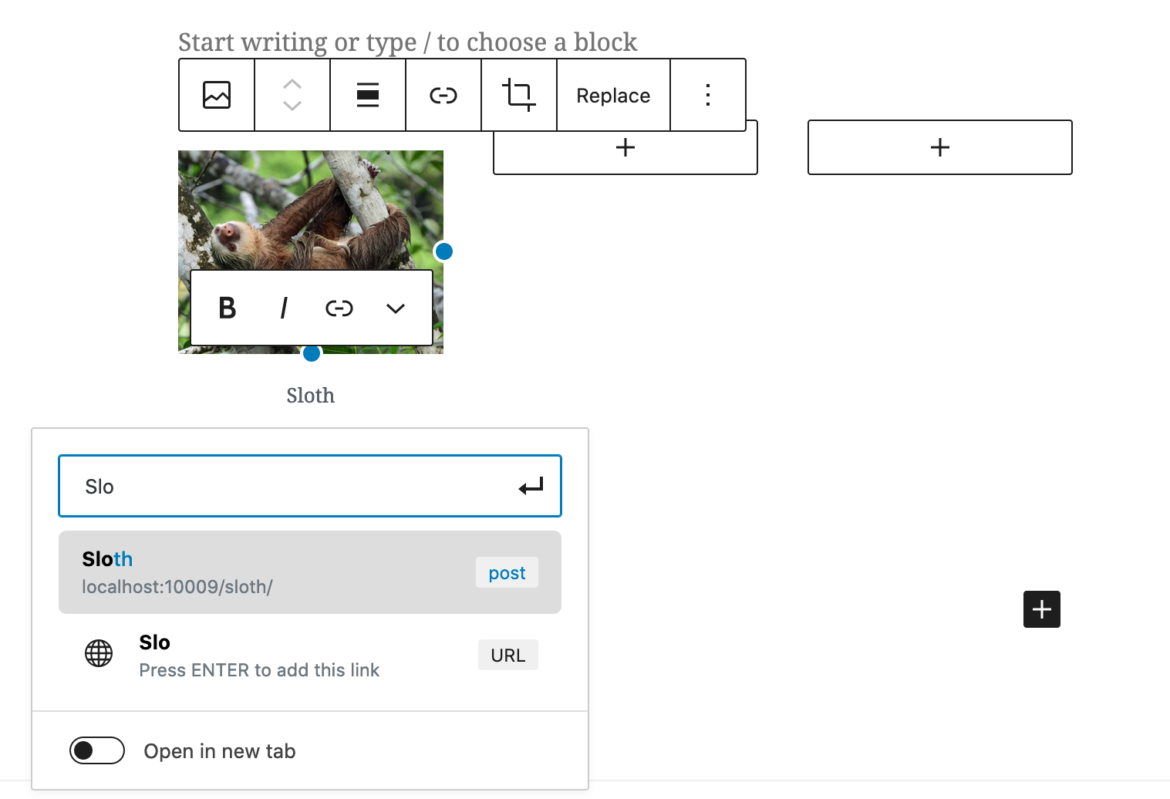
We can start typing the title of a post to get an auto-suggested link
With columns added under Flora and Fauna, our home page will now look like this:
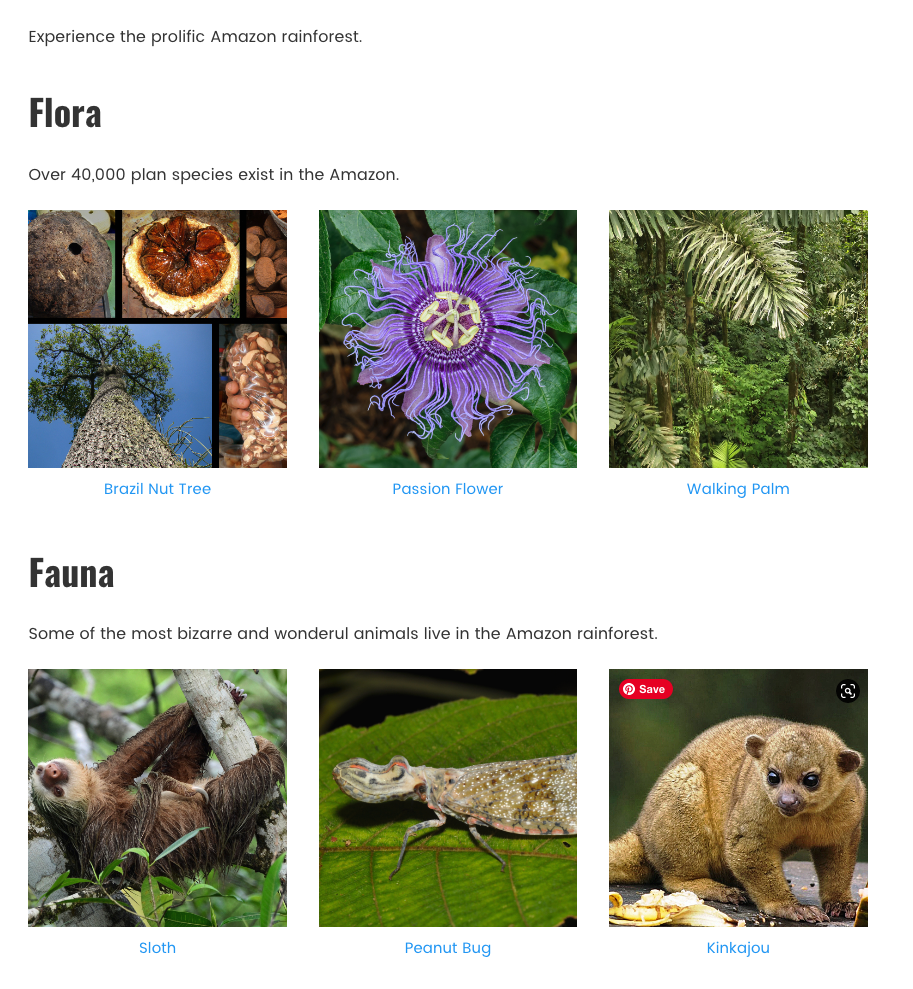
A bit more visually interesting, no?
And that’s about it for our demo app. Let’s get to localizing it using Phrase Strings.
Localizing our WordPress site with Phrase Strings
First, let’s create a new Phrase project. We’ll log in and, in our main spaces area, click the Create New Project button.
🗒 Note » If you don’t have a Phrase pro subscription, sign up for a free 14-day trial.
Adding the Phrase Strings project
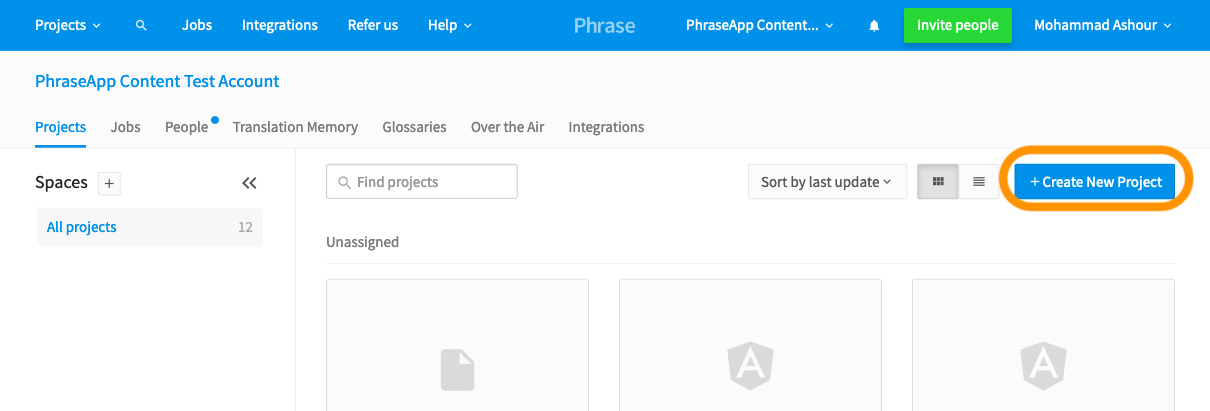
This pops up the Add Project dialog
In the Add Project dialog, we can give our project a name, leave the rest of the fields in the their default state, and click the Save button.
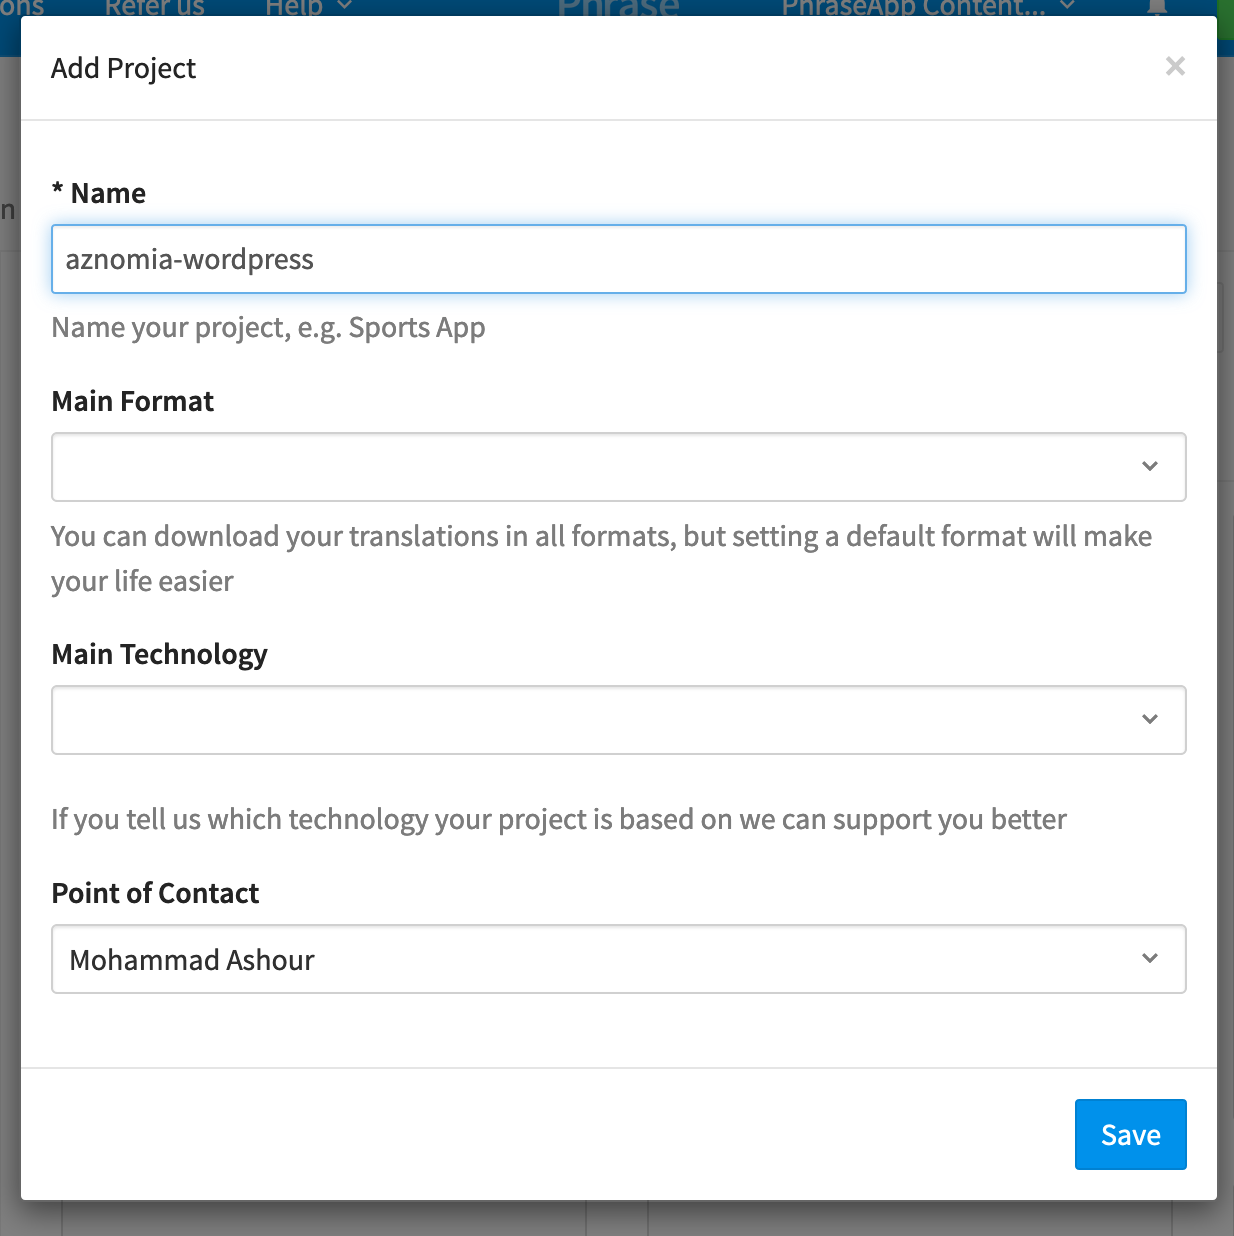
We just need to give our project a name
Our new project will now appear in our project grid. Let’s hover over its card and click the Languages button to add the languages our site will support.
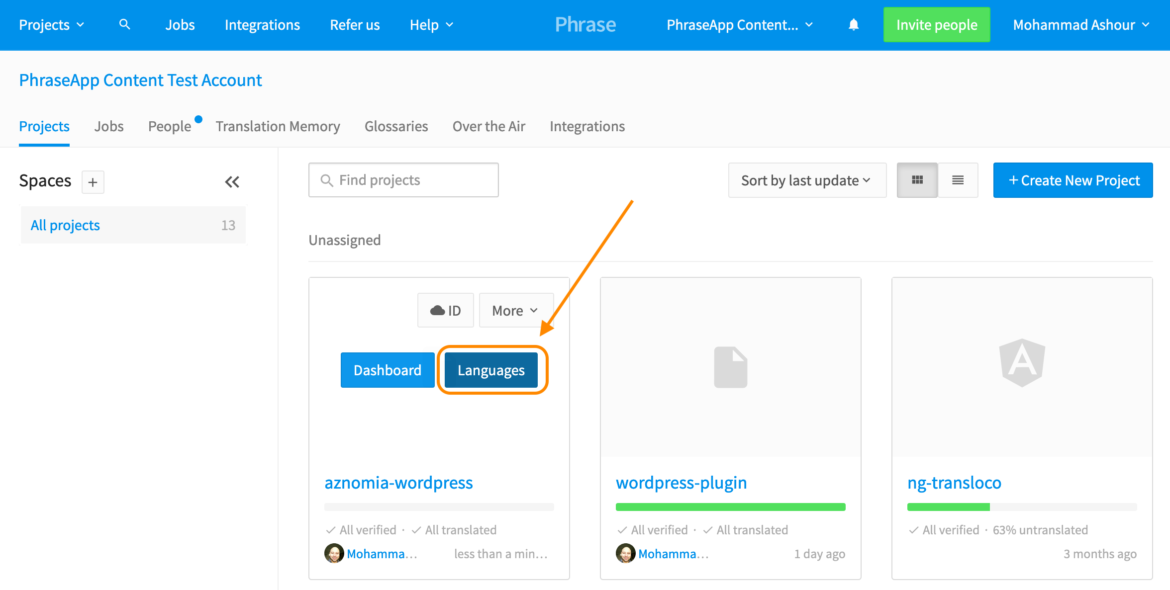
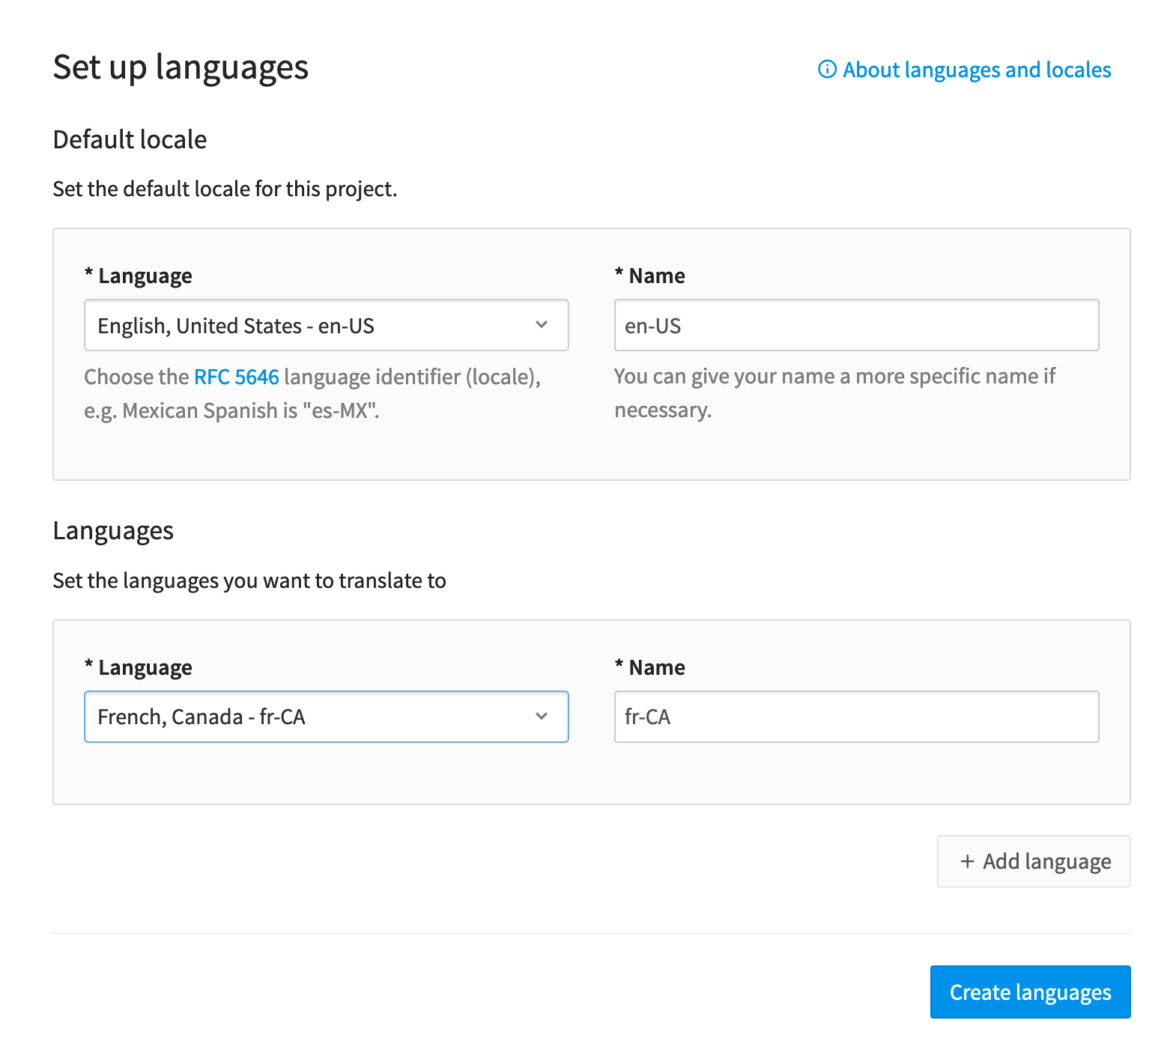
I’ll add US English and French Canadian here. You can add any languages your heart desires. Note that the first language we add becomes our source language for translations. Once we’re done, we can click Create Languages.
After that, we can click the Skip Setup button.

We don’t need the other setup options for our project
Creating an access token
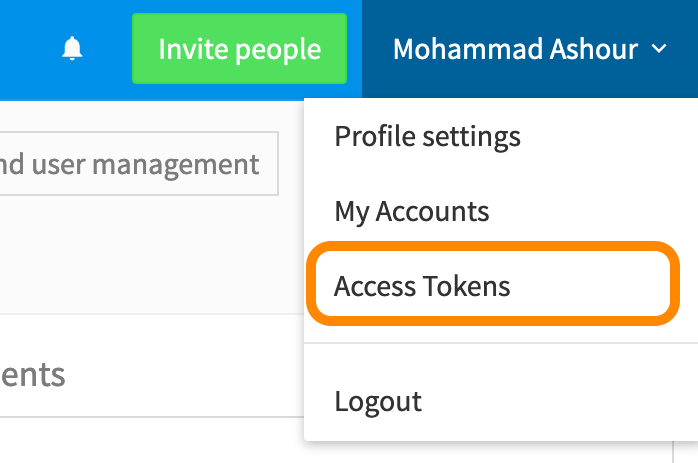
We’ll need an access token to connect our Phrase project to the Phrase Strings localization plugin for WordPress in a minute. Let’s create an access token while we’re in the Phrase console. We can do that by clicking on our name near the top-right of the screen to open a dropdown, then clicking Access Tokens.
Next, let’s click the Generate Token button.

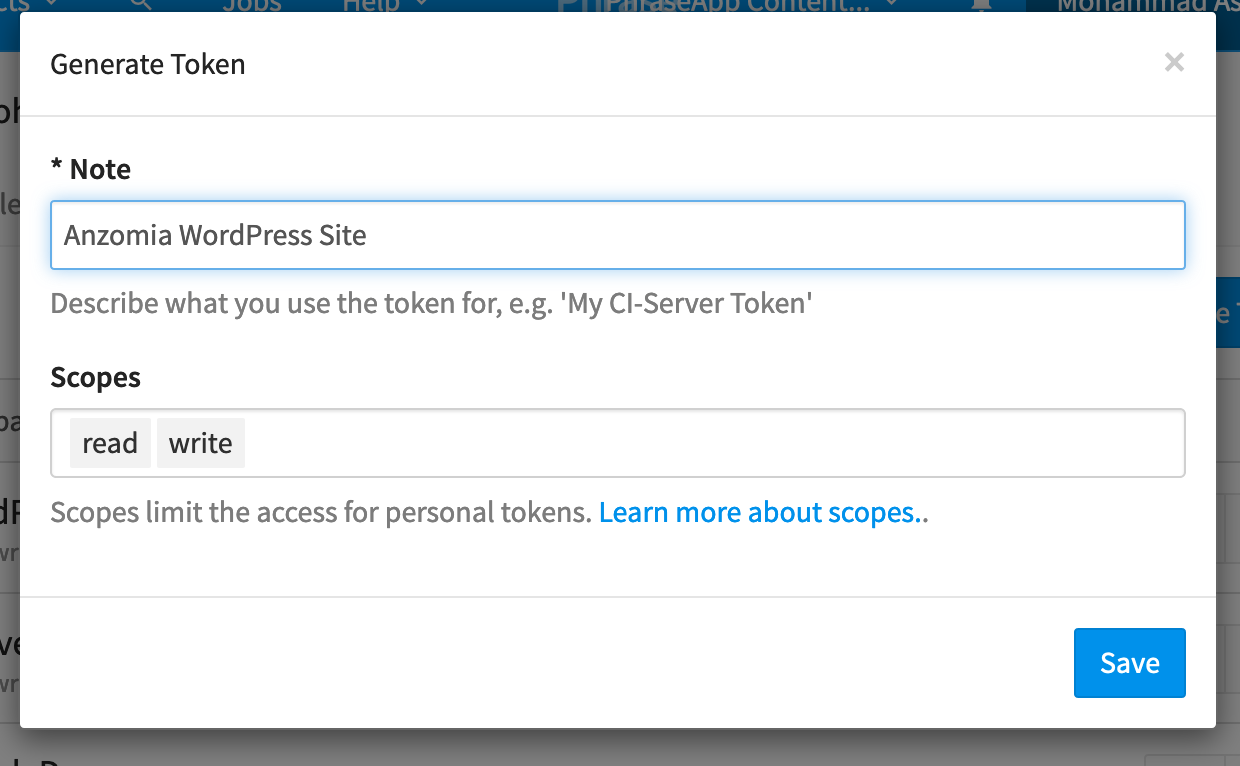
We’ll give our token a name, leave the Scopes field as it is, and click Save. This should add a new row to the top of our access tokens list. Notice that the new token is partially revealed and there’s a Copy button next to it.
✋🏽Heads up » You won’t be able to access your token later. You need to copy it as soon as you generate it.

We’ll click the Copy button and paste our token somewhere safe.
That’s it for the Phrase setup. We can now get back to WordPress.
Installing Phrase Strings' localization plugin for WordPress
We can download the plugin from the WordPress plugin directory. Once we’ve got the ZIP file, we can open our WordPress admin and go to Plugins → Add New → Upload Plugin.
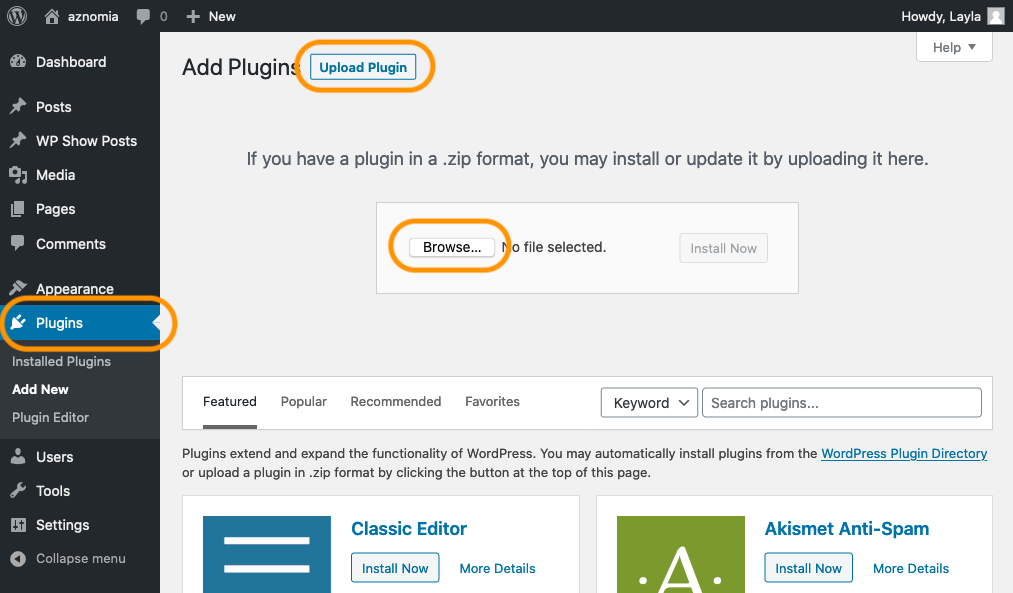
We can then click Browse, select the ZIP file we downloaded earlier, and click Open to upload and install the translation plugin. Once that’s done we need to make sure to click the Activate Plugin button.
With that done, we’ll have a new Phrase menu item in our admin sidebar. Clicking that opens the API Access Token form. We can now paste the access token we generated earlier and click Save Settings.
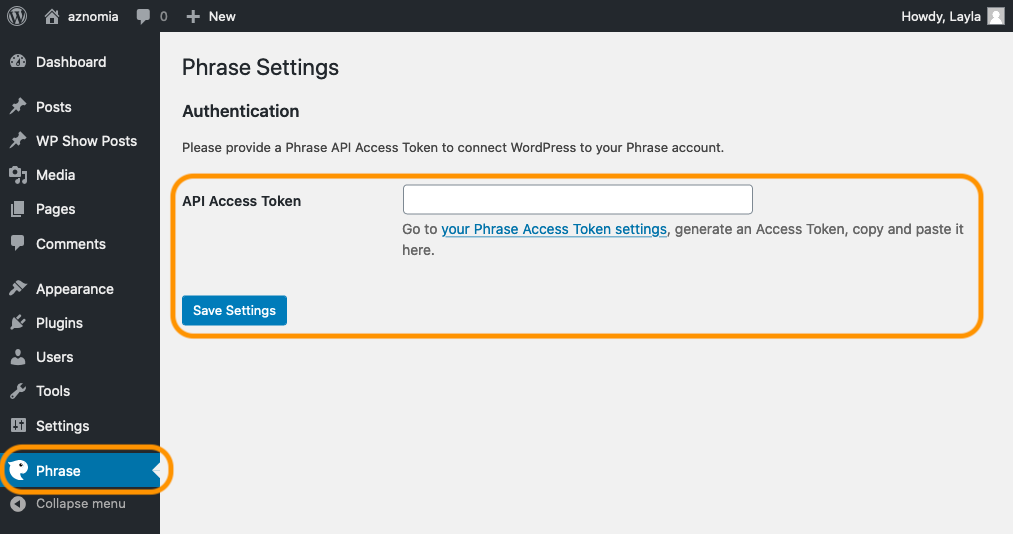
We're all set to start localizing.
Localizing pages
Let’s start localizing our home page. We can go to Pages → All Pages → Home → Edit. There we’ll find a new Phrase icon button. Once we click that button, we’ll see the Phrase String plugin sidebar appear.
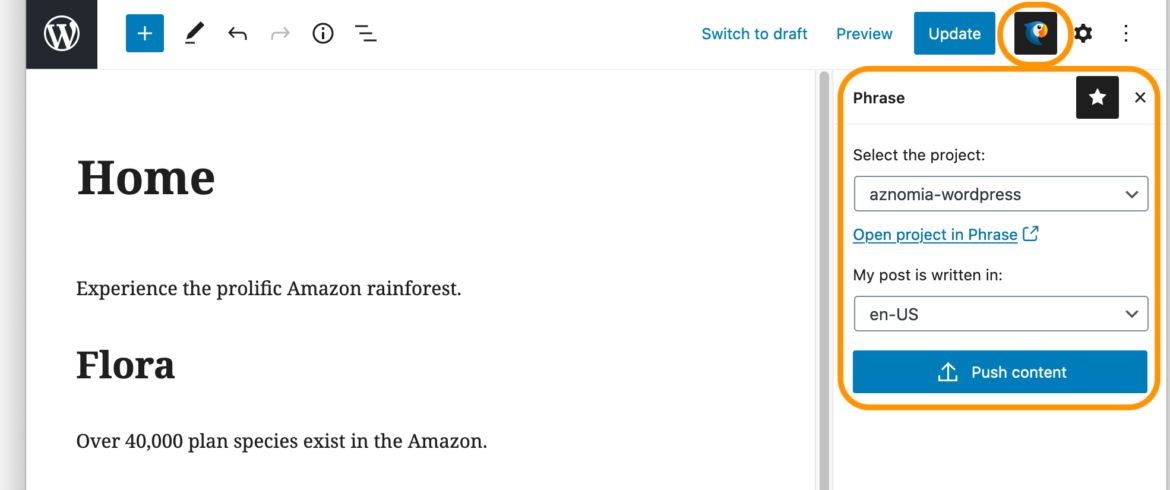
Under Select the project, we can open the dropdown and pick the Phrase project we created earlier. We can then select the page’s language under My post is written in and click Push content. This will upload our content for translation to our Phrase project.
Now let’s open our Phrase console and go to Projects → aznomia-wordpress → Languages. Notice that we see our source US English content is complete, and that we have untranslated French Canadian content.
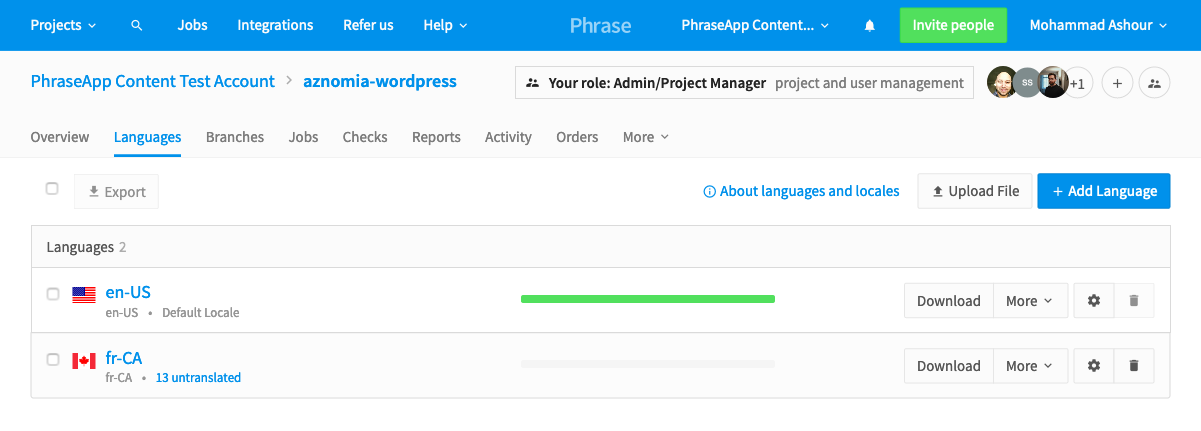
Let’s click on fr-CA to open the translation editor. Our translations are listed in the left sidebar. We can select one and begin translating it in the editor. You might want to keep the Autocomplete checkbox ticked since it can save you time by suggesting translated words as you type.
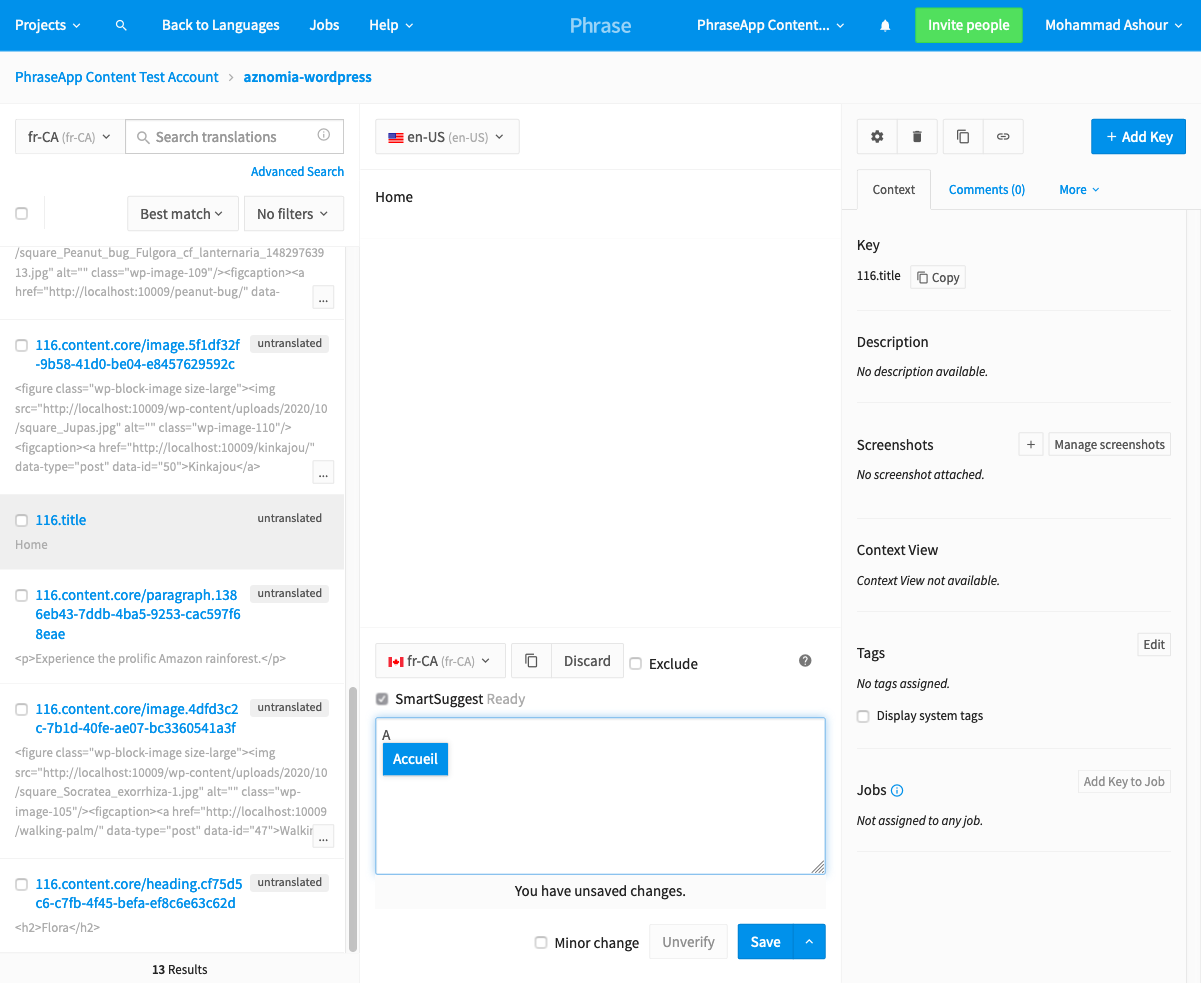
Autocomplete is a time saver for translators
Notice that our page’s title is its own translation item. So is each block in our page’s body. We can translate each one and click Save.
🗒 Note » Keep HTML tags in the same locations in your translations as they are in the source text.
Once we’re done translating, we can go back to the WordPress admin and edit the home page again. Now we can Select All translations and click the Pull translations button to create a new, translated home page.
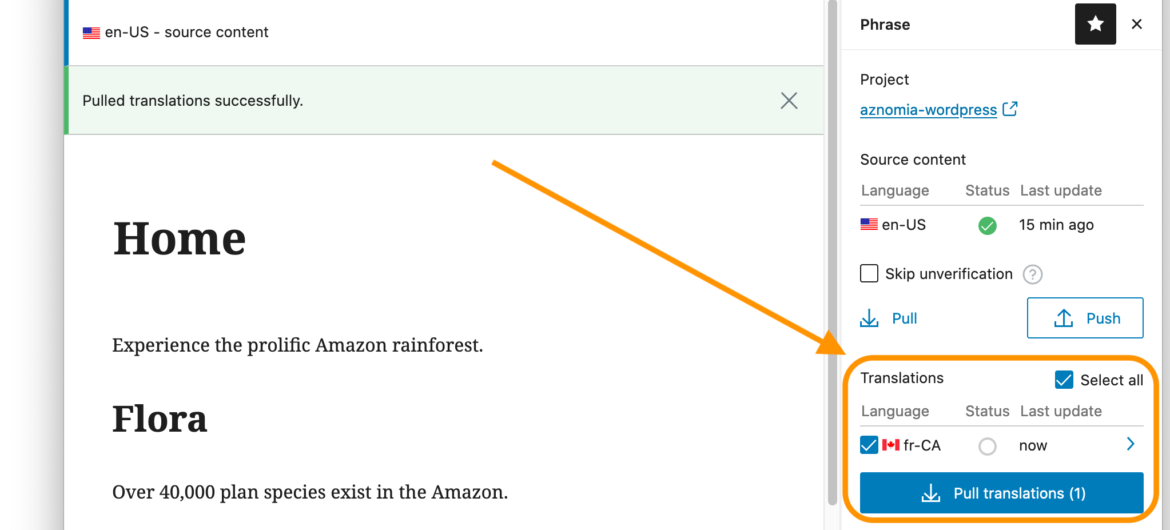
🗒 Note » Phrase will not sync translated WordPress slugs. Just ignore those in the translation editor.
Once the translations have been pulled, we’ll get a message reading “Pulled translations successfully.” We’ll also see a chevron next to our translation that links to the newly created translation page.
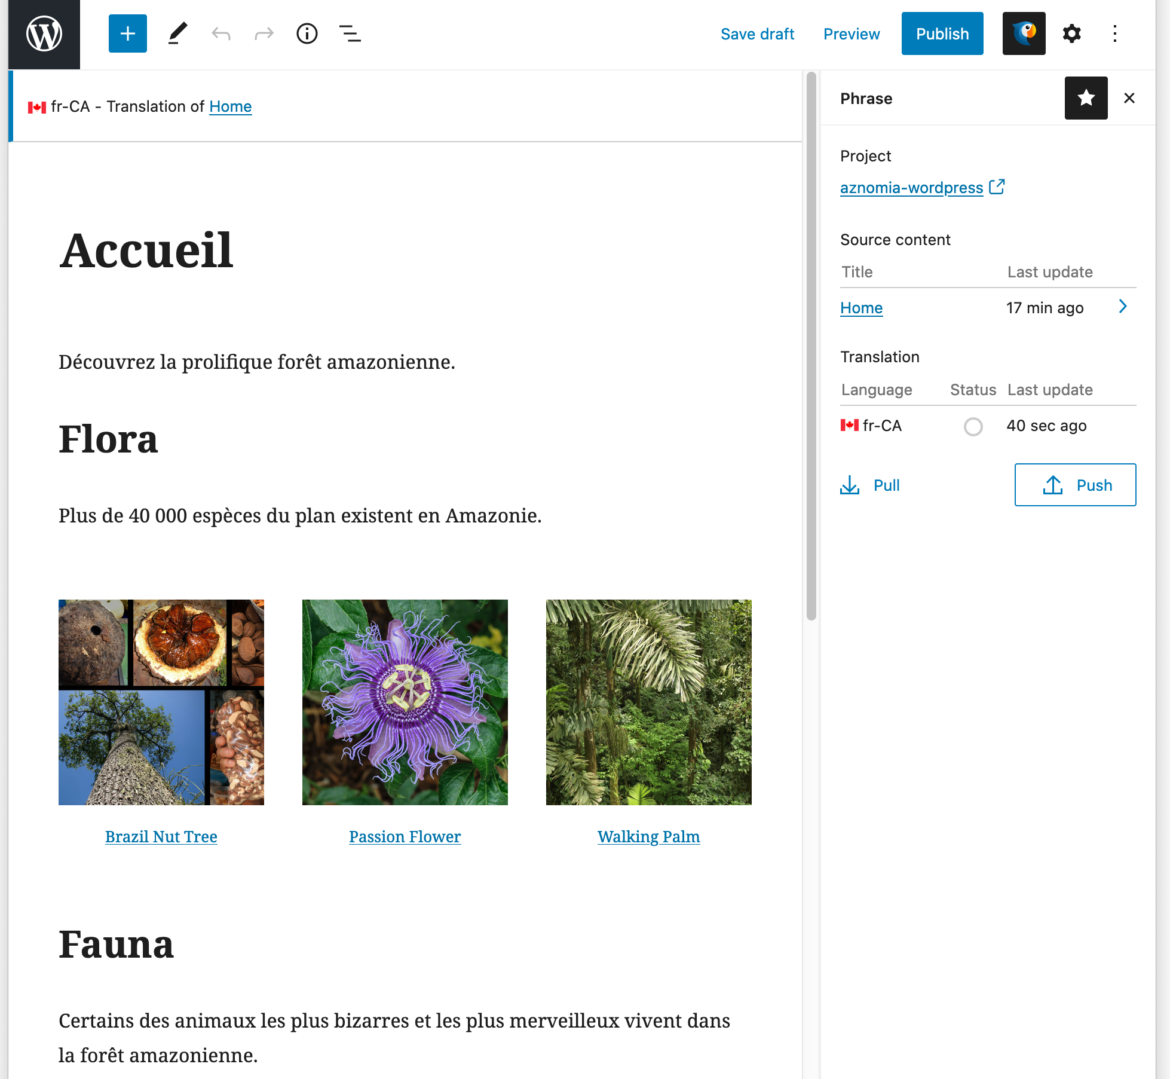
We now chose to publish the translated home page.
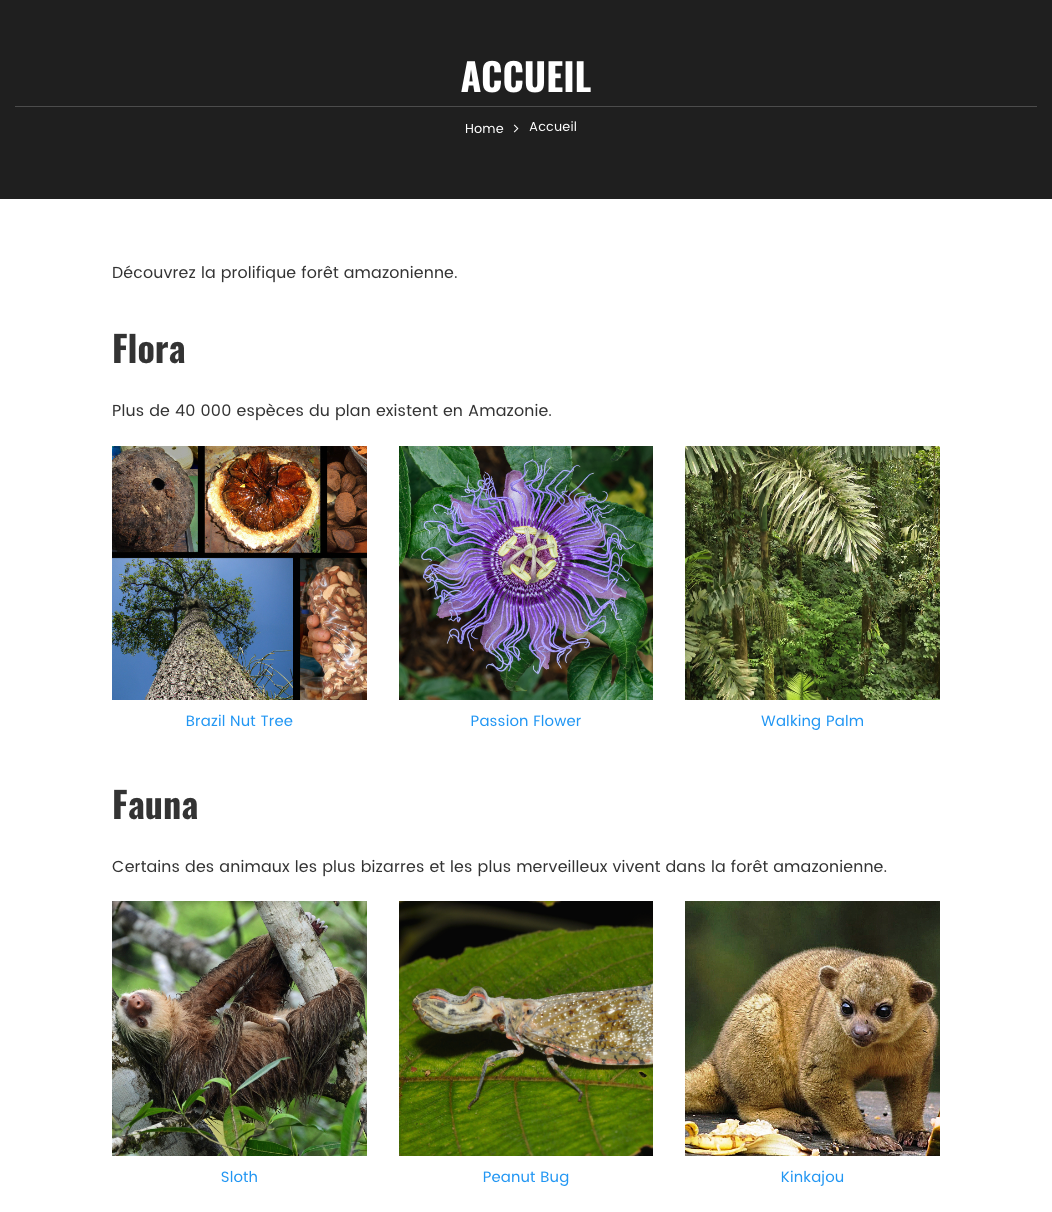
🗒 Note » Notice that we left our post links untranslated. That's because, at the time of writing, Phrase isn't syncing these blocks. I'm working with an early version of the Phrase plugin, and the Phrase team is working on fixing and updating the plugin. By the time you read this, this issue should be resolved.
Localizing posts
Localizing posts is a lot like localizing pages, so we’ll leave that as an exercise for you.
🔗 Resource » If you want a step-by-step guide to localizing posts with Phrase Strings's localization plugin for WordPress, check out the official help documentation.
🗒 Note » At the time of writing, the Phrase Strings plugin for WordPress only localized pages and posts. Support for localizing categories, tags, etc. is in the works and will be released in the future.
Once all our posts are translated and pulled in our posts listing page should look something like this.
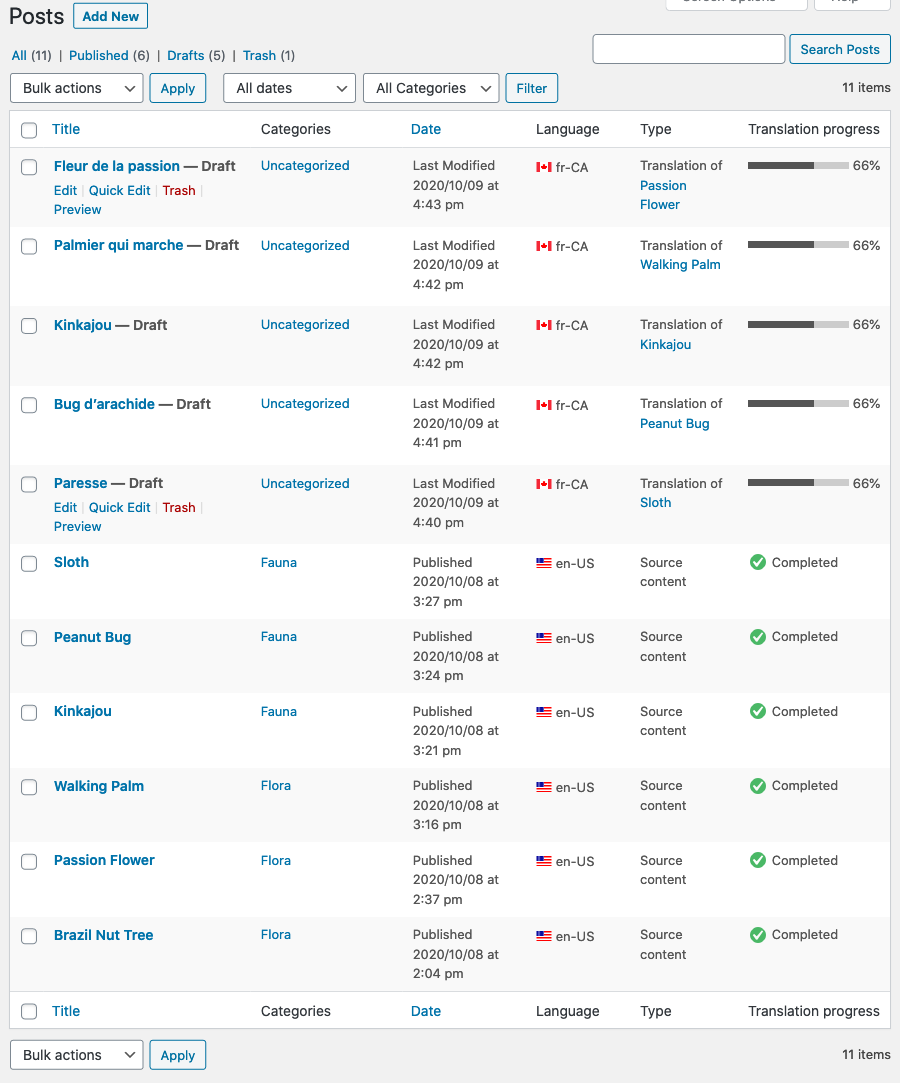
A translated French post has been added for each English source post
Adding Polylang
We probably want to add a language switcher to our site. We can do that with the free Polylang plugin. We’ll head to Plugins → Add New and search for Polylang using the plugin search box.
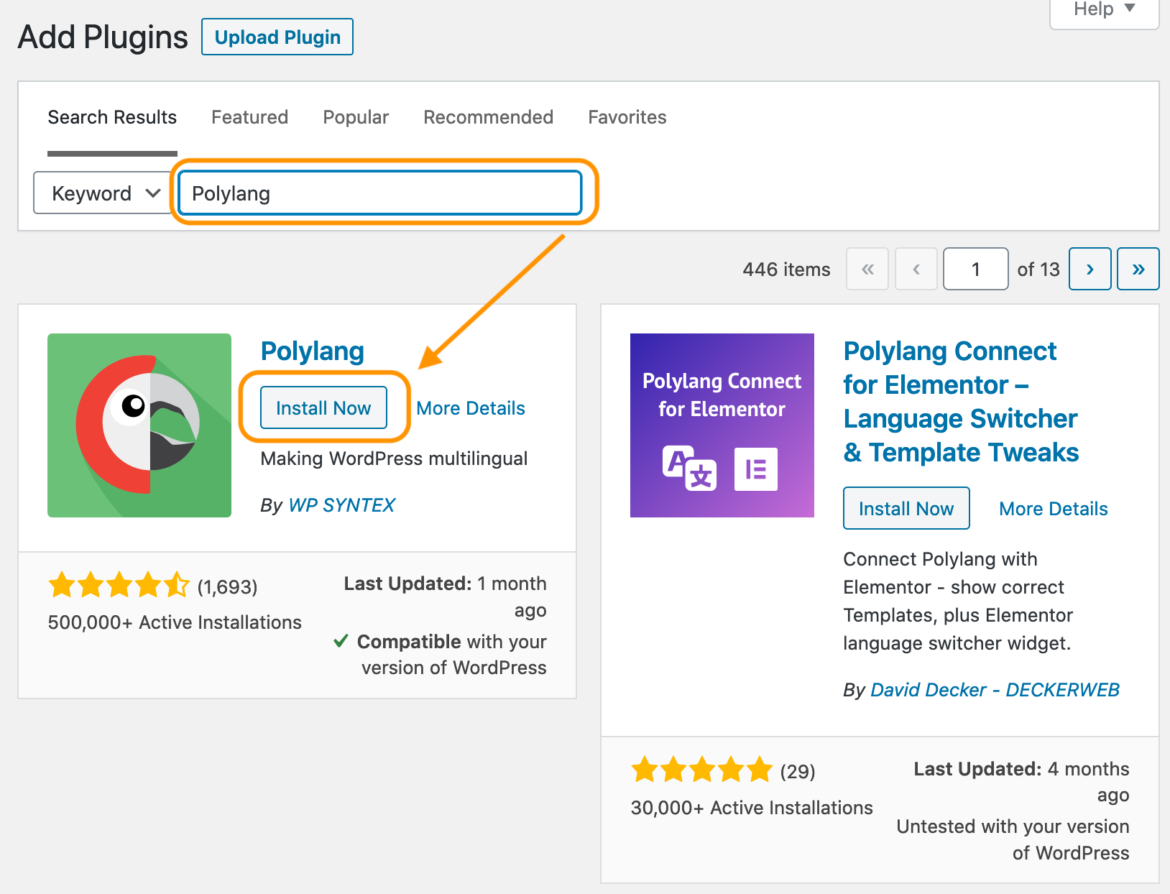
It’s the one with the parrot image…sassy
With the plugin installed and activated, we’ll be invited to run its setup wizard. Let’s click the button to do so.
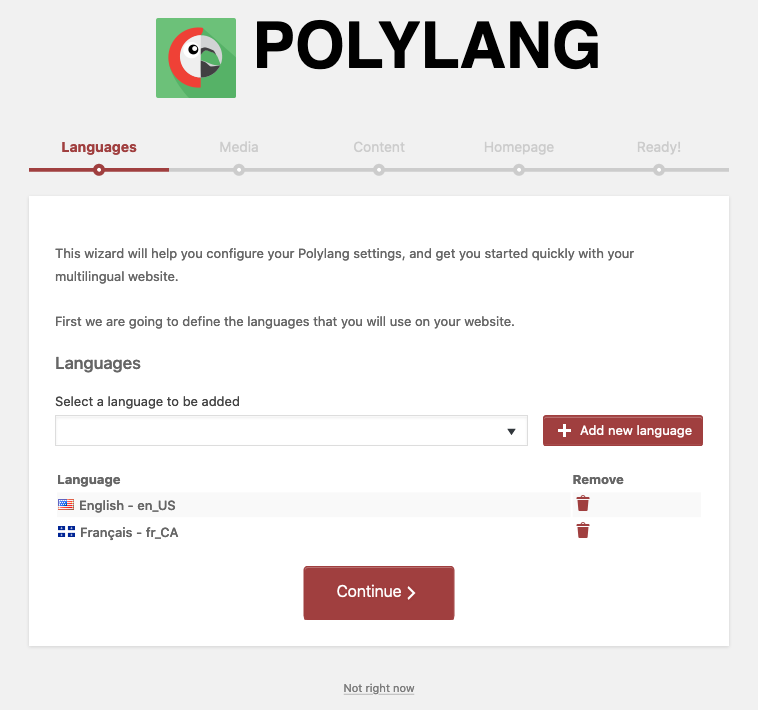
Polylang's Languages screen
We can pick the same languages to add to Polylang as we have in our Phrase project. We’re using US English and French Canadian in our demo site, so we’ll add those here.
The next option in the wizard regarding translating media is a matter of preference. I’ve chosen not to translate media here.
Next in line is the language to assign content that Polylang has not assigned content to. Our source language is a good candidate here. We can manually set our translated posts and pages after we complete the wizard.
We probably want to skip the step regarding translating the home page.
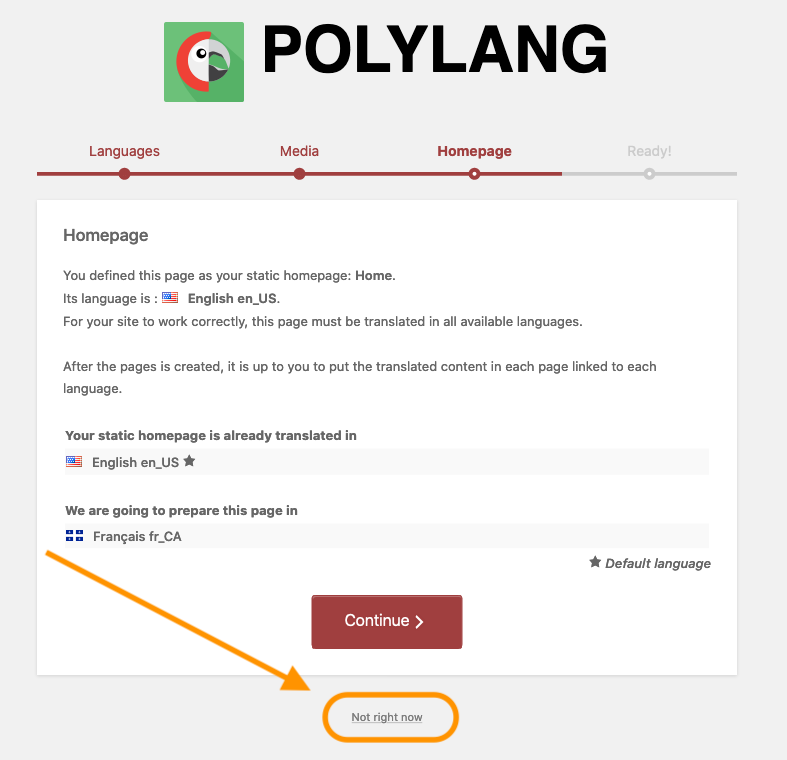
We already have a translated home page that we can manually set up later. So we can click Not right now to move on.
That’s it for the Polylang wizard. Let’s finish our setup manually.
Adding our translations to Polylang
Let’s start with our home page. We can navigate to Pages → All Pages to see the page index. We can click the Quick Edit button next to the French home page translation that we can create with Phrase. This will open up the quick edit controls for the page.
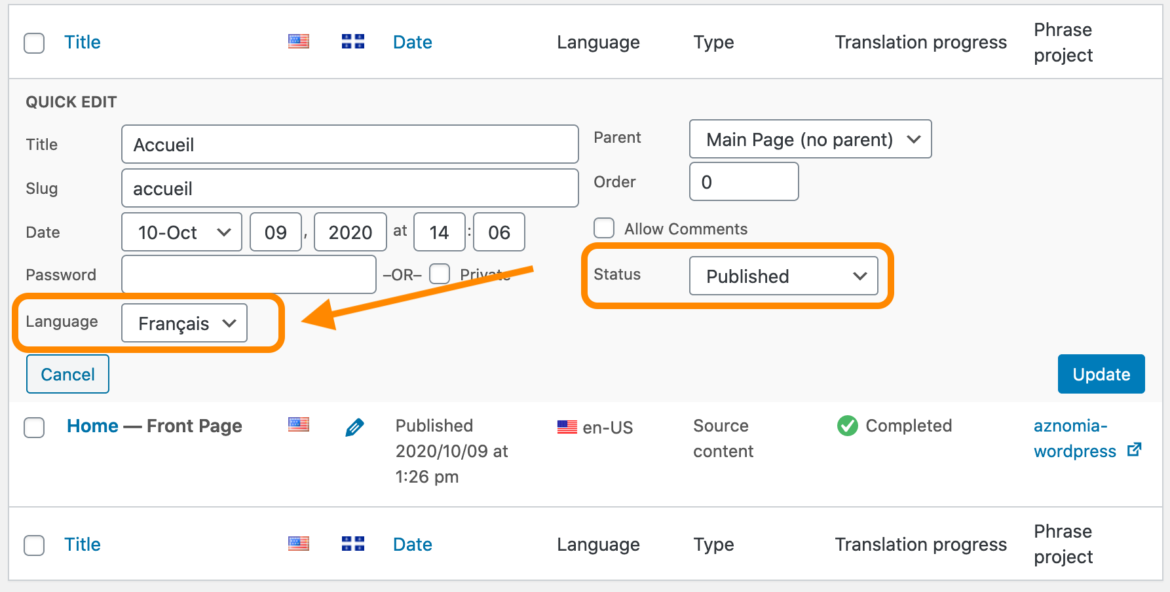
Let’s make sure our page’s translation Status is Published and that its Language is Français. The language we’re setting here is Polylang’s.
Next, let’s open the French translation by clicking its Edit button. Then, we’ll click the gear icon near the top-right of the window to open Document settings. From there, in Polylang’s Language section, we can start typing the title of the English “Home” page. We should get an autocomplete dropdown that we can click on to set the English home page as the source of this page in Polylang.
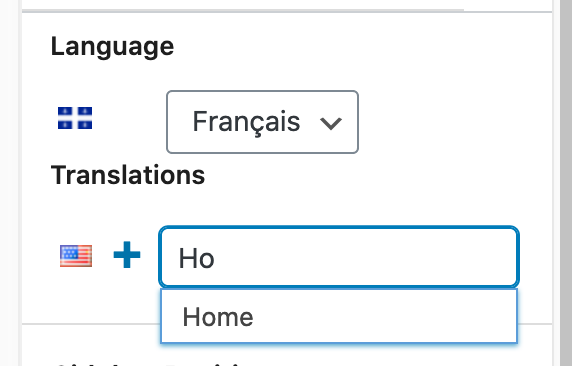
We’ll make sure to click the Update button when we're done. By doing that, we’ve just set our French home page as the front page in Polylang and WordPress.

Our English and French home pages are now linked in Polylang
We can link up our posts in Polylang as well. We’ll leave that as an exercise for you since it’s the exact same process as linking up our home page.
With that done, Polylang has internally linked our English content with its French counterpart. Each page or post has a localized URL as well. Our French home page, for example, is at /fr/accueil/.
🗒 Note » By default, source content (English in our case), won’t have a language code in its URL. We can change this in Polylang’s settings, however, under Languages → Settings → URL Modifications → Settings.
Adding a language switcher with Polylang
With all this linked content, it’s a shame that our visitors can’t manually switch between translations to read in their preferred languages. Luckily, Polylang comes with a handy language selector widget that we can stick into any of our theme’s widget areas.
Let’s head over to Appearance → Widgets, find the Language Switcher widget area settings, and set it to the Footer Middle widget area in our theme.
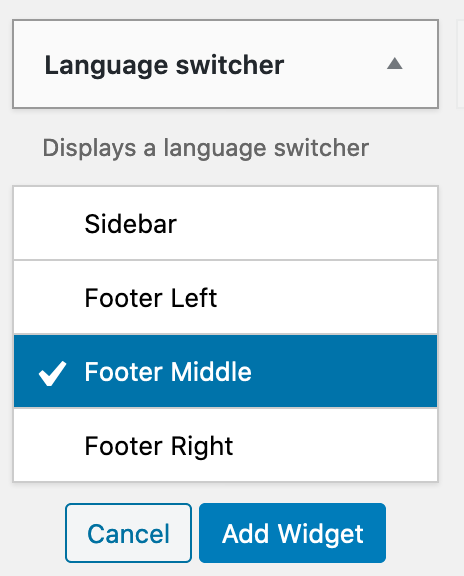
This will make the language switcher settings appear under the Footer Middle section near the right side of the window.
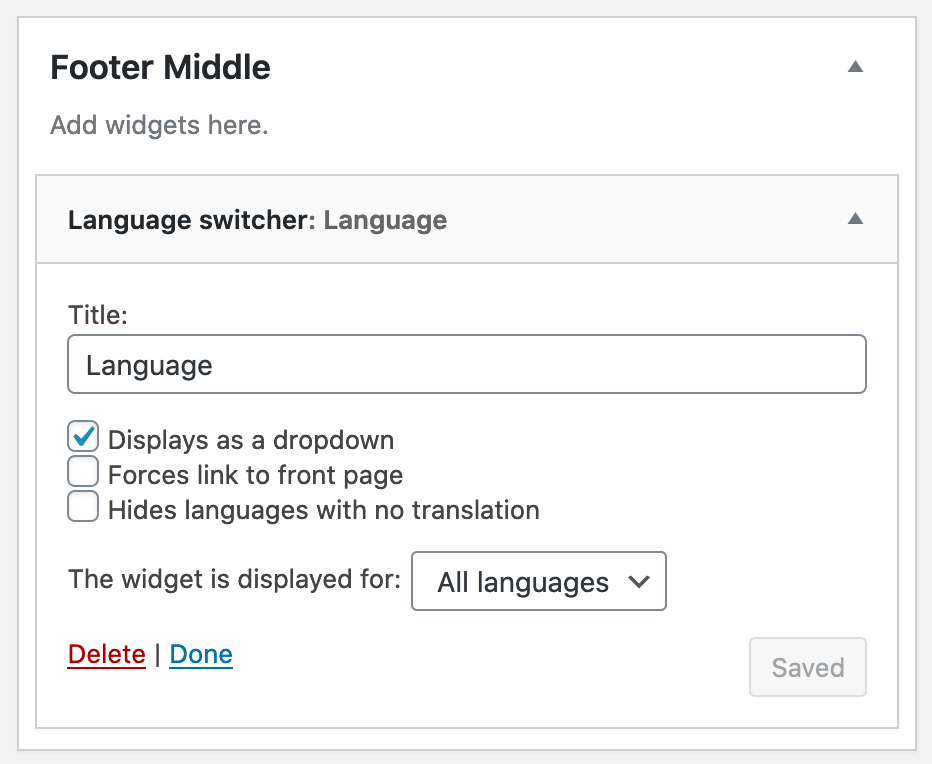
The widget settings are a matter of preference. I’ll set mine to have a title of Language and display it as a dropdown. Once we Save, we can see our language switcher near the bottom of every page on our front-facing site.
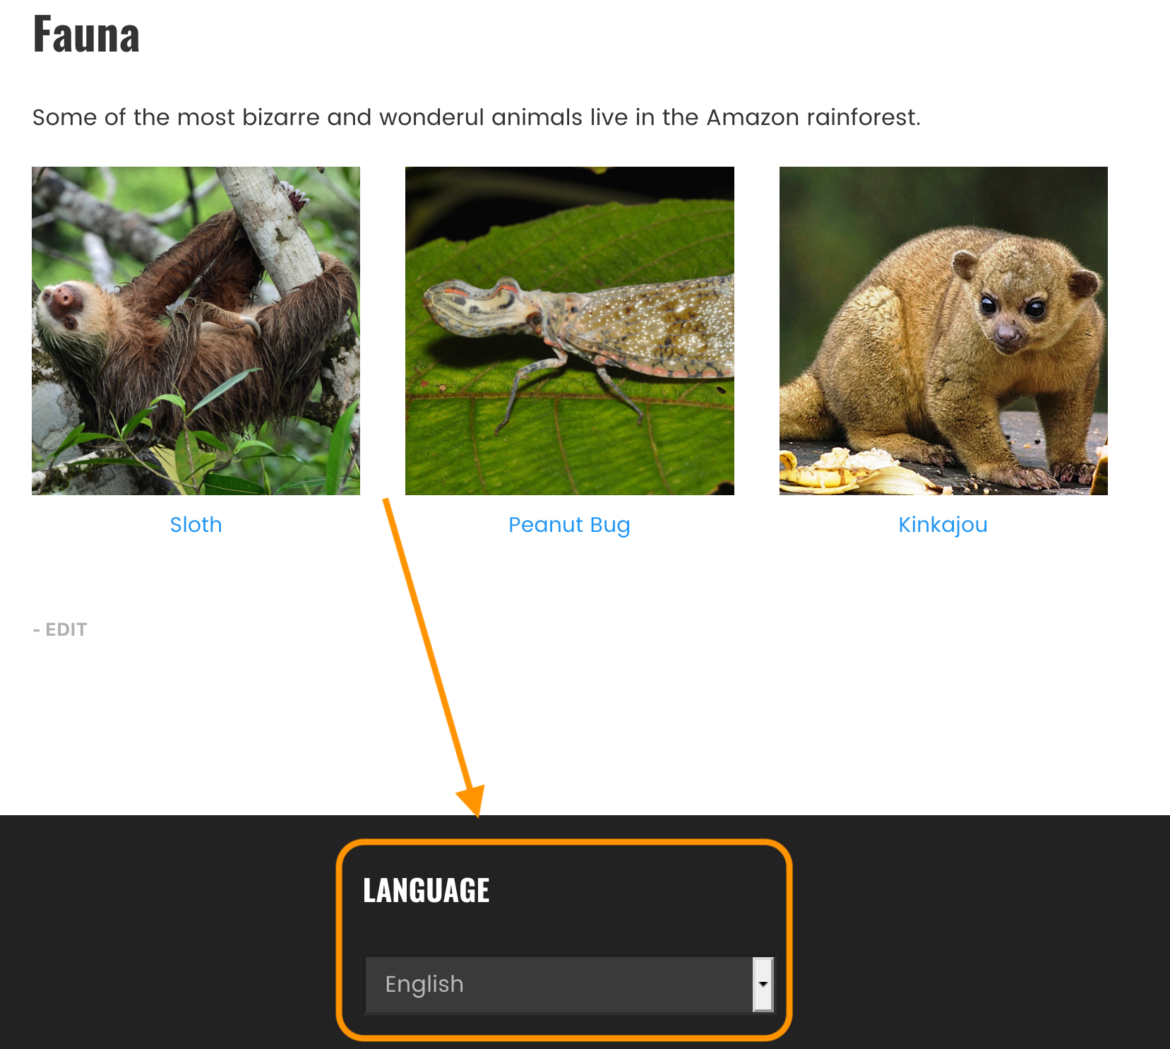
With that, our Aznomia is available in both English and French.
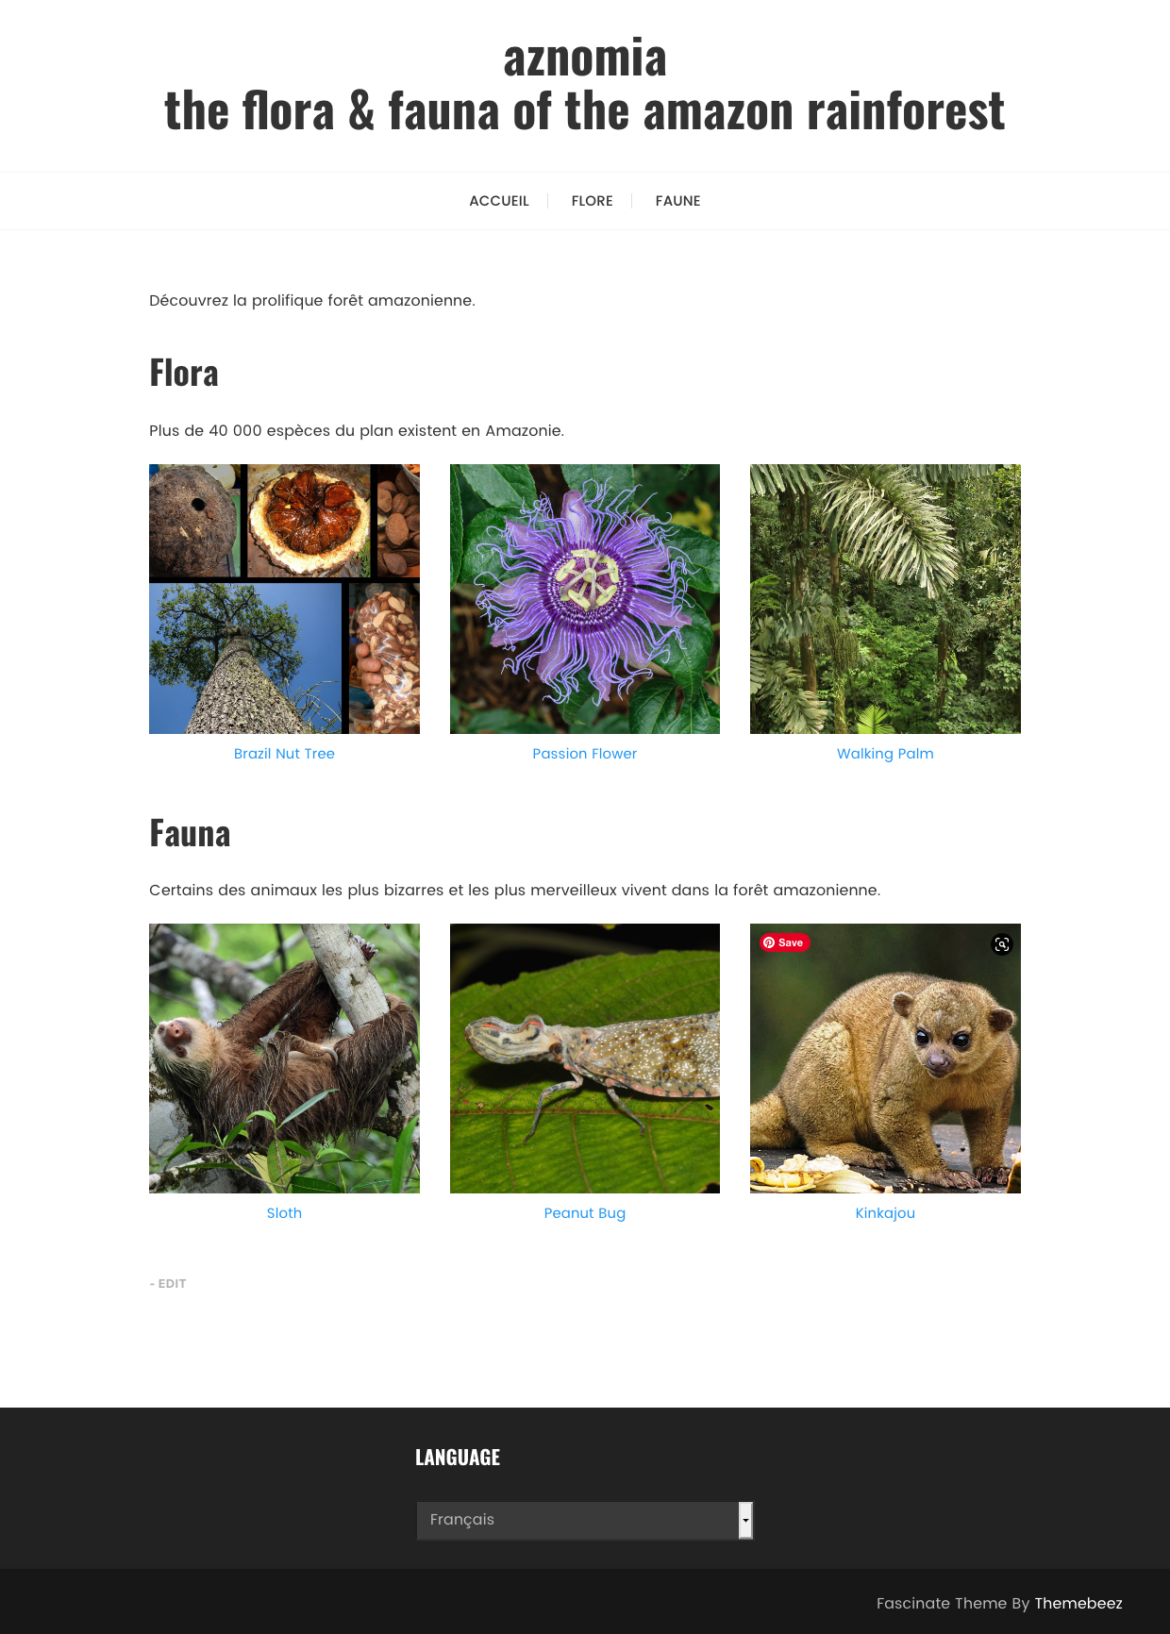
🗒 Note » My apologies if the French translations are off. I’ve been using third-party translation tools to prepare them.
Keep exploring
If you’re interested in going deeper into WordPress localization, check out our series:
- Creating a WordPress Multilingual Site – Part 1: Content & Polylang
- Creating a WordPress Multilingual Site – Part 2: Beginning Custom Theme Localization with gettext
- Creating a WordPress Multilingual Site – Part 3: Best Recipes for Custom Theme Localization
The power of Phrase Strings right in WordPress
Not only are we able to create, update, and sync our Phrase translations right within WordPress, but we also have all the advanced features that Phrase Strings provide us. That means our managers can set jobs for our translators from within Phrase. We can also automate translations, using machine learning to translate for us. And when we do need our translators, they can use the convenient Translation Editor in Phrase. All we have to do as WordPress developers is push our source content and pull the latest translations.
Check out all Phrase's translation products, and sign up for a free 14-day trial today!

