Software localization
How to Localize Siri Shortcuts

As Apple mobile device users, we can use and create new shortcuts based on actions available in the Shortcuts app. Those shortcuts are based on apps already installed on the device. Each shortcut can be really useful on its own, but when chained together, it becomes an even more powerful tool.
For instance, we can create a "Tweet GIF" shortcut from a photo in your library, transform it into the GIF format, and then tweet it via the Tweeter app.
From there, this new shortcut will be available as a simple action in the Shortcut gallery but also through command voice by directly asking Siri.
On top of the available shortcuts that Apple provides in the iOS system, many apps support their own shortcuts that can be directly added to Siri. Those would have a specific iOS button "Add to Siri."
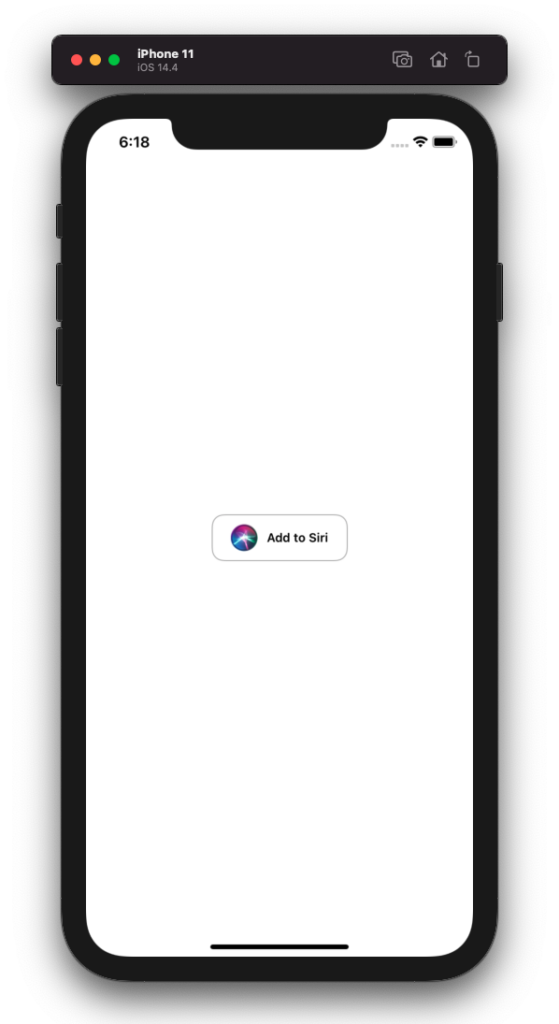
As a developer, creating a shortcut for mobile users can significantly enhance user experience, but how do we support localization to ensure a strong UX across cultures and languages? Let’s create one together, and learn how to localize it along the way.
Creating a shortcut
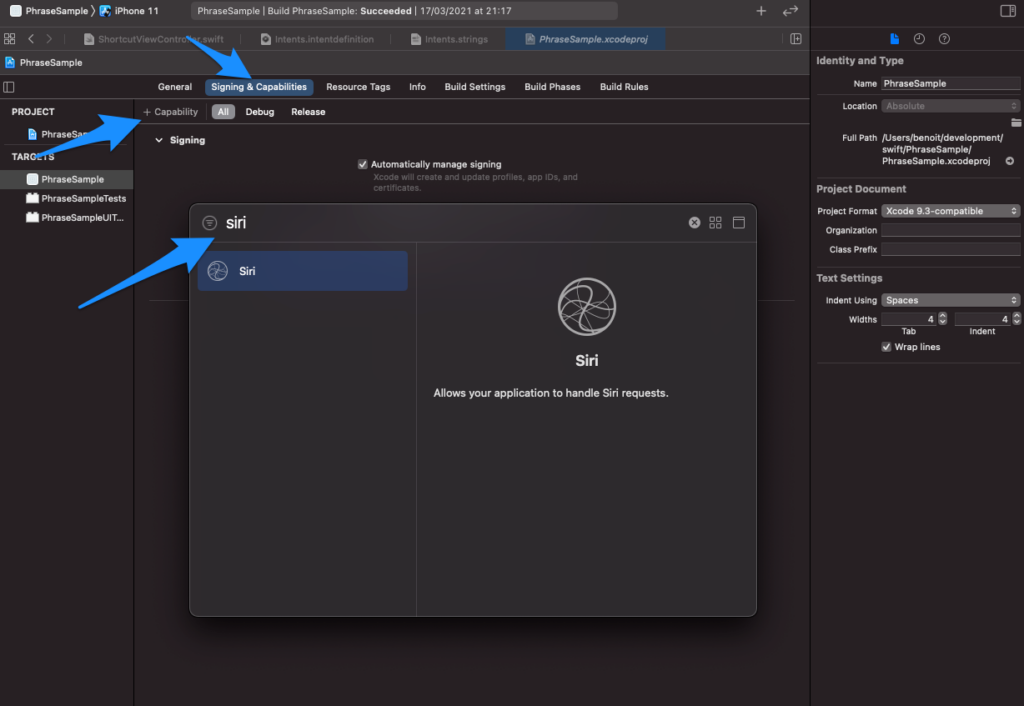
Before diving into the code, the first thing we need to do is configure our project and add the Siri capability to our app.
To do so, we need to navigate to our project file, select "Target," then "Signing & Capabilities," and add the Siri capability by clicking the "+" button.
From there, we need to define how our shortcut will behave. In Xcode, when designating shortcuts or actions, we actually define intent. This is based on a SiriKit intent definition file. To create one, add a file (through the top bar or a right-click) and search for "SiriKit Intent Definition File."
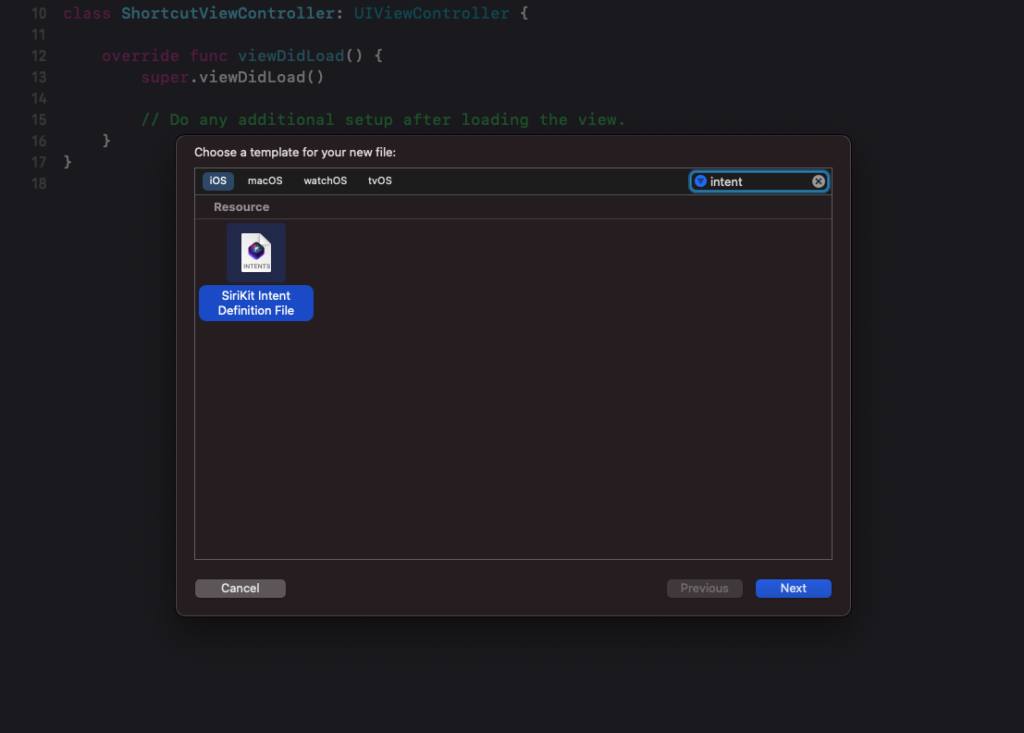
One file to define all our intents (or shortcuts) for a project should be enough, so I named mine "Intents." However, if you have many projects or targets overlapping, you might want to give yours a better name.
When opening the file, you can see it's a configuration file that doesn't reflect any code directly, but it's a set of properties to give Siri the instruction to support the intent.
By clicking the "+" button, let's create our first custom intent. I named mine "SendEmail." Its role will be to send "Hello" to a designated list of emails. Pretty simple, right?

At the top of the page, in the Category field, select an action that best defines the category of your intent. I believe the Siri framework is reusing this category as context to understand the request of your user the best way possible so let's be accurate.

In my example, the category will be "Send," the title "Send Email," and the description "Send email to a list of friends."
Regarding the rest of the properties, it depends on your intent. I left the confirmation and suggestions by default.
Since I want to send an email to a list of people, my intent requires some parameters, i.e. the emails of the recipients. In the "Parameters" section, we'll need to tap the "+" button to create a new one. I named mine "Emails."
The display name will be "Emails" in my case. In your, of course, the name should be as close as possible to your own parameters. The important part is the type of the parameter—it can be any system type—some are primitives types, e.g., Int, String, etc., and some more complex objects. I chose mine to be the "Person" type so that the user is able to reuse their contact list.
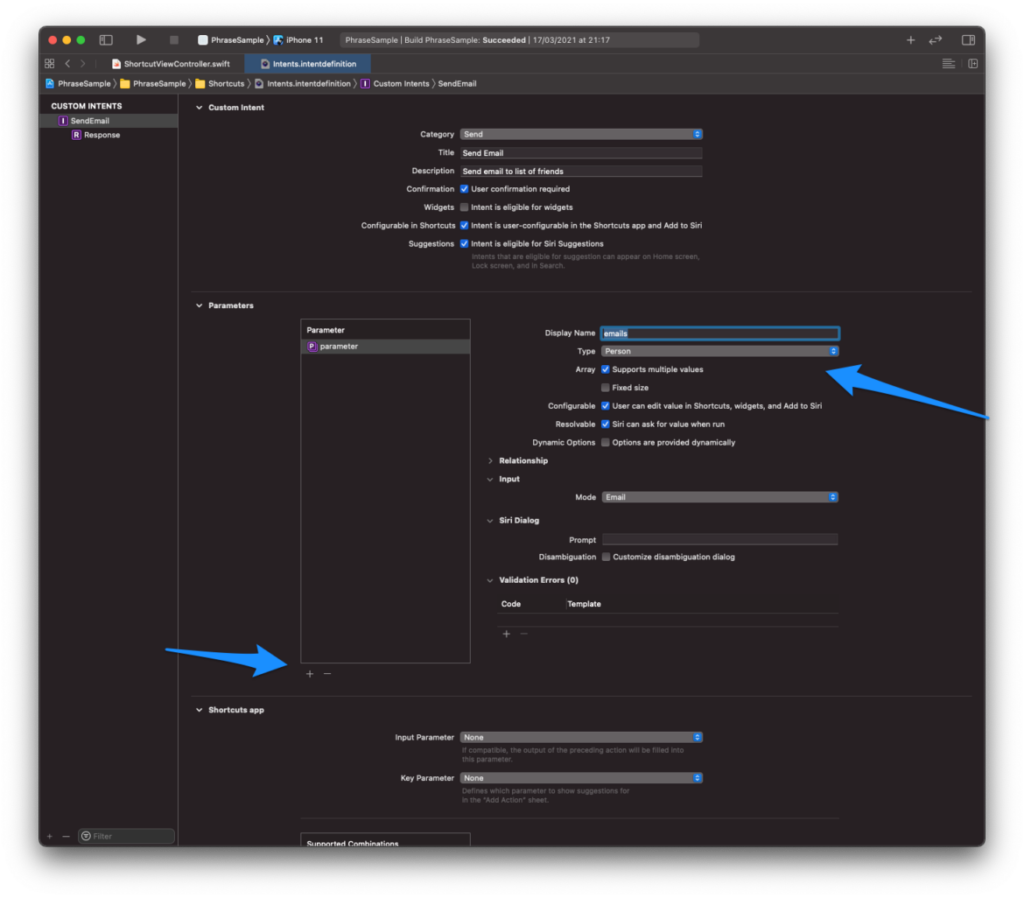
Because I want to send an email to a multitude of users, I ticked the box "Support multiple values." I also chose the input mode to be "Email" so the user can type an email of any contact to be added in.
If you are using other types of parameters that support a localized format like Date components or Currency amount, the input formatting and localization are handed over directly to the operating system itself. So, for a date, the user could input a specific style (let's say "01/12/2021" or "10 Dec 2021") or a specific day of the week ("Tuesday," "Mardi," etc.) in any language. Later on, this information will be resolved into a component you can actually consume in the app, but Siri and iOS will do the heavy lifting of understanding it for you at first.
Finally, in the "Siri Dialog," we need to add a prompt. I've set "Send Hello to friends," but once again, it's important to stay close to your own intent.
So, our intent is almost ready, we have defined its name and content, but we haven't provided a description for the Shortcut app or Siri of how to support the parameters in a sentence.
In the Shortcut app section, we need to define the input and key parameters, as well as a summary to define the context of our intent. Here, I will use "Send 'Hello' to Emails."
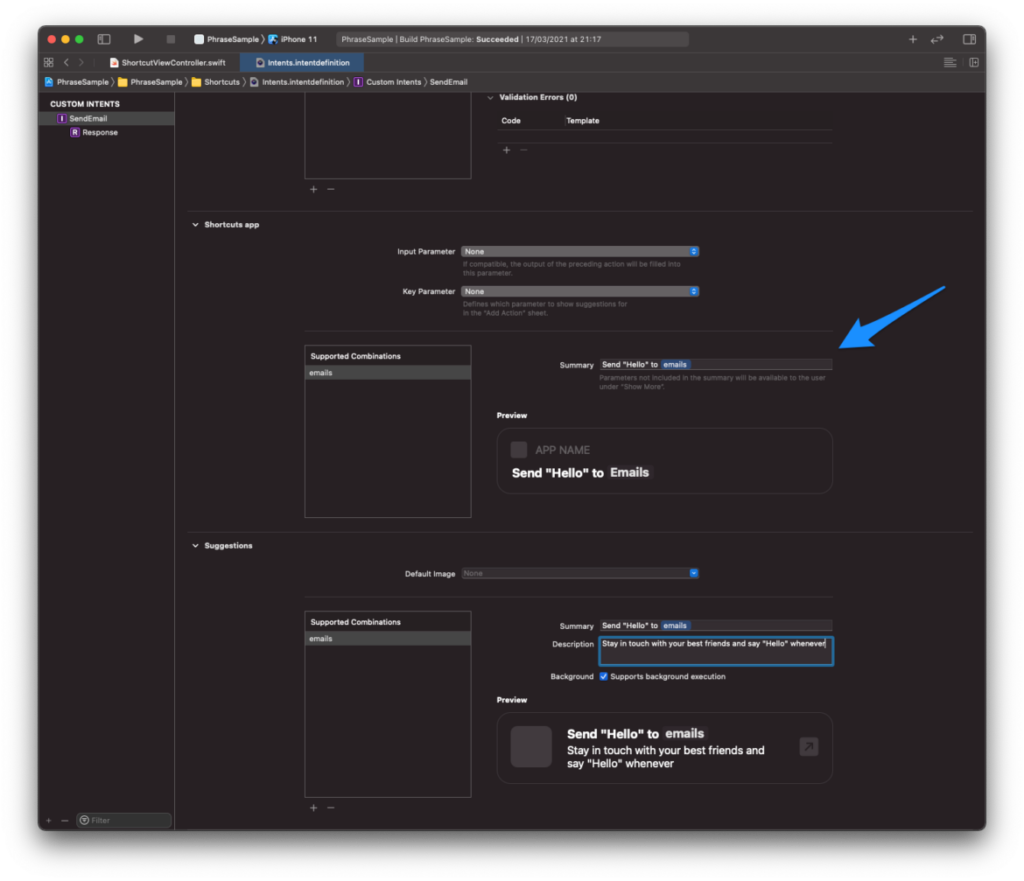
Note that in this context, "emails" is auto-completed and replaced, it's not just a plain text but a placeholder for the input parameter we've defined.
We'll do the same in the Suggestions section so that Siri will know where to place the parameters when the user initiates a voice command.
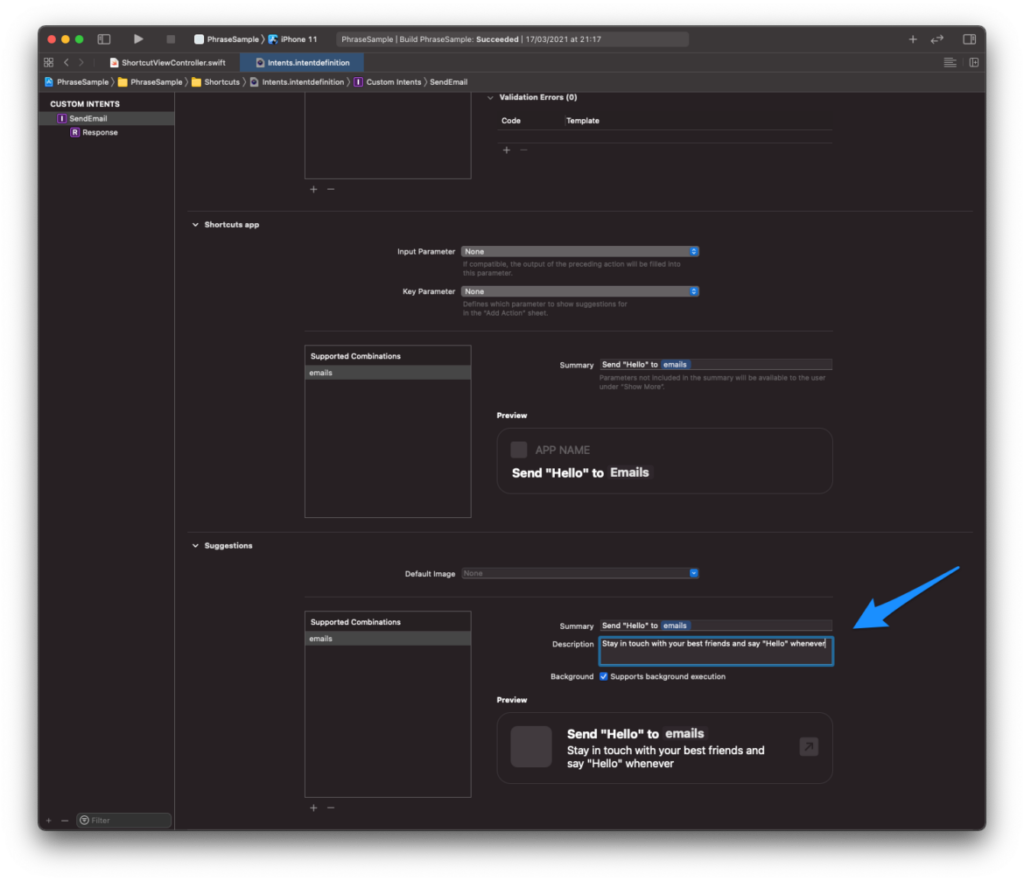
Alright, we've created our intent, but the user is still not able to use it. We need to make it available first.
Adding a shortcut to Siri
So far, we've mostly defined the parameters and the context of our Intent, but it won't be usable until the user adds it to Siri.
To be able to add our intent to Siri, we need to add a specific button in our app for the user to import it. The button itself is available through the IntentsUI framework.
import IntentsUI

import UIKit

class ShortcutViewController: UIViewController {

    private let intent = SendEmailIntent()

    private lazy var siriButton: INUIAddVoiceShortcutButton = {

        let button = INUIAddVoiceShortcutButton(style: .whiteOutline)

        button.shortcut = INShortcut(intent: intent)

        button.delegate = self

        button.translatesAutoresizingMaskIntoConstraints = false

        return button

    }()

    override func viewDidLoad() {

        super.viewDidLoad()

        view.addSubview(siriButton)

        NSLayoutConstraint.activate([

            siriButton.centerYAnchor.constraint(equalTo: view.centerYAnchor),

            siriButton.centerXAnchor.constraint(equalTo: view.centerXAnchor)

        ])

    }

}
Note that "SendEmailIntent" is now available as a generated class by Xcode. So, whenever you edit your Intent definition, it will generate the matching code for you. You should never edit the code itself, but it's good to understand how things work under the hood. Here is what mine looks like:
import Intents

@available(iOS 12.0, macOS 10.16, watchOS 5.0, *) @available(tvOS, unavailable)

@objc(SendEmailIntent)

public class SendEmailIntent: INIntent {

    @NSManaged public var emails: [INPerson]?

}

// more code ...
Back to our view. The button itself does not present or dismiss any shortcuts view yet. It delegates the presentation to the view controller, so we need to support these actions there.
// Add Shortcut Button Delegate

extension ShortcutViewController: INUIAddVoiceShortcutButtonDelegate {

    func present(_ addVoiceShortcutViewController: INUIAddVoiceShortcutViewController, for addVoiceShortcutButton: INUIAddVoiceShortcutButton) {

        addVoiceShortcutViewController.delegate = self

        addVoiceShortcutViewController.modalPresentationStyle = .formSheet

        present(addVoiceShortcutViewController, animated: true, completion: nil)

    }

    func present(_ editVoiceShortcutViewController: INUIEditVoiceShortcutViewController, for addVoiceShortcutButton: INUIAddVoiceShortcutButton) {

        editVoiceShortcutViewController.delegate = self

        editVoiceShortcutViewController.modalPresentationStyle = .formSheet

        present(editVoiceShortcutViewController, animated: true, completion: nil)

    }

}

// Add Shortcut ViewController Delegate

extension ShortcutViewController: INUIAddVoiceShortcutViewControllerDelegate {

    func addVoiceShortcutViewController(_ controller: INUIAddVoiceShortcutViewController, didFinishWith voiceShortcut: INVoiceShortcut?, error: Error?) {

        controller.dismiss(animated: true, completion: nil)

    }

    func addVoiceShortcutViewControllerDidCancel(_ controller: INUIAddVoiceShortcutViewController) {

        controller.dismiss(animated: true, completion: nil)

    }

}

// Edit Shortcut ViewController Delegate

extension ShortcutViewController: INUIEditVoiceShortcutViewControllerDelegate {

    func editVoiceShortcutViewController(_ controller: INUIEditVoiceShortcutViewController, didUpdate voiceShortcut: INVoiceShortcut?, error: Error?) {

        controller.dismiss(animated: true, completion: nil)

    }

    func editVoiceShortcutViewController(_ controller: INUIEditVoiceShortcutViewController, didDeleteVoiceShortcutWithIdentifier deletedVoiceShortcutIdentifier: UUID) {

        controller.dismiss(animated: true, completion: nil)

    }

    func editVoiceShortcutViewControllerDidCancel(_ controller: INUIEditVoiceShortcutViewController) {

        controller.dismiss(animated: true, completion: nil)

    }

}
Great, let's run this, and try it out.
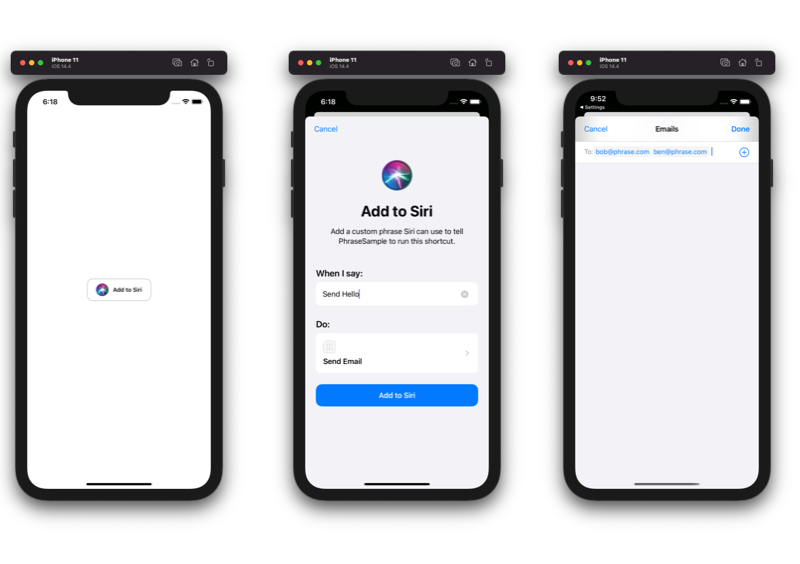
Perfect, we can add the shortcut and set a list of persons by emails. That was our initial goal.
If you open the Shortcuts app, you'll notice our intent was added there too. Quite cool, right?
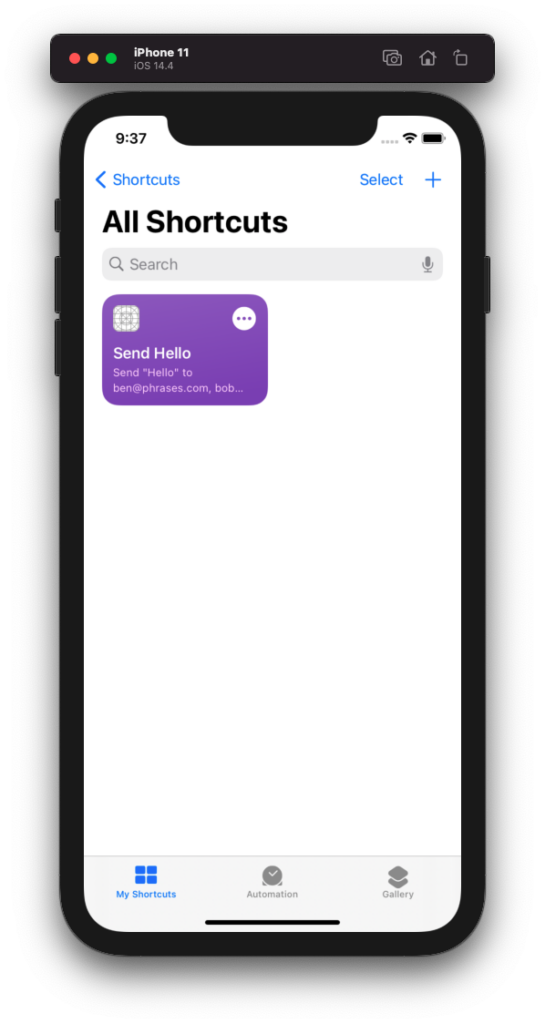
So, we are now familiar with defining and including a shortcut in our app, let's see now how to support localization.
Localizing a shortcut
In case your project is not available yet for localization, you can follow this quick guide to implement internationalization and localization into your iOS app.
Like any other file localization, we need to start localizing our SiriKi Intent definition file to enable it for another language or region. By clicking the "Localize" button on the lnspector menu, we can enable a new language.
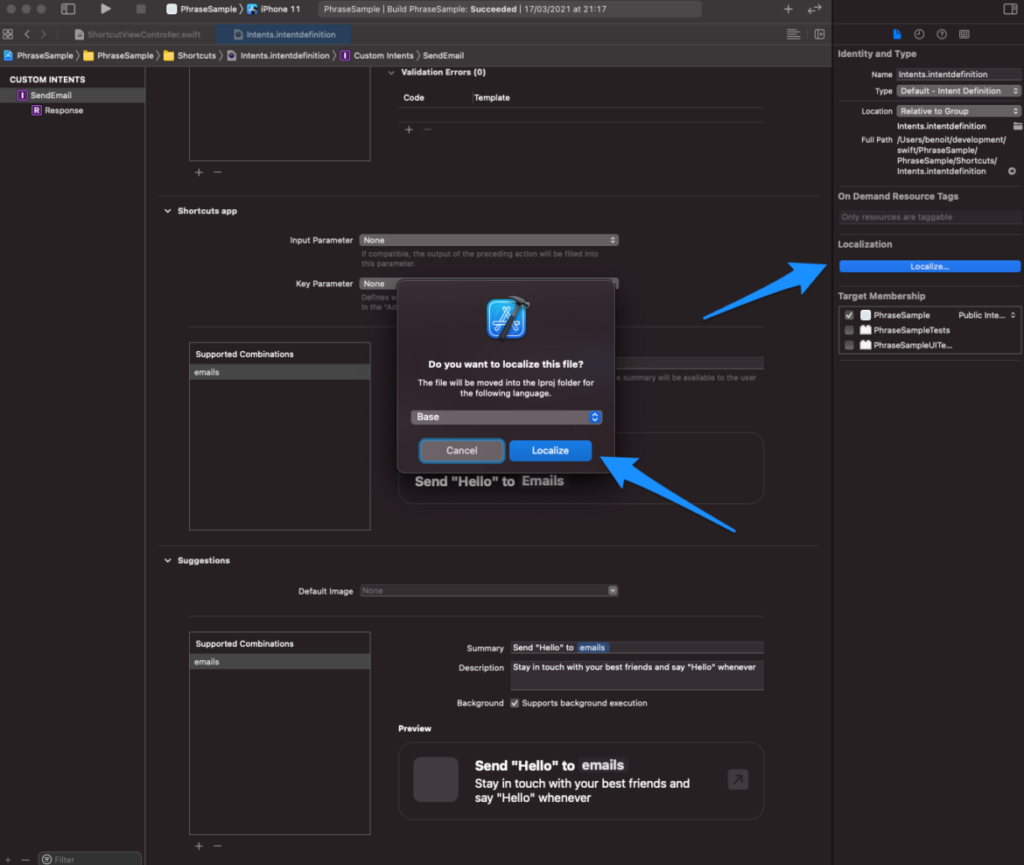
I keep the "Base" English and add a new version in French. Like any localizable string files or storyboard files, it creates a similar definition of the files with generated identifiers as the key and the existing copy as the value.
After replacing the values in French, my intent is now available to be used in French.
"2OA5xE" = "Envoyer \"Salut\" à ${emails}";

"DLPRIZ" = "Restez proche de vos amis et dites \"Salut\" n'importe quand";

"N71KxT" = "Envoyer un courriel";

"NJsHI1" = "Courriels";

"qd8JxP" = "Envoyer un courriel à un groupe d'amis";

"ug0pg6" = "Envoyer \"Salut\" à ${emails}";

"w0mAec" = "Envoie Salut à des amis";
To be able to test it in French, it will require a bit more effort than any usual translation.
If you are familiar with Xcode, you might know that editing the scheme to a specific region or language will apply the change to your app on the next launch.
If that is true for the content of the app, it does not apply to the rest of the iOS Simulator. However, the Shortcut app and Siri content are based on the iOS system language. This means we will need to go ahead and change the language at the system level.
To do so, let's open the Settings app > General > Languages & Region, and apply the right language.
Back to our app, if we open the dialog again, everything is following our translations: The shortcut is localized.
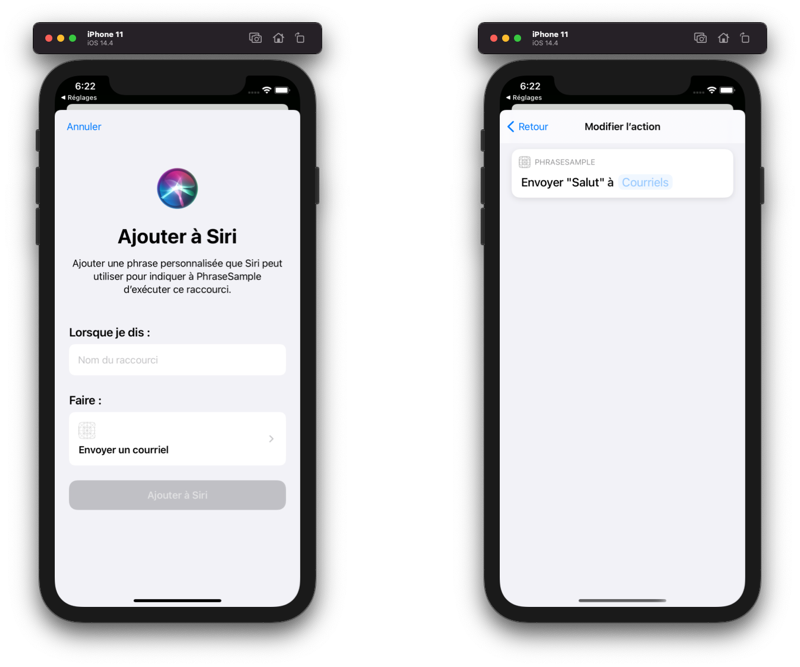
We've created a shortcut and localized it, but can we actually send the email to our friends? Let's handle the shortcut callback.
Handling a shortcut
As soon as Siri Suggestion or the Shortcut app execute the intent, it will call a dedicated function in your SceneDelegate, giving the context of the user activity. Without it, you will not be able to get the source and parameters of the intent.
func scene(_ scene: UIScene, continue userActivity: NSUserActivity) {

    if let intent = userActivity.interaction?.intent as? SendEmailIntent {

        let emails = intent.emails?.compactMap({ $0.personHandle?.value })

        print("Hello \(String(describing: emails))")

    }

}
From the code above, we detect the "SendEmail" intent by its type, then extract the email through the person value. When we launch the shortcut, we will print the list of emails.

Updating a localized shortcut
In the future, you might need to update the intent definition, e.g., add a parameter, change behaviors to suggestions, etc. If this is easy from the definition file, the localized file next to it will not be automatically updated.
It means that if you remove a field in your definition, you need to make sure you remove the matching key as well. It is the same process when adding a parameter: You need to either re-generate the localized strings (by removing the file and re-adding all translations) or be more meticulous and dive deeper into the intent definition changes.
The cleanest way I found is to manually open the definition file as a source code and look for the added keys. It should be fairly easy if use a versioning system like git to know what has been removed or added.
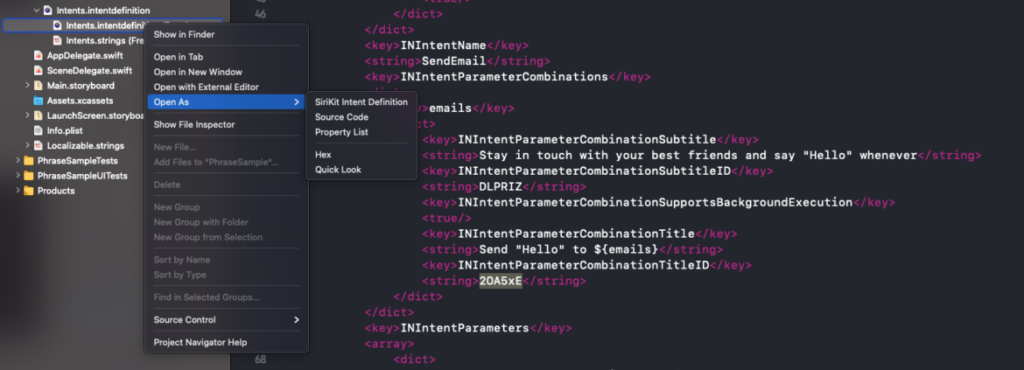
This is required only if the intent definition file is updated. If you only want to change the translation, you can directly dive into the intent string file instead.
Wrapping things up
In conclusion, like any iOS feature, the Shortcut app is a very powerful tool to help mobile users do more with less effort on a daily basis. To make sure every single app user enjoys a smooth user experience, it is crucial to localize your available shortcuts for your target market.
While Apple has made it fairly straightforward to add and support new shortcuts in an iOS app, it is a bit tedious to maintain and update them over time. Any change can lead to missing translations and a poorer user experience. Nevertheless, once we know what to look for and how to work around those roadblocks, our app UX will stay at its best.
Finally, if you feel your app content is now ready to be localized, check out Phrase. A software localization platform designed to streamline app localization end to end, Phrase features a flexible API and CLI, and a beautiful web platform for your translators to work together. Check out all of Phrase’s features and try it for 14 days for free.


