Software localization
A Step-by-Step Guide to Svelte Localization

With over 35K stars on GitHub, and over 1,000 NPM packages in its ecosystem, I think it’s safe to say that the Svelte JavaScript framework has found a solid niche for itself. And for good reason: unlike Angular, React, and Vue, Svelte has no virtual DOM. It’s effectively a compiler that doesn’t ship with your app, meaning it has almost no footprint in your app bundle. Svelte is also exceptionally minimal and elegant in its design, making it pretty learnable. In fact, if you haven't tried out Svelte yet, I urge you to give it a go.
But I assume I’m preaching to the choir, and that you’ve already been bitten by the Svelte bug. I’ll wager another assumption: you have a Svelte app and you want to internationalize and localize it. Well, look no further. In this article, we’ll build a small demo app, and we’ll use Christian Kaisermann’s svelte-i18n library to internationalize it. Let’s get to it!
🗒 Note » We’ve written about Svelte i18n before. In that article, we used svelte-i18n version 1-beta. This article is a refresh that covers svelte-18n version 3.
Our Demo App
Our application, Rebel Voter, allows users to upvote and downvote Star Wars characters.
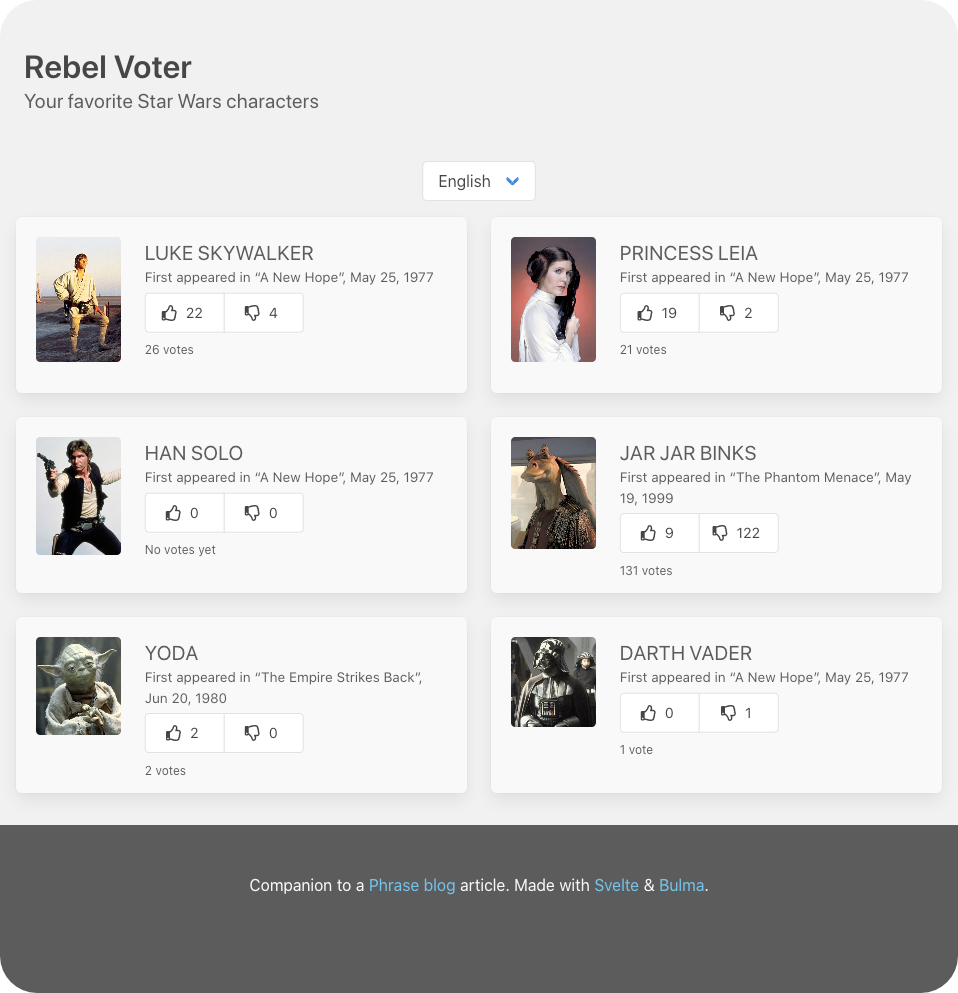
What our app will look like when all is said and done
While Rebel Voter won’t actually connect to a server to persist its voting data, it will serve as a great i18n demo for Svelte and svelte-i18n 3. Let’s build it out in the quickness and get to localizing it.
🔗 Resource » You can get all of the project’s code from our companion repo on GitHub.
Installing Svelte
I find the quickest way to install Svelte is through the npx degit command from the command line.
$ npx degit sveltejs/template rebel-voter

$ cd rebel-voter

$ npm install
These commands will scaffold our app using the official Svelte template, and install all the NPM package dependencies we need to start cooking.
With all that in place, we can run our dev server through npm run dev.
The Basic App
First off, let’s modify the App.svelte file that comes with Svelte template so that it looks like the following.
<script>

  import Header from './components/Layout/Header.svelte';

  import Footer from './components/Layout/Footer.svelte';

  import CharacterList from

    './components/Characters/CharacterList.svelte';

</script>

<Header />

<main role="main">

  <CharacterList />

</main>

<Footer />

<style>

  main { padding: 0 1rem; }

</style>
We start with three components. Header and Footer are presentational layout components. Our app’s heart and soul lie in CharacterList. Let’s take a look at the code of all three of these components.
The Header and Footer
Our Header and Footer are simple, presentational components.
<header class="hero">

  <div class="hero-body">

    <div class="container">

      <h1 class="title">Rebel Voter</h1>

      <h2 class="subtitle">Your favorite Star Wars characters</h2>

     </div>

  </div>

</header>
<style>
/* Styles are omitted for brevity
You can grab them on GitHub. */
</style>
<footer class="footer">
<div class="content has-text-centered">
<p>
Companion to a
<a href="https://phrase.com/blog">Phrase blog
</a> article. Made with
<a href="https://svelte.dev/">Svelte</a> &
<a href="https://bulma.io/">Bulma</a>.
</p>
</div>
</footer>
🔗 Resource » We’re using the sleek Bulma CSS framework for styling here. In fact, most CSS classes you’ll see in this article are Bulma classes.
The Character List
Our CharacterList component is where the main action begins. The component loads our demo JSON data and presents it.
Let’s take a look at how our data is structured.
[

  {

    "id": 1,

    "name": "Luke Skywalker",

    "imageUrl": "https://upload.wikimedia.org/wikipedia/en/9/9b/Luke_Skywalker.png",

    "firstAppearedInFilm": {

      "title": "A New Hope",

      "releasedAt": "1977-05-25"

    },

    "upVoteCount": 22,

    "downVoteCount": 4

  },

  {

    "id": 2,

    "name": "Princess Leia",

    "imageUrl": "https://upload.wikimedia.org/wikipedia/en/1/1b/Princess_Leia%27s_characteristic_hairstyle.jpg",

    "firstAppearedInFilm": {

      "title": "A New Hope",

      "releasedAt": "1977-05-25"

    },

    "upVoteCount": 19,

    "downVoteCount": 2

  },

  // ...

]
Now let's use this data in our Character component.
<script>

  import Character from './Character.svelte';

  function fetchCharacters() {

    return fetch('/data/characters.json')

      .then(response => response.json());

  }

</script>

{#await fetchCharacters()}

  <p>Loading...</p>

{:then characters}

  <div class="columns is-mobile is-multiline">

    {#each characters as character}

      <div

        class="column is-one-third-desktop is-half-tablet is-full-mobile"

      >

        <Character {character} />

      </div>

    {/each}

  </div>

{:catch error}

  <p>There was a problem loading characters.</p>

{/await}
We simply fetch() our data, iterate over the array it gives us, and pass each item in the array to Character to display it.
<script>

  import VotingButton from '../UI/VotingButton.svelte';

  export let character;

  const {

      name,

      imageUrl: src,

      firstAppearedInFilm,

  } = character;

  let {

    upVoteCount,

    downVoteCount,

  } = character;

</script>

<style>

  /* Styles are omitted for brevity

     You can grab them on GitHub. */

</style>

<div class="box">

  <div class="columns is-mobile">

    <div class="column is-one-quarter img-container">

      <img {src} alt="{name}">

    </div>

    <div class="column">

      <h3 class="is-size-5 is-uppercase name">

        {name}

      </h3>

      <p class="first-appeared">

        First appeared in

        <span class="first-appeared-title">

          {firstAppearedInFilm.title},

        </span>

        {firstAppearedInFilm.releasedAt}

      </p>

        <div class="buttons has-addons">

          <VotingButton

            type="up"

            count={upVoteCount}

            on:click={() => upVoteCount += 1}

          />

          <VotingButton

            type="down"

            count={downVoteCount}

            on:click={() => downVoteCount += 1}

          />

        </div>

    </div>

  </div>

</div>
Character controls two VotingButtons, which help us demo the dynamic upvoting and downvoting behavior.
<script>

  export let count = 0;

  export let type = "up";

</script>

<style>

  .button { min-width: 5rem; }

  .button-count { font-size: 0.9rem; }

</style>

<button class="button" on:click>

  <span class="icon">

    <span class="far fa-thumbs-{type}" />

  </span>

  <span class="button-count">{count}</span>

</button>
The fa-thumbs-up and fa-thumbs-down classes are FontAwesome CSS classes that display a thumbs up icon and a thumbs down icon, respectively.
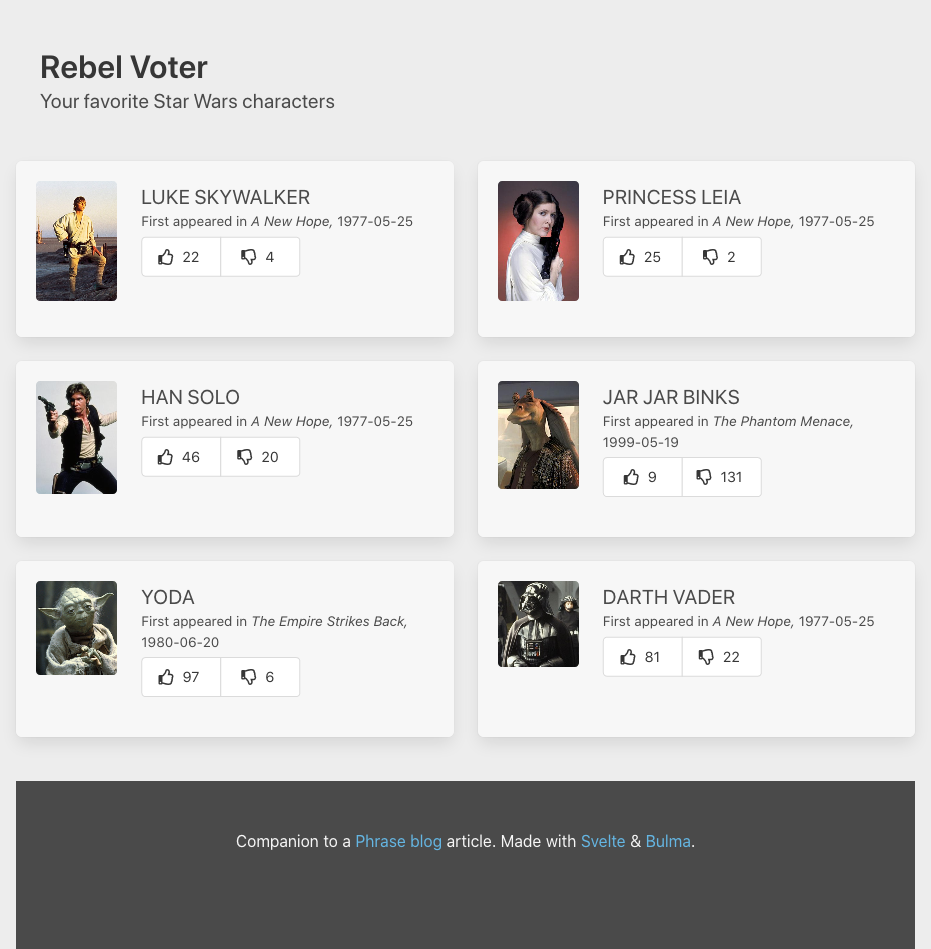
And that’s Rebel Voter. No one likes Jar Jar ☹️
Now we can get to our i18n and l10n.
🗒 Note » If you haven’t been coding along, and you want to start now that we’re tackling i18n, clone yourself a copy of our Git repo from GitHub and checkout the start branch.
Installing svelte-i18n
svelte-i18n is installed, as you might imagine, through NPM.
$ npm install --save svelte-i18n
✋🏽 Heads up » After installing svelte-i18n and running your development server, you may get warnings that say “(!) this has been rewritten to undefined“. This is a known problem when using Rollup with some modules. The code the warnings are referring to seems to work just fine in our case. Still, if you do want to get rid of the warnings, you can modify the project’s Rollup configuration to pass the modules the value of
thisthat they expect. In fact, we’ve done all the work for you, and it’s in our repo on GitHub.
Bootstrapping svelte-i18n
svelte-i18n is relatively easy to use out of the box. It just needs a wee bit of setup to get going.
Translation Message Dictionaries
svelte-i18n works with key/value translation message dictionaries, one for each language. The library takes these dictionaries in via an addMessages() function. We’ll get to that in a moment. Let’s first organize our project by placing our translation dictionaries in per-language files.
{

  "app_title": "Rebel Voter",

  "app_slogan": "Your favorite Star Wars characters"

}
{

  "app_title": "الناخب المتمرد",

  "app_slogan": "شخصياتك المفضلة في حرب النجوم"

}
I’m using English and Arabic as my two app languages here. Feel free to use any languages you want. I hear there are many.
Working with JSON in Svelte
At time of writing, if we want to work with JSON files in Svelte, we need to install the JSON Rollup plugin.
$ npm install --save-dev @rollup/plugin-json
We also need to configure the plugin via the rollup.config.js file.
// ...

import json from "@rollup/plugin-json";

// ...

export default {

  // ...

  plugins: [

    json(),

    svelte({

      // ...

    }),

    // ...

};

// ...
Now we can import our JSON translation files and give them to svelte-i18n’s addMessages(). We also need to call the library’s init() function to tell svelte-i18n which language our app should boot with.
<script>

  import { addMessages, init } from "svelte-i18n";

  // ...

  import en from "./lang/en.json";

  import ar from "./lang/ar.json";

  addMessages("en", en);

  addMessages("ar", ar);

  init({

    initialLocale: "en",

  });

</script>

<Header />

  <main role="main">

        <CharacterList />

  </main>

<Footer />
Basic Translation
Believe it or not, we’ve basically internationalized our app at this point. We can now pull in the _ (underscore) Svelte store from svelte-i18n to display translated messages instead of hard-coded ones.
<script>

  import { _ } from "svelte-i18n";

</script>

<header class="hero">

    <div class="hero-body">

        <div class="contiainer">

            <h1 class="title">{$_("app_title")}</h1>

            <h2 class="subtitle">{$_("app_slogan")}</h2>

        </div>

    </div>

</header>
We simply pass our translation message keys to the $_() store. The store will always use the messages from our active locale/language. $_() is, like any other Svelte store, reactive, meaning that it will force our components to re-render if the active locale or translation messages change.
If we run our app now, everything will look the same. However, if we switch the value of initialLocale in our App.svelte file to "ar", our app’s header will show our Arabic translations.

Our header in Arabic. That was easy.
Async Translation File Loading
Our current setup works great for smaller apps. If our translation files get significantly bigger, however, we might start taxing our users’ bandwidth (and patience, since our app may well slow down). This is because we’re currently bundling the translation files for all languages in our main app bundle.
We can, instead, load our translation files when they’re needed, asynchronously. svelte-i18n is supposed to have this functionality built-in. When I tried it, however, I hit a breaking bug. I logged the bug, and hopefully it will get sorted out soon. When it does, we’ll update this article to the built-in svelte-i18n async loading. For the time being, we can roll our own.
The first thing we have to do is make our translation files available for download by moving them to the public directory.
src/lang/en.json → public/lang/en.json

src/lang/ar.json → public/lang/ar.json
We can now write a wrapper around the svelte-i18n functions that downloads our files and configures svelte-i18n to use them.
import { get } from "svelte/store";

import {

  addMessages,

  locale,

  init,

  dictionary,

  _,

} from "svelte-i18n";

const MESSAGE_FILE_URL_TEMPLATE = "/lang/{locale}.json";

function setupI18n(options) {

  const { withLocale: locale_ } = options;

  // Initialize svelte-i18n

  init({ initialLocale: locale_ });

  // Don't re-download translation files

  if (!hasLoadedLocale(locale_)) {

    const messagesFileUrl =

      MESSAGE_FILE_URL_TEMPLATE.replace(

        "{locale}",

        locale_,

      );

	// Download translation file for given locale/language

    return loadJson(messagesFileUrl).then((messages) => {

      // Configure svelte-i18n to use the locale

      addMessages(locale_, messages);

      locale.set(locale_);

    });

  }

}

function loadJson(url) {

  return fetch(url).then((response) => response.json());

}

function hasLoadedLocale(locale) {

  // If the svelte-i18n dictionary has an entry for the

  // locale, then the locale has already been added

  return get(dictionary)[locale];

}

// We expose the svelte-i18n _ store so that our app has

// a single API for i18n

export { _, setupI18n };
Our module exposes a setupI18n(options: Object) function that accepts one option for the moment, withLocale: string. withLocale is just the language we want to set up by downloading its translation file and initializing svelte-i18n to use it.
We can now update our App.svelte component to use our new module.
<script>

  // Remove all code that references svelte-i18n

  // directly and use our wrapper library instead

  import { setupI18n } from "./services/i18n";

  // ...

   setupI18n({ withLocale: "ar" });

</script>

<!-- ... -->
Our app will behave largely as it did before. However, our translation files are no longer bundled in the main app bundle and are download asynchronously as they’re needed.
There’s a problem with the current state of our code. Our app may look fine on our development machine, but no translated messages will render for our users until the active locale’s translation file is downloaded.
🗒 Note » svelte-i18n is kind enough to warn us about scenarios like this by logging helpful messages in the browser console.
Rendering After the Locale Is Loaded
Let’s create a bit of a global state called isLocaleLoaded that we can use to check if the last translation file we asked for has finished loading. We can use this state to display loading messages to the user where appropriate.
import { get, derived, writable } from "svelte/store";

// ...

let _activeLocale;

// Internal store for tracking network

// loading state

const isDownloading = writable(false);

function setupI18n(options) {

  // ...

  if (!hasLoadedLocale(locale_)) {

    isDownloading.set(true);

    // ...

    return loadJson(messagesFileUrl).then((messages) => {

      _activeLocale = locale_;

      addMessages(locale_, messages);

      locale.set(locale_);

      isDownloading.set(false);

    });

  }

}

const isLocaleLoaded = derived(

  [isDownloading, dictionary],

  ([$isDownloading, $dictionary]) =>

    !$isDownloading &&

    $dictionary[_activeLocale] &&

    Object.keys($dictionary[_activeLocale]).length > 0,

);

// ...

export { _, setupI18n, isLocaleLoaded };
isLocaleLoaded is a derived Svelte store: it listens to changes in two other stores, our own isDownloading and svelte-i18n’s messages dictionary. When our active translation file has finished downloading, and svelte-i18n has loaded its translations into its messages dictionary, isLocaleLoaded === true.
Like any other Svelte store, we can use isLocaleLoaded with the $ prefix in our components. When we do so, Svelte will subscribe our component to the store and re-render it when the store updates. Svelte will also unsubscribe from the store when our component is destroyed.
Our new store, $isLocaleLoaded, is exactly what we need to solve our loading state issue.
<script>

  import { setupI18n, isLocaleLoaded } from "./services/i18n";

  // ...

  setupI18n({ withLocale: "ar" });

</script>

{#if $isLocaleLoaded}

  <Header />

  <main role="main">

    <CharacterList />

  </main>

  <Footer />

{:else}

  <p>Loading...</p>

{/if}

<!-- ... -->
This UX is a bit better, don’t you agree?
Getting and Setting the Active Locale
Retrieving, and manually setting, the active locale in svelte-i18n can be achieved by interacting with the locale Svelte store.
<script>

  import { locale } from "svelte-i18n";

  // React to locale changes

  locale.subscribe((newLocale) => {

    // Do something with newLocale, or not.

  });

  // Set the active locale to Canadian French

  locale.set("fr-CA");

</script>
Of course, we can use the $locale syntax in our components' markup to get easy reactivity.
<!-- Class will be .button.button-fr-CA when

     our locale is Canadian French -->

<div class="button button-{$locale}">

  {$_("subscribe")}

</div>
A Simple Language Switcher
Let’s do something useful with this getting and setting of the active locale. We often want to give the user a way to switch the active locale manually. We can add a LocaleSwitcher component to our app to achieve just that.
<script>

  import { createEventDispatcher } from "svelte";

  export let value;

  const dispatch = createEventDispatcher();

  function handleLocaleChange(event) {

    event.preventDefault();

    dispatch("locale-changed", event.target.value);

  }

</script>

<style>

  /* ... */

</style>

<div class="locale-selector">

  <div class="select">

    <select value={value} on:change={handleLocaleChange}>

      <option value="en">English</option>

      <option value="ar">عربي</option>

    </select>

  </div>

</div>
LocaleSelector doesn’t have any internal state. Instead, it exposes a value prop that corresponds to the active item in its internal <select> dropdown. LocaleSelector also fires a custom locale-changed event whenever the user selects a new locale via the dropdown.
We can now use LocaleSelector to update our active locale in App.svelte.
First, let’s expose svelte-i18n’s locale store through our own wrapper library.
import {

  addMessages,

  locale,

  init,

  dictionary,

  _,

} from "svelte-i18n";

// ...

export { _, setupI18n, isLocaleLoaded, locale };
This keeps our i18n API consistent. Let’s import locale and wire it up to our new LocaleSelector.
<script>

  import {

    setupI18n,

    isLocaleLoaded,

    locale,

  } from "./services/i18n";

  // ...

  import LocaleSelector from

    "./components/UI/LocaleSelector.svelte";

  // ...

</script>

{#if $isLocaleLoaded}

  <Header />

  <LocaleSelector

    value={$locale}

    on:locale-changed={e =>

      setupI18n({ withLocale: e.detail }) }

  />

  <!-- ... -->

{/if}

<!-- ... -->
Et voilà!
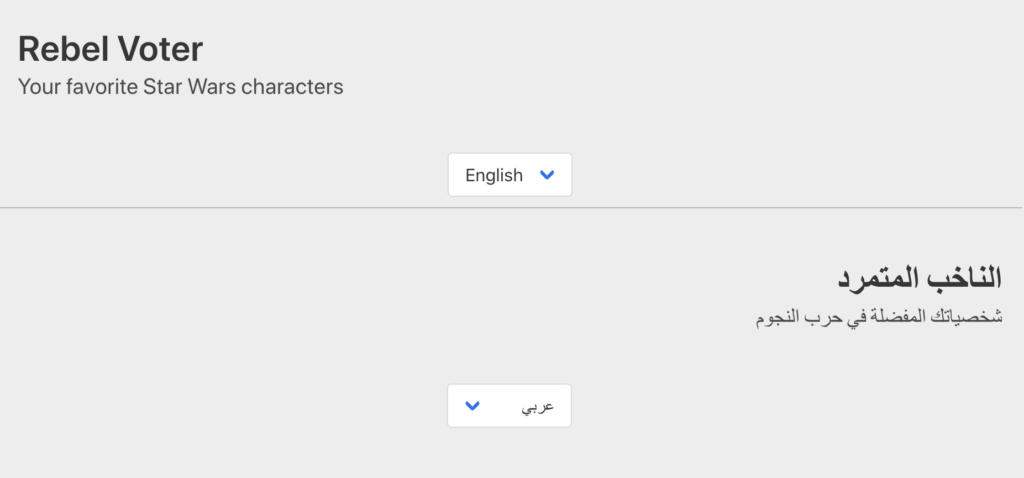
Our users can now select their own language
Automatically Detecting the User’s Locale
A language dropdown is often necessary, but we sometimes want to guess the user’s preferred language from their browser settings or some other means. svelte-i18n has a few built-in ways to do this. Let’s go with one of the most common: detecting through the browser.
Supported Locales
When we auto-detect the user’s locale, we’ll have to check whether we provide translations for that locale. If we don’t, we’ll have to show translations in a locale that we do support. Let’s configure this in a single source of truth.
// Locales our app supports

const locales = {

  en: "English",

  ar: "عربي",

};

// Locale to show when we don't support the

// requested locale

const fallbackLocale = "en";

export { locales, fallbackLocale };
Detection with Fallback
Now let’s update our custom i18n wrapper library so that it will auto-detect the user’s locale when we don’t explicitly give it one.
// ...

// options object is now an optional param

function setupI18n(options = {}) {

  // If we're given an explicit locale, we use

  // it. Otherwise, we attempt to auto-detect

  // the user's locale.

  const locale_ = supported(

    options.withLocale ||

      language(getLocaleFromNavigator()),

  );

  init({ initialLocale: locale_ });

  // ...

}

// ...

// Extract the "en" bit from fully qualified

// locales, like "en-US"

function language(locale) {

  return locale.replace("_", "-").split("-")[0];

}

// Check to see if the given locale is supported

// by our app. If it isn't, return our app's

// configured fallback locale.

function supported(locale) {

  if (Object.keys(locales).includes(locale)) {

    return locale;

  } else {

    return fallbackLocale;

  }

}

// ...
setupI18n can now be called without any parameters, which triggers auto-detection. We’re using svelte-i18n’s getLocaleFromNavigator() strategy, which retrieves the highest priority locale the user has configured in her browser options.
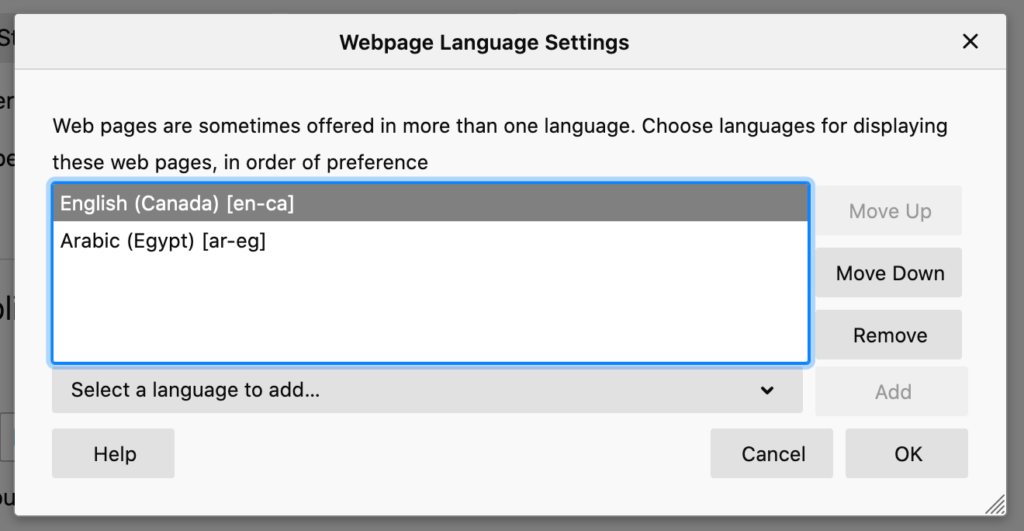
Firefox’s language options, also available in all modern browsers.
Let's use auto-detection in our App component.
<script>

// ...

   setupI18n();

</script>

{#if $isLocaleLoaded}

  <!-- ... -->

  <!-- This stays the same -->

  <LocaleSelector

    value={$locale}

    on:locale-changed={e =>

      setupI18n({ withLocale: e.detail }) }

  />

{:else}

  <!-- ... -->

{/if}

<!-- ... -->
We call setupI18n() with no params when initializing our App, causing svelte-i18n to auto-detect the user’s language on first load. If the user manually selects a language through our LocaleSelector, we call setupI18n({ withLocale: "fr" }), as we did before, to explicitly set the active locale.
Updating our Language Selector
Let’s refactor our LocaleSelector to #each over our configured supported locales, instead of using hard-coded magic values.
<script>

 import { locales } from "../../config/l10n";

 // ...

</script>

<!-- ... -->

<div class="locale-selector">

  <div class="select">

    <select value={value} on:change={handleLocaleChange}>

      {#each Object.keys(locales) as locale}

        <option value={locale}>{locales[locale]}</option>

      {/each}

    </select>

  </div>

</div>
Layout Direction: Left-to-Right and Right-to-Left
Depending on the direction of the active locale, left-to-right (LTR) or right-to-left (RTL), we often need to change the layout of our website. So it’s a good idea to be able to query for the active locale’s direction. We can easily add that functionality with another derived store.
import { get, derived, writable } from "svelte/store";

// ...

const dir = derived(locale, ($locale) =>

  $locale === "ar" ? "rtl" : "ltr",

);

// ...

export { _, setupI18n, isLocaleLoaded, locale, dir };
Localizing the Document Direction
We can now react to $dir in our app and set our HTML document’s direction accordingly.
<script>

  import {

    setupI18n,

    isLocaleLoaded,

    locale,

    dir,

  } from "./services/i18n";

  // ...

  setupI18n();

  $: if (document.dir !== $dir) {

    document.dir = $dir;

  }

</script>

<!-- ... -->
📖 Go deeper » The $: syntax declares a Svelte reactive statement, which you can read more about in the official tutorial.
Loading CSS Based on Direction
Our styles often vary significantly between LTR and RTL layouts. In the case of our demo app, we’re using the Bulma CSS framework. Bulma provides a default LTR version, and a special RTL version as well.
We have the Bulma CSS <link>ed as the first stylesheet in our document’s <head>.
<!DOCTYPE html>

<html lang="en">

  <head>

    <!-- ... -->

    <title>Svelte app</title>

    <link

      rel="stylesheet"

      href="https://cdn.jsdelivr.net/npm/bulma@0.9.0/css/bulma.min.css"

    />

    <!- ... -->

  </head>

  <body></body>

</html>
However, we want to be able to conditionally choose between bulma.min.css, and bulma-rtl.min.css, depending on the active locale’s direction. To do this, let’s set the file URL in the relevant <link> tag through JavaScript, instead of hard-coding it.
<!DOCTYPE html>

<html lang="en">

  <head>

    <!-- ... -->

    <title>Svelte app</title>

    <!-- We give our link tag an id so we can

         reference it in our JavaScript -->

    <link id="bulmaCssLink" rel="stylesheet" />

    <!- ... -->

  </head>

  <body></body>

</html>
🗒 Note » svelte-i18n automatically overrides the html[lang] attribute for us to match its active $locale.
Now let’s react to layout direction changes in App.svelte, and update the <link> URL to match the direction.
<script>

  import {

    setupI18n,

    isLocaleLoaded,

    locale,

    dir,

  } from "./services/i18n";

  import { bulmaUrl } from "./services/css";

  // ...

  setupI18n();

  $: if (document.dir !== $dir) {

    document.dir = $dir;

    document.getElementById("bulmaCssLink").href =

      bulmaUrl($dir);

  }

</script>

<!-- ... -->
We’re using a helper bumlaUrl() function to get the CSS file that matches the current direction.
function bulmaUrl(dir = "ltr") {

  const suffix = dir == "rtl" ? "-rtl" : "";

  return (

    "https://cdn.jsdelivr.net/npm/bulma@0.9.0/css/" +

    `bulma${suffix}.min.css`

  );

}

export { bulmaUrl };
Now when we switch languages, our app will react and reflow its layout to match the current language’s direction.
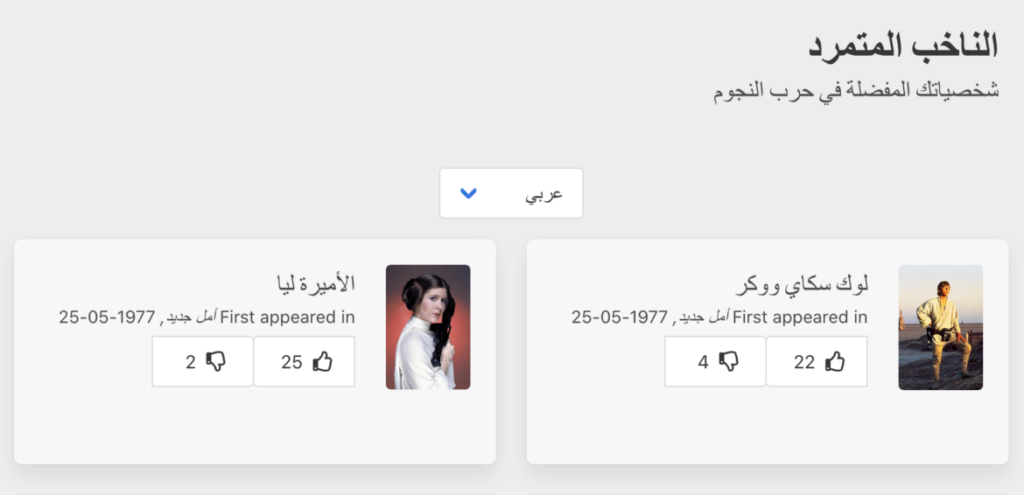
Arabic and several other languages are written in right-to-left
Localizing the Document Title
Our HTML document <title> often needs to be localized. We can do that easily via another reactive statement.
<script>

  import {

    setupI18n,

    isLocaleLoaded,

    locale,

    dir,

    _,

  } from "./services/i18n";

  // ...

  $: if ($isLocaleLoaded) {

    document.title = $_("app_title");

  }

</script>

<!-- ... -->
Translation Messages
We’ve scratched the surface of what’s possible with svelte-i18n’s translation messages. However, there’s a lot more that we can do them than we’ve seen so far.
In fact, svelte-i18n is a light Svelte wrapper around the FormatJS library, so it provides ICU message support.
🔗 Resource » Learn more about how svelte-i18n handles message formatting in the official formatting doc. And if you want an in-depth guide to the ICU message format, check out our article about it, The Missing Guide to the ICU Message Format. Note that it’s not necessary to understand the ICU format to use svelte-i18n. The format is quite intuitive.
Let’s take a look at our Header component again.
<script>

  import { _ } from "svelte-i18n";

</script>

<header class="hero">

    <div class="hero-body">

        <div class="container">

            <h1 class="title">{$_("app_title")}</h1>

            <h2 class="subtitle">{$_("app_slogan")}</h2>

        </div>

    </div>

</header>
You’ll remember that our $_() calls are keying into our translation message dictionaries.
{

  "app_title": "Rebel Voter",

  "app_slogan": "Your favorite Star Wars characters"

}
{

  "app_title": "الناخب المتمرد",

  "app_slogan": "شخصياتك المفضلة في حرب النجوم"

}
Nesting Translation Messages
We can also group the messages in our translation dictionaries.
// In our dictionary, we nest messages under a namespace

{

  "app": {

    "title": "Rebel Voter",

    "slogan": "Your favorite Star Wars characters"

  }

}

// In our component, we use dot notations to refine into

// the dictionary

<h1 class="title">{$_("app.title")}</h1>

<h2 class="subtitle">{$_("app.slogan")}</h2>
Interpolation
Oftentimes, we want to inject a dynamic value into a translation message. We can do that with {variable} syntax.
// In our dictionary

{

  "hello_user": "Hello, {name}!"

}

// In our component

<p>{$_("hello_user", {values: {name: "Adam"}})</p>
The second parameter to $_() is an options object, which can contain a values object itself. values holds name/value pairs where the values will replace their respective named placeholders at runtime.
✋🏽 Heads Up » If you declare an interpolated value, like {name}, in a translation message, you must provide a corresponding name/value pair when you call $_(). Otherwise, svelte-i18n will throw an error and your app will crash.
Using HTML in Translation Messages
Sometimes we want to have HTML within our translation messages. svelte-i18n doesn’t accommodate this out of the box. However, we can use interpolation and the unsafe @html Svelte directive to work around this.
In our Footer, for example, we may want to have links as part of our translation message. We can add interpolated values, like {phraseUrl}, to inject the URLs at runtime, while keeping the link HTML in the message itself.
{
// ...
"footer": "Companion to a <a href=\"{phraseUrl}\">Phrase blog</a> article. Made with <a href=\"{svelteUrl}\">Svelte</a> & <a href=\"{bulmaUrl}\">Bulma</a>."
}
{

  // ...

  "footer": "ملحق لمقال <a href=\"{phraseUrl}\">مدونة Phrase</a>. صنع بواسطة <a href=\"{svelteUrl}\">Svelte</a> و <a href=\"{bulmaUrl}\">Bulma</a>."

}
In our Footer component, we can then assign the URLs as normal values that we pass to $_().
<script>

  import { _ } from "../../services/i18n";

</script>

<!-- ... -->

<footer class="footer">

  <div class="content has-text-centered">

    <p>

      {@html $_("footer", { values: {

        phraseUrl: "https://phrase.com/blog",

        svelteUrl: "https://svelte.dev/",

        bulmaUrl: "https://bulma.io/s" }})}

    </p>

  </div>

</footer>
We’re using the special Svelte @html directive here. Normally, Svelte will escape HTML characters when we output them using {}. @html tells Svelte to skip the escaping step, and to just output HTML characters literally. This is what we want here, since we have <a> tags in our translation message.
✋🏽 Heads up » Be careful with @html, since Svelte will not sanitize output for XSS attacks when you use it.
Using Global CSS to Style In-Message Elements
In the code above, when we moved our <a> tags inside our translation message, we actually introduced a problem—we lost our custom CSS styles for our <a> tags.
This is because Svelte normally scopes a <style>’s selectors so that they don’t leak out of their associated component. To illustrate this, let’s take a look at our Footer component before we localized it.
<style>
.footer {
margin-top: 2rem;
background-color: #4a4a4a;
color: #f7f7f7;
}
a, a:active, a:hover, a:visited {
color: #65b6e3;
}
</style>
<footer class="footer">
<div class="content has-text-centered">
<p>
Companion to a
<a href="https://phrase.com/blog">Phrase blog
</a> article. Made with
<a href="https://svelte.dev/">Svelte</a> &
<a href="https://bulma.io/">Bulma</a>.
</p>
</div>
</footer>
The preceding code is actually compiled by Svelte to look something like this at runtime:
<!-- In our app's CSS bundle -->
<style>
.footer.svelte-ub7hie {
margin-top: 2rem;
background-color: #4a4a4a;
color: #f7f7f7;
}
a.svelte-ub7hie,
a.svelte-ub7hie:active,
a.svelte-ub7hie:hover,
a.svelte-ub7hie:visited {
color: #65b6e3;
}
</style>
<!-- Our rendered component -->
<footer class="footer svelte-ub7hie">
<div class="content has-text-centered">
<p>Companion to a
<a href="https://phrase.com/blog" class="svelte-ub7hie">Phrase blog</a> article. Made with <a href="https://svelte.dev/" class="svelte-ub7hie">Svelte</a> & <a href="https://bulma.io/" class="svelte-ub7hie">Bulma</a>
</p>
</div>
</footer>
Notice that Svelte gave our component’s styled HTML element’s a special hash, ub7hie. This scopes the <style> selectors we provided to our component. Most of the time this is great. However, if we move HTML out of our component and inject it dynamically at runtime, Svelte doesn’t add this hash to the injected HTML. So the a.svelte-ub7hie CSS rules won’t target the HTML inside our translation messages.
To deal with situations like this, Svelte provides :global syntax that we can use to remove the normally-injected hash from our CSS selectors.
<script>

  import { _ } from "../../services/i18n";

</script>

<style>

  .footer {

    margin-top: 2rem;

    background-color: #4a4a4a;

    color: #f7f7f7;

  }

  .footer :global(a),

  .footer :global(a:active),

  .footer :global(a:hover),

  .footer :global(a:visited) {

    color: #65b6e3;

  }

</style>

<footer class="footer">

  <div class="content has-text-centered">

    <p>

      {@html $_("footer", { values: {

        phraseUrl: "https://phrase.com/blog",

        svelteUrl: "https://svelte.dev/",

        bulmaUrl: "https://bulma.io/s" }})}

    </p>

  </div>

</footer>
With this in place, the scoping hash won’t be added to the style selectors. This means that our CSS will render as just .footer a. Our footer links will now match the selectors, and render exactly as they did before we localized the component.

Footers are often overlooked, and sometimes overcooked
Plurals
Different languages have different plural rules, so it’s nice when an i18n library is aware of these language specifics. Thankfully, svelte-i18n, being built in top of FormatJS, is very much aware of these plural rules.
Let’s use this capability to localize our VotingButton component. We’ll add a label that shows the total number of votes, upvotes + downvotes.
<script>

  // ...

  export let character;

  // ...

  let {

    upVoteCount,

    downVoteCount,

  } = character;

  $: totalVoteCount = upVoteCount + downVoteCount;

</script>

<!-- ... -->

<div class="box">

  <div class="columns is-mobile">

    <!-- ... -->

    <div class="column">

      <!-- ... -->

      <p class="is-size-7">{totalVoteCount} votes</p>

    </div>

  </div>

</div>
The total votes text is currently hard-coded. Let’s localize it. To add plurals to a translation message in svelte-i18n, we use the ICU message format.
{

  // ...

  "total_votes": "{n, plural, =0 {No votes yet} one {# vote} other {# votes}}",

  // ...

}
{

  // ...

  "total_votes": "{n, plural, =0 {لا توجد أصوات بعد} one {صوت #} two {صوتان} few {# أصوات} other {# صوت}}",

  // ...

}
Wrapped in {}, a plural expression declares the count variable n. We can reference n within our messages using the special # character.
Within the expression, we can have as many rule/message pairs as we want. There are named rules that are shared among languages. English, for example, has two named plural rules: one and other. Arabic has six plural rules. We don’t have to use all the plural rules for a language, but the other rule is always required.
If we want to target a specific count, like 13, we can use the =13 syntax in our plural expression. We’ve done this with =0 rule above. (We could have used the named zero rule in this case as well.)
Now that we’ve defined our plural messages, we can use them in our component.
<!-- ... -->

<div class="box">

  <div class="columns is-mobile">

    <!-- ... -->

    <div class="column">

      <!-- ... -->

      <p class="is-size-7">

        {$_("total_votes", {values: {n: totalVoteCount}})}

      </p>

    </div>

  </div>

</div>
This will cause svelte-i18n to output the matching plural message for our active locale at runtime. The n value is used for selection, and its value swaps in for the # character in our messages.

With very little work, we have locale-aware plurals
🔗 Resource » Learn more about ICU Message plural rules in The Missing Guide to the ICU Message Format.
Date Formatting
In our Character component, we’re currently displaying the release dates of Star Wars movies exactly like we’re getting them in the JSON data.

These aren’t the dates you’re looking for
We can localize these dates, and specify some formatting rules for them, using svelte-i18n’s reactive $date store.
Let’s expose the store in our wrapper library.
// ...

import {

  _,

  date,

  init,

  locale,

  dictionary,

  addMessages,

  getLocaleFromNavigator,

} from "svelte-i18n";

// ...

export {

  _,

  dir,

  date,

  locale,

  setupI18n,

  isLocaleLoaded,

};
Now let’s use the store in our Character component to localize our dates.
<script>

  import { _, date } from "../../services/i18n";

  // ...

</script>

<!-- ... -->

<div class="box">

  <div class="columns is-mobile">

    <!-- ... -->

    <div class="column">

      <!-- ... -->

      <p class="first-appeared">

        <!-- ... -->

        {$date(

          new Date(firstAppearedInFilm.releasedAt),

          { format: "medium" }

        )}

      </p>

      <!-- ... -->

    </div>

  </div>

</div>
$date accepts a JavaScript Date object, so we parse our date string into one before we pass it in. The store will localize the given date to the active locale, and react when the locale changes, forcing the date output to re-render. $date accepts a second, optional argument, which can contain one of preset formats. We’ve chosen the medium format here.
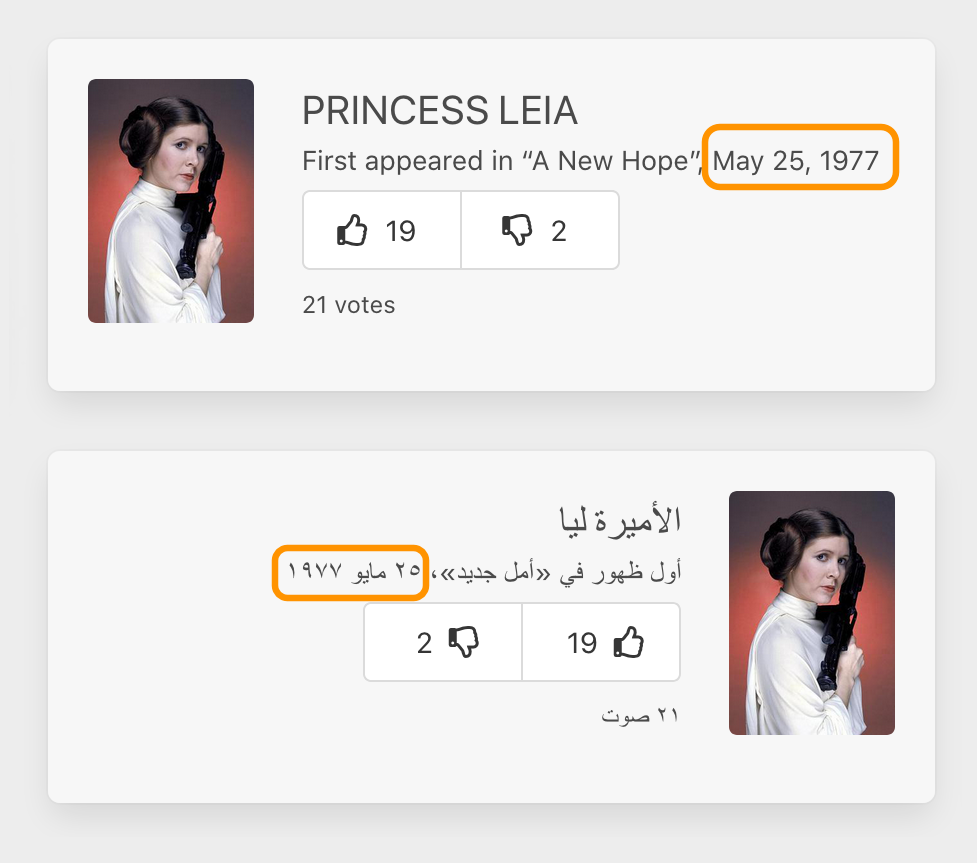
Localized dates with zero effort
With that in place, we’ve localized our entire demo app ;)

The English localization of Rebel Voter
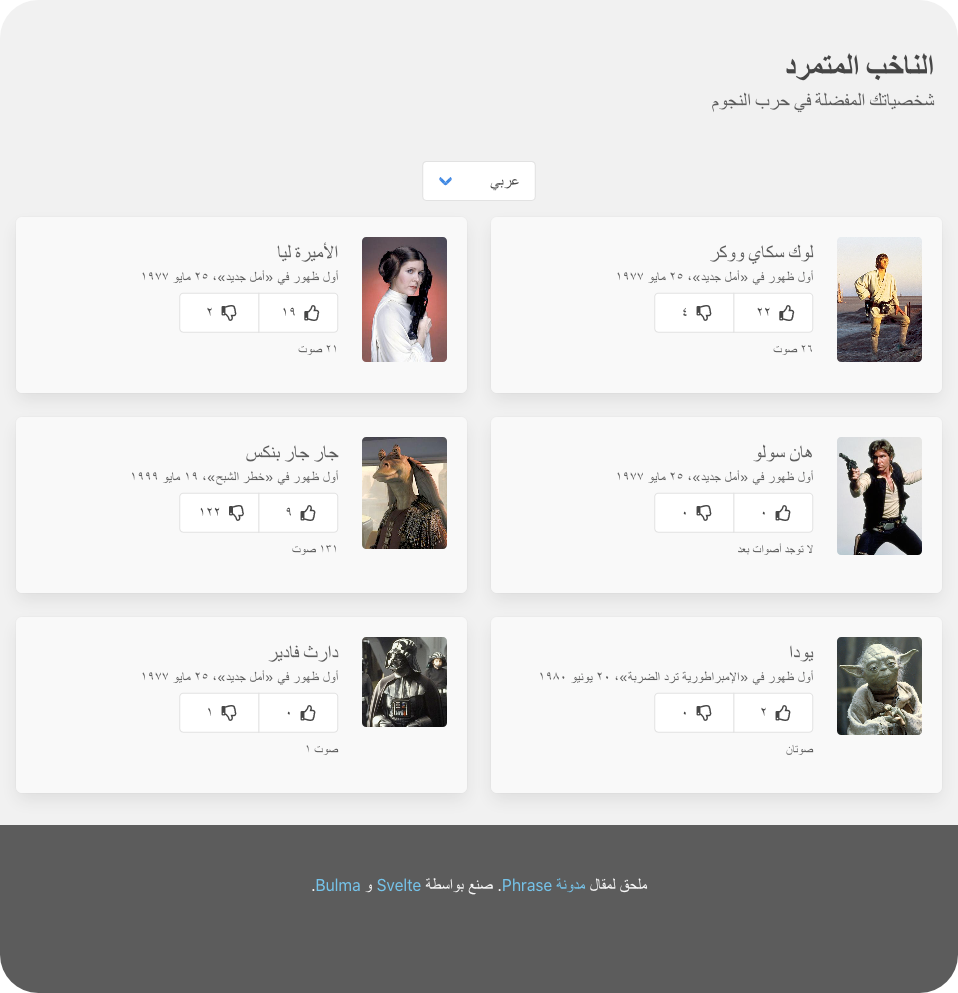
Rebel Voter in Arabic
Related Articles
We’ve got more JavaScript i18n/l10n intros and deep dives for your perusing pleasure.
- The Ultimate Guide to JavaScript Localization
- The Best JavaScript I18n Libraries
- A Human-friendly Way to Display Dates in TypeScript/JavaScript
- Roll Your Own JavaScript i18n Library with TypeScript – Part 1
- Roll Your Own JavaScript i18n Library with TypeScript – Part 2
Peace Out
We hope you’ve enjoyed this step-by-step guide to localizing a Svelte app with svelte-i18n. Looking to take your localization game to the next level? Check out Phrase. A professional localization solution, Phrase offers a flexible API, CLI, and a great web console for translators. Automatic GitHub, Bitbucket, and GitLab syncing allow seamless handover of translation files between you and your translation team. And over-the-air translations for mobile apps mean no more waiting for App Store reviews to push new translations through. Check out all of Phrase's features and see for yourself how they can help you take your apps global.


