
Weird, maturing, arguably expressive, and amazing, JavaScript is the most used programming language today. Being the language of the browser—and putting in work on the server with Node—JavaScript is all over today’s web stacks.
And with many multiplatform mobile frameworks, desktop wrappers, game engines, and even internet-of-things (IoT) frameworks, it’s really JavaScript’s world—we just live in it.
Now, of course, you’re here because you want to take all that 🔥 and learn to localize JavaScript applications, enabling them for a global audience. Have no fear: This guide will cover everything you need to know to start browser JavaScript localization.
Let’s rock && roll.
🔗 Resource » Get all the code accompanying this article from our GitHub repo.
🗒 Note » Internet Explorer (IE), with a 2.15% global market share, can be considered a legacy browser. For brevity, we’re omitting IE-specific solutions in this guide. If you are supporting IE, be sure to check whether the built-in JavaScript features we’re covering in this article require forks or polyfills.
How do I localize a web page with JavaScript?
While it might be tempting to grab an off-the-shelf internationalization (i18n) library for your localization needs—and that might in fact be the right choice for your project—you’ll find that vanilla JavaScript can do you just fine for smaller projects. Rolling your own will also give you a nice cookbook of i18n techniques that you can use with any library you choose.
🤿 Go deeper » Our article, What Is I18n: A Simple Definition of Internationalization, goes into more detail regarding what internationalization (i18n) and localization (l10n) are.
✋🏽 Heads up » If you’re building a traditional MPA (multi-page application), it’s often the case that a lot of the localization happens on the server itself. We’re only working with browser localization here. We’ve got you covered server-side, though, with a Node i18n tutorial and a full-stack JavaScript i18n guide.
Alright, let’s say we have a page we want to localize.
<!DOCTYPE html>
<html lang="en">
<head>
  <meta charset="UTF-8">
  <!-- ... -->
  <title>My Appy Apperson</title>
</head>
<body>
  <div class="container">
    <h1>My Appy Apperson</h1>
    <p>Welcome to my little spot on the interwebs!</p>
  </div>
  <script src="js/scripts.js"></script>
</body>
</html>

🔗 Resource » You can get all the code for the app we’re building in this section from the vanilla folder in our GitHub repo.
🔗 Resource » I’m using the skeletal Skeleton CSS library in case you were wondering.
This looks OK, but it isn’t exactly global-ready, is it? All the content is hard-coded in English. Let’s do some basic i18n here.
<!DOCTYPE html>
<html lang="en">
<head>
  <meta charset="UTF-8">
  <!-- ... -->
  <title>My Appy Apperson</title>
</head>
<body>
  <div class="container">
    <h1 data-i18n-key="app-title">My Appy Apperson</h1>
    <p data-i18n-key="lead">Welcome to my little spot on the interwebs!</p>
  </div>
  <script src="js/scripts.js"></script>
</body>
</html>
Note the data-i18n-key attributes we added to our text containers above. We can tap into these when the document loads and replace their text with translations. In fact, let’s do just that.
// The active locale
const locale = "en";
// We can have as many locales here as we want,
// and use any locales we want. We have English
// and Arabic as locales here as examples.
const translations = {
  // English translations
  "en": {
    "app-title": "My Appy Apperson",
    "lead": "Welcome to my little spot on the interwebs!",
  },
  // Arabic translations
  "ar": {
    "app-title": "تطبيقي المطبق",
    "lead": "أهلاً بك في مكاني الصغير على النت.",
  },
};
// When the page content is ready...
document.addEventListener("DOMContentLoaded", () => {
  document
    // Find all elements that have the key attribute
    .querySelectorAll("[data-i18n-key]")
    .forEach(translateElement);
});
// Replace the inner text of the given HTML element
// with the translation in the active locale,
// corresponding to the element's data-i18n-key
function translateElement(element) {
  const key = element.getAttribute("data-i18n-key");
  const translation = translations[locale][key];
  element.innerText = translation;
}
With this in place, let’s change the second line above to const locale = "ar"; and reload the page. When the DOMContentLoaded event is triggered, our page takes on our Arabic translations.

🗒 Note » "en" and "ar" above are the ISO 639-1 codes for English and Arabic, respectively. It’s standard to use ISO codes for languages and countries when localizing.
Loading translations asynchronously
We’re off to a good start with our i18n solution. However, adding locales and translations doesn’t scale well at the moment. As our app grows, we’d probably want to split our translations into separate, per-locale files. The translation file corresponding to the active locale could then be loaded without the cost of loading the other locales. We can implement this without too much effort.
First, let’s move our translations out of our main script and into JSON files, one for each locale we support.
{
  "app-title": "My Appy Apperson",
  "lead": "Welcome to my little spot on the interwebs!"
}
{
  "app-title": "تطبيقي المطبق",
  "lead": "أهلاً بك في مكاني الصغير على النت."
}
Now let’s rework our script so that we load the JSON files asynchronously when needed.
// The locale our app first shows
const defaultLocale = "en";
// The active locale
let locale;
// Gets filled with active locale translations
let translations = {};
// When the page content is ready...
document.addEventListener("DOMContentLoaded", () => {
  // Translate the page to the default locale
  setLocale(defaultLocale);
});
// Load translations for the given locale and translate
// the page to this locale
async function setLocale(newLocale) {
  if (newLocale === locale) return;
  const newTranslations =
    await fetchTranslationsFor(newLocale);
  locale = newLocale;
  translations = newTranslations;
  translatePage();
}
// Retrieve translations JSON object for the given
// locale over the network
async function fetchTranslationsFor(newLocale) {
  const response = await fetch(`/lang/${newLocale}.json`);
  return await response.json();
}
// Replace the inner text of each element that has a
// data-i18n-key attribute with the translation corresponding
// to its data-i18n-key
function translatePage() {
  document
    .querySelectorAll("[data-i18n-key]")
    .forEach(translateElement);
}
// Replace the inner text of the given HTML element
// with the translation in the active locale,
// corresponding to the element's data-i18n-key
function translateElement(element) {
  const key = element.getAttribute("data-i18n-key");
  const translation = translations[key];
  element.innerText = translation;
}
If we reload our page now, it looks exactly as it did before. However, under the hood, we’ve made our app a lot more scalable and maintainable.
🗒 Note » We use the handy Fetch API built into modern browsers to grab our JSON files via the network.
Creating a locale switcher
Our users have no way to make use of our awesomely asynchronous abilities as of yet. Shall we build a language-switching dropdown for them?
We’ll add a navbar and house our switcher in said navbar.
<!DOCTYPE html>
<html lang="en">
<head>
  <!-- ... -->
  <title>My Appy Apperson</title>
</head>
<body>
  <div class="container">
    <nav class="navbar">
      <div class="container">
        <ul class="navbar-list navbar-left">
          <!-- Nav links -->
        </ul>
        <div class="navbar-right">
          <!-- ... -->
          <select data-i18n-switcher class="locale-switcher">
            <option value="en">English</option>
            <option value="ar">Arabic (العربية)</option>
          </select>
        </div>
      </div>
    </nav>
    <h1 data-i18n-key="app-title">My Appy Apperson</h1>
    <p data-i18n-key="lead">Welcome to my little spot on the interwebs!</p>
  </div>
  <script src="js/scripts.js"></script>
</body>
</html>
A simple <select> can do us here. We can use a data-i18n-switcher attribute to hook into from our JavaScript and load the user-selected locale.
const defaultLocale = "en";
let locale;
// ...
// When the page content is ready...
document.addEventListener("DOMContentLoaded", () => {
  setLocale(defaultLocale);
  bindLocaleSwitcher(defaultLocale);
});
// ...
// Whenever the user selects a new locale, we
// load the locale's translations and update
// the page
function bindLocaleSwitcher(initialValue) {
  const switcher =
    document.querySelector("[data-i18n-switcher]");
  switcher.value = initialValue;
  switcher.onchange = (e) => {
    // Set the locale to the selected option[value]
    setLocale(e.target.value);
  };
}
The onchange event handler allows us to update our page’s translations according to the value of the selected <option>. Et voila. Our site visitor can now select their own locale.

📣 Shout out » to Hary Murdiono JS from the Noun Project for his translate icon.
Detecting the user’s preferred locales from the browser
Sometimes it’s a good idea to make a guess at the user’s preferred locale before giving them the option to manually select their own. Most people have their browser UI set in their language of choice, often the operating system language.
This browser UI language can be found in the navigator object, specifically the standard in navigator.language string.
The also-standard—if experimental as I write this—navigator.languages array should contain the UI language as its first entry, in addition to any languages the user has explicitly set in her browser’s preferred languages setting.
A little function that queries navigator.languages can get us going with browser locale detection.
/**
 * Retrieve user-preferred locales from the browser
 *
 * @param {boolean} languageCodeOnly - when true, returns
 * ["en", "fr"] instead of ["en-US", "fr-FR"]
 * @returns array | undefined
 */
function browserLocales(languageCodeOnly = false) {
  return navigator.languages.map((locale) =>
    languageCodeOnly ? locale.split("-")[0] : locale,
  );
}
Now let’s say the user has French (Canada) and Chinese (Simplified) in their browser settings.

In this case, browserLocales() will return ["fr-CA", "zh-CN"]. If we call browserLocales(true), we’ll get ["fr", "zh"] instead.
We can now use this new function to detect the user’s preferred locales when we first load our page.
// The locale our app first shows
const defaultLocale = "en";
const supportedLocales = ["en", "ar"];
// ...
document.addEventListener("DOMContentLoaded", () => {
  const initialLocale =
    supportedOrDefault(browserLocales(true));
  setLocale(initialLocale);
  bindLocaleSwitcher(initialLocale);
});
// ...
function isSupported(locale) {
  return supportedLocales.indexOf(locale) > -1;
}
// Retrieve the first locale we support from the given
// array, or return our default locale
function supportedOrDefault(locales) {
  return locales.find(isSupported) || defaultLocale;
}
// ...
function browserLocales(languageCodeOnly = false) {
  return navigator.languages.map((locale) =>
    languageCodeOnly ? locale.split("-")[0] : locale,
  );
}
Notice that we’ve introduced the concept of supportedLocales; these are the only locales that we have translations for. With them, we can fall back on our default locale if none of the user’s preferred locales are in our supported list.
Our app will now be translated to the first locale in the user’s preferred list, with an elegant fallback.
🤿 Go deeper » We cover locale detection on both the browser and server in depth in Detecting browser language preference with JavaScript.
Handling direction: right-to-left and right-to-left languages
Arabic, Hebrew, Persian, Urdu, and other languages use scripts that are written right to left. While left-to-right (LTR) languages far outnumber right-to-left (RTL) ones, it’s good to know how to support the latter. Luckily, a lot of the work is done by the browser here; we just have to set the <html dir> attribute in our pages.
// ...
// Load translations for the given locale and translate
// the page to this locale
async function setLocale(newLocale) {
  if (newLocale === locale) return;
  const newTranslations = await fetchTranslationsFor(
    newLocale,
  );
  locale = newLocale;
  translations = newTranslations;
  // Set <html dir> attribute
  document.documentElement.dir = dir(newLocale);
  // Not necessary for direction flow, but for good measure...
  document.documentElement.lang = newLocale;
  translatePage();
}
// ...
function dir(locale) {
  return locale === "ar" ? "rtl" : "ltr";
}
// ...
The <html dir> attribute can take the values "ltr" or "rtl". We provide this value via a very simple dir() function and set the attribute whenever we switch locales.

If we open our browser dev tools, we can see the <html> attributes updating as we switch languages
The browser will flow the document right to left automatically when we set <html dir="rtl">. However, any of our custom directional styles, e.g. margin-left: 20px, will require some flipped, RTL-specific CSS. That’s generally not too tricky; it’s just a bit out of the scope of this article.
🤿 Go deeper » Read more about localized CSS in How Do I Use a CSS File for Site Localization?
With our new code in place, we get an Arabic page Avicenna would approve!

Basic translation messages
Before we move on to more complex messages, like those with interpolated values and plurals, let’s briefly revisit how we’ve implemented our translation messages.
// In our HTML page
<h1 data-i18n-key="app-title">My Appy Apperson</h1>
// In our JavaScript
function translateElement(element) {
  const key = element.getAttribute("data-i18n-key");
  const translation = translations[key];
  element.innerText = translation;
}
// Given that we've loaded Arabic translations from ar.json:
translations = {
  "app-title": "تطبيقي المطبق",
};
translateElement(document.querySelector("[data-i18n-key='lead']"));
// renders to:
<h1 data-i18n-key="app-title">تطبيقي المطبق</h1>
That’s our translation system in a nutshell.
Interpolation
What happens when we have values that change at runtime and need to be injected into our messages? A common example is the name of the currently logged in user. We’ll have to update our translation system to handle cases like these.
<!DOCTYPE html>
<html lang="en">
<head>
  <!-- ... -->
</head>
<body>
  <div class="container">
    <!-- ... -->
    <h1 data-i18n-key="app-title">My Appy Apperson</h1>
    <p
      data-i18n-key="lead"
      data-i18n-opt='{"username": "Swoodesh"}'
    >
      Welcome to my little spot on the interwebs, {username}!
    </p>
  </div>
  <script src="js/scripts.js"></script>
</body>
</html>
We indicate placeholders for values we want to interpolate in our messages with the {variable} syntax. A new data-i18n-opt attribute stores interpolation key/value pairs in a valid JSON object.
Of course, we’ll need the placeholders in our language files.
{
  "lead": "Welcome to my little spot on the interwebs, {username}!",
}
{
  "lead": "أهلاً بك في مكاني الصغير على النت يا {username}.",
}
Now we can modify our translateElement function to handle interpolations.
// ...
function translateElement(element) {
  const key = element.getAttribute("data-i18n-key");
  const translation = translations[key];
  const options = JSON.parse(
    element.getAttribute("data-i18n-opt")
  );
  element.innerText = options
    ? interpolate(translation, options)
    : translation;
}
// Convert a message like "Hello, {name}" to "Hello, Chad"
// given the interpolations object {name: "Chad"}
function interpolate(message, interpolations) {
  return Object.keys(interpolations).reduce(
    (interpolated, key) =>
      interpolated.replace(
        new RegExp(`{\s*${key}\s*}`, "g"),
        interpolations[key],
      ),
    message,
  );
}
// ...
If we detect a data-i18n-opt attribute on the element given to translateElement(), we run its translated message through a new interpolate() function before updating the element. Now when we load our page, we see the message with the value interpolated.


Of course, having static values in the HTML is of limited use to us. Ideally, we want to be able to interpolate dynamically with JavaScript. That’s not too hard to code up.
Translating dynamically after page load
Let’s extract a general translation function from translateElement().
// ...
function translateElement(element) {
  const key = element.getAttribute("data-i18n-key");
  const options =
    JSON.parse(element.getAttribute("data-i18n-opt")) || {};
  element.innerText = translate(key, options);
}
function translate(key, interpolations = {}) {
  return interpolate(translations[key], interpolations);
}
// ...
We’ve simply extracted the code that handles retrieving a message in the active locale, with interpolations, to a new translate() function. We can now use this function to update an element’s translation after page load. Let’s say we want to update our lead copy after the user logs in. No big deal.
const element =
  document.querySelector("[data-i18n-key='lead']");
// Our new function is serving us well here
element.innerText =
  translate("lead", { username: "Maggie" });
// Store the updated interpolations in the document
// in case the element is re-rendered in the future
element.setAttribute(
  "data-i18n-opt",
  JSON.stringify({ username: "Maggie" }),
);

Now we can update elements’ translations at any time from our JavaScript.
Plurals
Not only do we often need to present different messages based on a counter—like “1 follower” or “20,000 followers”—different languages have different plural rules. While English has two plural forms: one and other, Arabic has six plural forms, for example. Historically, this meant that implementing plural support for front-end apps wasn’t very easy. Luckily, the now-standard Intl.PluralRules object makes quick work of handling plurals.
Let’s say we’re prolific penmen, and we want to let the world know how many articles we’ve indeed penned.
<p
  data-i18n-key="article-plural"
  data-i18n-opt='{"count": 122}'
>
  {count} articles written and counting.
</p>
Note that we’re using a convention of ending our plural message key with -plural. And, of course, we need a required count integer to select the correct plural form. Speaking of plural forms, let’s add them.
{
  // English has two plural forms
  "article-plural": {
    "one": "{count} article and counting",
    "other": "{count} articles and counting"
  }
}
{
  // Arabic has six plural forms
  "article-plural": {
    "zero": "لا توجد مقالات",
    "one": "مقال {count}",
    "two": "مقالان",
    "few": "{count} مقالات",
    "many": "{count} مقال",
    "other": "{count} مقال"
  }
}
Now let’s update our translate function to handle plural messages.
// ...
function translate(key, interpolations = {}) {
  const message = translations[key];
  if (key.endsWith("-plural")) {
    return interpolate(
      pluralFormFor(message, interpolations.count),
      interpolations,
    );
  }
  return interpolate(message, interpolations);
}
// ...
/*
  Given a forms object like
  {
    "zero": "No articles",
    "one": "One article",
    "other": "{count} articles"
  } and a count of 3, returns "3 articles"
*/
function pluralFormFor(forms, count) {
  const matchingForm = new Intl.PluralRules(locale).select(count);
  return forms[matchingForm];
}
// ...
The magic sauce here is the bit that reads new Intl.PluralRules(locale).select(...). The built-in Intl.PluralRules object, given a locale, knows that locale’s plural rules. For example, passing "ar" to the constructor, then calling select(5) on the returned object, returns "few"—the correct form here.
So with very few lines of code, we have fully globalized plural support 🙌

Number formatting
Three hundred thousand Euros is “€300,000.00” in English (United States), “300.000,00 €” in German (Germany), “€3,00,000.00” in Hindi (Indian)—notice the commas in that last one—and “٣٠٠٬٠٠٠٫٠٠ €” in Arabic (Egypt). How do we manage all these formats? No worries; another Intl object that’s part of the modern JavaScript standard is just what the doctor ordered. Intl.NumberFormat to the rescue!
Aspiring entrepreneurs that we are, say we want to start an NFT tracking website, with numerical stats, of course.
<p
  data-i18n-key="nyan-cat-price"
  data-i18n-opt='{"price": {"number" : 5300}}'
>
  Nyan Cat (Official) NFT: {price}
</p>
Our data-i18n-opt identifies the number value of the {price} in our locale files. We’ll be looking for that number key when we update our interpolation code in a second. First, let’s provide our message translations.
{
  "nyan-cat-price": "Nyan Cat (Official) NFT: {price}"
}
{
  "nyan-cat-price": "نيان كات NFT: {price}"
}
OK, let’s update our JavaScript to get this working.
// ...
const fullyQualifiedLocaleDefaults = {
  en: "en-US",
  ar: "ar-EG",
};
// ...
function interpolate(message, interpolations) {
  return Object.keys(interpolations).reduce(
    (interpolated, key) => {
      const value = formatNumber(interpolations[key]);
      return interpolated.replace(
        new RegExp(`{\s*${key}\s*}`, "g"),
        value,
      );
    },
    message,
  );
}
/*
  Given a value object like
  {
    "number" : 300000,
    "style": "currency",
    "currency": "EUR"
  } and that the active locale is "en", returns "€300,000.00"
*/
function formatNumber(value) {
  if (typeof value === "object" && value.number) {
    const { number, ...options } = value;
    return new Intl.NumberFormat(
      fullyQualifiedLocaleDefaults[locale],
      options,
    ).format(number);
  } else {
    return value;
  }
}
// ...
When we interpolate our translated messages, we pass the value we’re swapping in through a number formatter first, which uses the built-in Intl.NumberFormat object in turn. So, again, with very few lines of code, we have localized number formatting.


✋🏽 Heads up » It’s best to pass a fully qualified locale, like "en-US", to the Intl.NumberFormat() constructor. If we pass in just a language code, like "en", each browser will decide what region to use to format its numbers: One browser might default to "en-US" while another goes with "en-UK". So we use a fullyQualifiedLocaleDefaults map in our formatNumber() function to get consistent cross-browser formatting.
Because we’re passing all options defined in our interpolations object to the Intl.NumberFormat() constructor, we can make use of its myriad formatting options anytime we want.
<p
  data-i18n-key="nyan-cat-price"
  data-i18n-opt='{"price": {
    "number" : 5300,
    "style": "currency",
    "currency": "EUR"
  }}'
 >
  Nyan Cat (Official) NFT: {price}
</p>


🔗 Resource » You might enjoy our Concise Guide to Number Localization.
Date formatting
Similar to numbers, date formatting is region-specific. December 5, 2021, in its short form, is formatted as “12/5/2021” in English (US), and “5.12.2021” in German (Germany), for example. And again, a handy built-in Intl.DateTimeFormat object can handle the heavy lifting when it comes to date formatting.
Say we want to show the publishing date and time an article of ours.
<p
  data-i18n-key="publish-date"
  data-i18n-opt='{"publishDate": {
    "date": "2021-12-05 15:29:00"
  }}'
>
  Published on {publishDate}
</p>
The special date key in our data-i18n-opt object holds the datetime value we want to format. As usual, we’ll want to add our localized messages.
{
  // ...
  "publish-date": "Published {publishDate}"
}
{
  //...
  "publish-date": "نشر {publishDate}"
}
Now let’s update our translation system to look for date keys and format their values as localized dates.
// ...
function interpolate(message, interpolations) {
  return Object.keys(interpolations).reduce(
    (interpolated, key) => {
      const value = formatDate(
        formatNumber(interpolations[key]),
      );
      return interpolated.replace(
        new RegExp(`{\s*${key}\s*}`, "g"),
        value,
      );
    },
    message,
  );
}
// ...
/*
  Given a value object like
  {
    "date": "2021-12-05 15:29:00",
    "dateStyle": "long",
    "timeStyle": "short"
  } and that the current locale is en,
  returns "December 5, 2021 at 3:29 PM"
*/
function formatDate(value) {
  if (typeof value === "object" && value.date) {
    const { date, ...options } = value;
    const parsedDate =
      typeof date === "string" ? Date.parse(date) : date;
    return new Intl.DateTimeFormat(
      fullyQualifiedLocaleDefaults[locale],
      options,
    ).format(parsedDate);
  } else {
    return value;
  }
}
// ...
After passing our value object to our number formatter, we do another pass through our new date formatter. The date formatting options are passed through to the Intl.DateTimeFormat constructor, allowing for a decent amounting of flexibility in formatting dates.
✋🏽 Heads up » We use Date.parse() above to make sure that our string date is converted to a Date object, otherwise Intl.DateTimeFormat will throw an error.
With that, we have localized date formatting 👍
<p
  data-i18n-key="publish-date"
  data-i18n-opt='{"publishDate": {
    "date": "2021-12-05 15:29:00",
    "dateStyle": "long",
    "timeStyle": "short"
  }}'
>
  Published on {publishDate}
</p>


🤿 Go deeper » If you’re looking for more robust date formatting features, check out our rundown, What Is the Best JavaScript Date and Time Library? And our Human-friendly Way to Display Dates in TypeScript/JavaScript gets you formatting like “1 hour ago.”
🔗 Resource » If you’re using a declarative framework like React, you can take what we built in this section further and Roll Your Own JavaScript i18n Library with TypeScript.
What are some good JavaScript i18n libraries I can use?
We’ve covered rolling your own JavaScript i18n library above. However, it might make more sense for your project to adopt an off-the-shelf i18n library. There’s no shortage of options here, and in this article, we’ll walk through using the Polyglot, i18next, and Globalize libraries.
For an even wider selection, our popular articles can get you started on the right foot:
🗒 Note » If you happen to be working with legacy gettext, take a look at the Jed library.
How do I localize a web page with Polyglot?
Maintained by Airbnb, Polyglot is a small i18n library that solves some localization problems previously unsupported by JavaScript’s standard libraries. Most noteworthy among Polyglot’s features is its excellent handling of plurals. However, as we mentioned earlier, the now built-in Intl.PluralRules constructor is supported by all modern browsers and handily solves the pluralization problem. Still, the last version of this article featured Polyglot heavily, so we wanted to include this section in case some of our readers still want a Polyglot guide.
🗒 Note » Unless your use case requires Polyglot, check out the alternative i18next library in the next section before you land on a localization solution.
Without further ado, let’s get our little demo app localized with Airbnb’s localization library.
<!DOCTYPE html>
<html lang="en">
<head>
  <!-- ... -->
</head>
<body>
  <div class="container">
    <nav class="navbar">
      <div class="container">
        <ul class="navbar-list navbar-start">
          <li class="navbar-item">
            <a href="#" data-i18n-key="home" class="navbar-link">
              Home
            </a>
          </li>
          <li class="navbar-item">
            <a href="#" data-i18n-key="about" class="navbar-link">
              About
            </a>
          </li>
        </ul>
        <div class="navbar-end">
          <img src="img/translation-icon@2x.png" class="translation-icon" />
          <select data-i18n-switcher class="locale-switcher">
            <option value="en">English</option>
            <option value="ar">Arabic (العربية)</option>
          </select>
        </div>
      </div>
    </nav>
    <h1 data-i18n-key="app-title">With Polyglot</h1>
    <p data-i18n-key="lead" data-i18n-opt='{"username": "Cadence"}'>
      Welcome to my little spot on the interwebs, %{username}!
    </p>
    <p
      data-i18n-key="article-plural"
      data-i18n-opt='{"smart_count": 2}'
    >
      %{smart_count} articles written and counting.
    </p>
  </div>
</body>
</html>

Alright, let’s get to localizing this puppy with Polyglot.
Installation
Polyglot has some NPM dependencies, so it needs Node installed locally. With Node in place, we can initialize a package.json file for our demo app by running the following from the command line.
npm init -y
In order to bundle our NPM dependencies into a file browsers can read, we’ll install the Webpack module bundler as a dev dependency. The Webpack dev server will help us with hot-reloading our bundle in the browser as we develop.
npm install --save-dev webpack webpack-cli webpack-dev-server
Alright, now let’s install the star of the show: Polyglot.
npm install node-polyglot
An index.js will serve as the entry point for our app, and we can use it to smoke-test the library installations.
import Polyglot from "node-polyglot";
console.log({ Polyglot });
A start script in our package.json will ease our development by spinning up the dev server with our custom config.
{
  "name": "polyglot-demo",
  // ...
  "scripts": {
    "start": "webpack-dev-server --config webpack.config.js"
  },
  // ...
  "devDependencies": {
    "webpack": "^5.65.0",
    "webpack-cli": "^4.9.1",
    "webpack-dev-server": "^4.6.0"
  },
  "dependencies": {
    "node-polyglot": "^2.4.2"
  }
}
🗒 Note » We’re using a relatively simple webpack.config.js file to bundle our app and configure the dev server. Check it out from our Git repo on GitHub.
Now we’ll bring in our bundled JS right before the closing </body> tag in our public/index.html file.
<script src="./bundle.js"></script>
With this in place, we should be able to run our start script from the command line to initialize the Webpack dev server.
npm start
If all goes well, our app should automatically open in the browser. If we open our browser developer tools, we should see console logs similar to the following.

Basic translations
Let’s move on to basic Polyglot usage. Here’s the recipe:
// 1. Import the library
import Polyglot from "node-polyglot";
// 2. Create an instance
const polyglot = new Polyglot();
// 3. Add translation messages for the active locale
polyglot.extend({
  "app-title": "With Polyglot",
});
// 4. Use the messages to translate page elements
const element = document.querySelector(
  "[data-i18n-key='app-title']",
);
// polyglot.t() resolves a translation message given
// a key
element.innerHTML = polyglot.t("app-title");
To switch locales, we can reload the page with the new locale’s messages.
✋🏽 Heads up » We use innerHTML in this article to set element content. Be careful with this attribute in production; make sure to sanitize any HTML that you inject using innerHTML to avoid XSS (cross-site scripting) attacks.
import Polyglot from "node-polyglot";
const polyglot = new Polyglot();
polyglot.extend({
  "app-title": "مع بوليجلوت",
});
const element = document.querySelector(
  "[data-i18n-key='app-title']",
);
element.innerHTML = polyglot.t("app-title");
Async translation file loading
While the above works fine for the tiniest apps, we could do a bit better by splitting out our translations messages into separate, per-locale JSON files.
{
  "app-title": "With Polyglot",
  "home": "Home",
  "about": "About"
}
{
  "app-title": "مع بوليجلوت",
  "home": "الرئيسية",
  "about": "نبذة عنا"
}
Now we can configure a default locale for our app and load its translations from the network when our page loads.
import Polyglot from "node-polyglot";
const defaultLocale = "en";
const polyglot = new Polyglot();
// Load translation messages from the network
async function loadTranslations(locale) {
  return await fetch(`/lang/${locale}.json`).then(
    (response) => response.json(),
  );
}
// Translate all elements on the page that have our custom
// data-i18n-key attribute
function translatePage() {
  const translatableElements = document.querySelectorAll(
    "[data-i18n-key]",
  );
  translatableElements.forEach((el) => {
    const key = el.getAttribute("data-i18n-key");
    el.innerHTML = polyglot.t(key);
  });
}
// Init
(async function () {
  const translations = await loadTranslations(
    defaultLocale,
  );
  polyglot.extend(translations);
  translatePage();
})();
With that, we get the following render in the browser.

Our navigation menu items and main title are translated into our default locale, English. However, notice the polyglot errors in the console, and how missing keys (lead and article-plural) display the value of the keys themselves. We’ll add translations for these keys in a minute to rectify this.
If we change defaultLocale to "ar", we get the following render.

Language switcher
Our app is now more scalable since only the active locale’s translations are loaded. Let’s use this to build a language switcher. We already have the HTML for the switcher in our app:
<!DOCTYPE html>
<html lang="en">
<head>
  <!-- ... -->
</head>
<body>
  <div class="container">
    <nav class="navbar">
      <div class="container">
		<!-- ... -->
        <div class="navbar-end">
          <img src="img/translation-icon@2x.png" class="translation-icon" />
          <select data-i18n-switcher class="locale-switcher">
            <option value="en">English</option>
            <option value="ar">Arabic (العربية)</option>
          </select>
        </div>
      </div>
    </nav>
    <!-- ... -->
  <script src="./bundle.js"></script>
</body>
</html>
Hooking into this <select> element from our JavaScript allows us to add our locale-switching behavior.
import Polyglot from "node-polyglot";
const defaultLocale = "en";
const polyglot = new Polyglot();
// ...
// Load translations for the given locale and translate
// page elements for this locale
async function loadAndTranslate(locale) {
  const translations = await loadTranslations(locale);
  polyglot.replace(translations);
  translatePage();
}
// Whenever the user switches the active locale, load
// this locale's messages into the page
function bindLocaleSwitcher(initialValue) {
  const switcher = document.querySelector(
    "[data-i18n-switcher]",
  );
  switcher.value = initialValue;
  switcher.onchange = (e) => {
    loadAndTranslate(e.target.value);
  };
}
// Init
loadAndTranslate(defaultLocale);
bindLocaleSwitcher(defaultLocale);
We’ve refactored the code that loads our translation messages and translates our page elements to a reusable loadAndTranslate() function. A new bindLocaleSwitcher() function hooks into the language switcher <select>; it uses loadAndTranslate() to refresh our translations based on the user-select locale.
✋🏽 Heads up » polyglot.extend() will add translation messages to the ones already loaded, so we use polyglot.replace() instead to ensure that we only load the active locale translations.
This should get our swanky locale switcher up and running.

Interpolation
Our lead text includes the currently logged-in user’s name (mocked, of course). This kind of interpolated value is handled by Polyglot using a special %{variable} syntax by default.
🗒 Note » You can change the characters that denote interpolate values using the interpolation option passed to the Polyglot constructor.
<!-- ... -->
    <p data-i18n-key="lead" data-i18n-opt='{"username": "Cadence"}'>
      Welcome to my little spot on the interwebs, %{username}!
    </p>
<!-- ... -->
{
  // ...
  "lead": "Welcome to my little spot on the interwebs, %{username}!"
}
{
  // ...
  "lead": "أهلاً بك في مكاني الصغير على النت يا %{username}."
}
A few lines of code can be added to our translatePage() function to accommodate interpolations.
// ...
// Translate all elements on the page that have a
// data-i18n-key attribute
function translatePage() {
  const translatableElements = document.querySelectorAll(
    "[data-i18n-key]",
  );
  translatableElements.forEach((el) => {
    const key = el.getAttribute("data-i18n-key");
    // Extract interpolation key/values from the HTML and
    // parse them to JSON
    const interpolations = el.getAttribute("data-i18n-opt");
    const parsedInterpolations = interpolations
      ? JSON.parse(interpolations)
      : {};
    // Pass the parsed interpolations to polyglot.t(),
    // which automatically handles substitutions
    el.innerHTML = polyglot.t(key, parsedInterpolations);
  });
}
// ...
With the above code in place, we now have our interpolated lead paragraph rendered in the active locale.


Plurals
Say we want to show the currently logged in user how many messages he or she has received: “You have 1 new message” or “You have 12 new messages,” for example. Polyglot handles plurals like this well. We just need to add our translation messages with the special interpolated number value, smart_count.
<!-- ... -->
    <p
      data-i18n-key="new-messages"
      data-i18n-opt='{"smart_count": 12}'
    >
      You have %{smart_count} new messages"
    </p>
<!-- ... -->
Polyglot uses smart_count to select the correct plural form from a translation message depending on the active locale. Plural forms are separated using four pipes |||| in our messages. English has one and other plural forms, and we need to provide them in order:
{
  // ...
  "new-messages": "You have %{smart_count} new message |||| You have %{smart_count} new messages"
}
Arabic has six plural forms, and we add them to our messages much the same way.
{
  // ...
  "new-messages": "لا توجد لديك رسائل جديدة |||| لديك رسالة جديدة |||| لديك رسالتان جداد |||| لديك %{smart_count} رسائل جديدة |||| لديك %{smart_count} رسالة جديدة |||| لديك %{smart_count} رسالة جديدة"
}
🗒 Note » Check out the How do I localize a web page with JavaScript? ➞ Plurals section for more details on plural forms.
One more thing: by default, Polyglot is blissfully unaware of the active locale, so it won’t know the plural rules of the active locale unless we explicitly specify the locale on load.
// ...
// Load translations for the given locale and translate
// page elements for this locale
async function loadAndTranslate(locale) {
  const translations = await loadTranslations(locale);
  polyglot.locale(locale);
  polyglot.replace(translations);
  translatePage();
}
// ...
And that’s it! We now have advanced plural support in our app.


🔗 Resource » Get all the code for our Polyglot app from our GitHub repo.
🔗 Resource » The official Polyglot documentation is as tight as the library itself.
How do I localize a web page with i18next?
As I write this, i18next is one of the most popular JavaScript i18n libraries. The “learn once, [use] everywhere” library works standalone, and with a slew of JavaScript frameworks. A rich plugin ecosystem means that you’re often an NPM install away from solving a common i18n problem. All this makes i18next an easy recommendation.
Alright, enough jibber-jabber. Let’s revisit our little demo and localize it with i18next.
<!DOCTYPE html>
<html lang="en">
<head>
  <!-- ... -->
</head>
<body>
  <div class="container">
    <nav class="navbar">
      <div class="container">
        <ul class="navbar-list navbar-start">
          <li class="navbar-item">
            <a href="#" data-i18n-key="home" class="navbar-link">
              Home
            </a>
          </li>
          <li class="navbar-item">
            <a href="#" data-i18n-key="about" class="navbar-link">
              About
            </a>
          </li>
        </ul>
        <div class="navbar-end">
          <img src="img/translation-icon@2x.png" class="translation-icon" />
          <select data-i18n-switcher class="locale-switcher">
            <option value="en">English</option>
            <option value="ar">Arabic (العربية)</option>
          </select>
        </div>
      </div>
    </nav>
    <h1 data-i18n-key="app-title">With i18next</h1>
    <p data-i18n-key="lead" data-i18n-opt='{"username": "Zelda"}'>
      Welcome to my little spot on the interwebs, {{username}}!
    </p>
    <p data-i18n-key="new-messages" data-i18n-opt='{"count": 12}'>
      You have {{count}} new messages
    </p>
  </div>
  <script src="./bundle.js"></script>
</body>
</html>
Not much new here. Let’s get localizing.
Installation
We’ll use Node and its NPM package manager to install i18next. First, let’s create a package.json file to track our project dependencies and NPM scripts by running the following from the command line.
npm init -y
The Webpack bundler will allow us to package up i18next, its plugins, and our custom JavaScript and serve them in one file to the browser. Let’s install Webpack, along with its development server, which has a handy hot reload feature that eases development:
npm install --save-dev webpack webpack-cli webpack-dev-server
We can’t forget our i18n library, of course:
npm install i18next
A handy npm start script can shortcut spinning up our dev server.
{
  "name": "i18next-demo",
  //...
  "scripts": {
    "start": "webpack-dev-server --config webpack.config.js"
  },
  // ...
  "devDependencies": {
    "webpack": "^5.65.0",
    "webpack-cli": "^4.9.1",
    "webpack-dev-server": "^4.6.0"
  },
  "dependencies": {
    "i18next": "^21.6.3"
  }
}
🗒 Note » We’re using a relatively simple webpack.config.js file to bundle our app and configure the dev server. Check it out from our Git repo on GitHub.
Let’s create an index.js entry point for our app and smoke-test i18next to make sure it’s installed correctly.
import i18next from "i18next";
console.log({ i18next });
Now when we run npm start from the command line, we should see the Webpack dev server start up and load our app in our browser automatically.

Basic translation messages
i18next is flexible in how it accepts translation messages. We do most of our configuration as we initialize the library with i18next.init(...). The most basic setup has us inlining our translation messages under a resources option.
import i18next from "i18next";
i18next.init({
  // The active locale
  lng: "en",
  // Enabled useful console output when developing
  debug: true,
  // Translation messages, keyed by locale code
  resources: {
    en: {
      // By default, i18next expects messages under the
      // "translation" namespace
      translation: {
        "app-title": "With Polyglot",
        home: "Home",
        about: "About",
      },
    },
    ar: {
      translation: {
        "app-title": "مع بوليجلوت",
        home: "الرئيسية",
        about: "نبذة عنا",
      },
    },
  },
});
// Translate page elements
const translatableElements = document.querySelectorAll(
  "[data-i18n-key]",
);
translatableElements.forEach((el) => {
  const key = el.getAttribute("data-i18n-key");
  el.innerHTML = i18next.t(key);
});
With the above, we should see no changes when our app reloads in the browser. However, if we change lng to "ar", we see the following Arabic translations.

🗒 Note » The debug: true option enables very handy console logs in the browser. Note the missing key messages above, for example.
Async translation loading
Future-looking devs that we are, let’s make our app more scalable by splitting our translations up into separate files, one per locale.
{
  "app-title": "With i18next",
  "home": "Home",
  "about": "About"
}
{
  "app-title": "مع آي أيتين نيكست",
  "home": "الرئيسية",
  "about": "نبذة عنا"
}
i18next is mature and has a lot of bases covered; so we don’t need to write our own code to load translation files from the network. The official HTTP backend plugs into the library and does all the work for us. Let’s install it.
npm install i18next-http-backend
We can now pull the backend into our index.js and use() it as we initialize i18next.
import i18next from "i18next";
import HttpApi from "i18next-http-backend";
// We make the function async so we can await
// the translation file as it pipes down the
// network
async function initI18next() {
  // We use() the backend and await it to load
  // the translations from the network
  await i18next.use(HttpApi).init({
    lng: "en",
    debug: true,
    // Remove inlined `resources`
    // Disable loading of dev locale
    fallbackLng: false,
    // Configure Http backend
    backend: {
      loadPath: "/lang/{{lng}}.json",
    },
  });
}
// Quick refactor of the page translation code
// to a function
function translatePageElements() {
  const translatableElements = document.querySelectorAll(
    "[data-i18n-key]",
  );
  translatableElements.forEach((el) => {
    const key = el.getAttribute("data-i18n-key");
    el.innerHTML = i18next.t(key);
  });
}
// Init
(async function () {
  await initI18next();
  translatePageElements();
})();
The backend.loadPath option overrides the backend’s default translation file path. A special {{lng}} placeholder is replaced with the active locale. For example, when our app first loads, the backend will look for /lang/en.json, since we specified the default locale as en earlier in our config.
That’s about it. Our translations now load from the network instead of being inlined in our code.
Supported locales and fallback
We often want to specify a list of locales that our app supports and a locale to fall back on when a translation is missing. We can use i18next’s supportLngs and fallbackLng config options, respectively, to accomplish this.
// ...
async function initI18next() {
  await i18next.use(HttpApi).init({
    lng: "en",
    debug: true,
    supportedLngs: ["en", "ar"],
    fallbackLng: "en",
    backend: {
      loadPath: "/lang/{{lng}}.json",
    },
  });
}
// ...
✋🏽 Heads up » The fallback locale will always be loaded, regardless of the active locale.
Automatically detecting the user’s locale
It’s common to want to detect the user’s browser settings and use her or his locale if we support it. This is normally a bit tricky, but again i18next has an official plugin that can sort us out quickly here. We can start by installing it.
npm install i18next-browser-languagedetector
Much like the HTTP backend, we import the detector plugin and use() it as we initialize.
import i18next from "i18next";
import HttpApi from "i18next-http-backend";
import LanguageDetector from "i18next-browser-languagedetector";
async function initI18next() {
  await i18next
    .use(HttpApi)
    .use(LanguageDetector)
    .init({
      debug: true,
      supportedLngs: ["en", "ar"],
      fallbackLng: "en",
      // Allow "en" to be used for
      // "en-US", "en-CA", etc.
      nonExplicitSupportedLngs: true,
      backend: {
        loadPath: "/lang/{{lng}}.json",
      },
    });
}
// ...
And that’s all it takes to get solid automatic locale detection with i18next.
🔗 Resource » You might be wondering what criteria the locale detector is using to determine the user’s locale. We cover this in detail in our Guide to React Localization with i18next .
✋🏽 Heads up » The locale detector will store the locale it detects in the browser’s locale storage by default, and use that value when the user visits our site again.
🤿 Go deeper » We have a dedicated guide to Detecting browser language preference with JavaScript, which might pique your interest.
Language switcher
Automatic locale detection is good and all, but we often need to have a UI for our users to explicitly set their language of choice. We already have the markup for a locale switcher set up.
<!DOCTYPE html>
<html lang="en">
<head>
  <!-- ... -->
</head>
<body>
  <div class="container">
    <nav class="navbar">
      <div class="container">
      <!-- ... -->
        <div class="navbar-end">
          <img src="img/translation-icon@2x.png" class="translation-icon" /   >
          <select data-i18n-switcher class="locale-switcher">
            <option value="en">English</option>
            <option value="ar">Arabic (العربية)</option>
          </select>
        </div>
      </div>
    </nav>
    <!-- ... -->
  </div>
  <script src="./bundle.js"></script>
</body>
</html>
Let’s hook into this HTML and use the i18next.changeLanguage() function to set our active locale to the one the user chooses. After the locale’s messages are loaded in, we can chain translatePageElements to re-render the page with updated translations.
// ...
function bindLocaleSwitcher(initialValue) {
  const switcher = document.querySelector(
    "[data-i18n-switcher]",
  );
  switcher.value = initialValue;
  switcher.onchange = (e) => {
    i18next
      .changeLanguage(e.target.value)
      .then(translatePageElements);
  };
}
// Init
(async function () {
  await initI18next();
  translatePageElements();
  bindLocaleSwitcher(i18next.resolvedLanguage);
})();
✋🏽 Heads up » The locale detector could have detected a locale we don’t support, and that value will exist in i18next.language. We use i18next.resolvedLanguage above to ensure that we use the active, supported locale when initializing our locale switcher.
Et voila! A language-switching UI:

Interpolation
By default, i18next uses a {{variable}} syntax to denote interpolated values in translation messages.
<!-- ... -->
    <p data-i18n-key="lead" data-i18n-opt='{"username": "Zelda"}'>
      Welcome to my little spot on the interwebs, {{username}}!
    </p>
<!-- ... -->
{
  // ...
  "lead": "Welcome to my little spot on the interwebs, {{username}}!"
}
{
  // ...
  "lead": "أهلاً بك في مكاني الصغير على النت يا {{username}}."
}
We can pull these dynamic values from our HTML attributes and feed them to i18next.t(), which handles the interpolation for us.
// ...
function translatePageElements() {
  const translatableElements = document.querySelectorAll(
    "[data-i18n-key]",
  );
  translatableElements.forEach((el) => {
    const key = el.getAttribute("data-i18n-key");
    const interpolations = el.getAttribute("data-i18n-opt");
    const parsedInterpolations = interpolations
      ? JSON.parse(interpolations)
      : {};
    el.innerHTML = i18next.t(key, parsedInterpolations);
  });
}
// ...
With that in place, we get our dynamic values replaced in our messages.


Plurals
Under the hood, i18next tries to use the standard Intl.PluralRules to handle plurals. A special interpolated count variable directs the plural form choice, depending on the active locale.
<!-- ... -->
    <p data-i18n-key="new-messages" data-i18n-opt='{"count": 12}'>
      You have {{count}} new messages
    </p>
<!-- ... -->
i18next uses a message_form convention for plural message keys. For example, to handle the one and other forms in an English new-messages translation, we can specify the following.
{
  // ...
  "new-messages_one": "You have {{count}} new message",
  "new-messages_other": "You have {{count}} new messages"
}
Arabic has six plural forms, and we can specify them much the same way.
{
  // ...
  "new-messages_zero": "لا توجد لديك رسائل جديدة",
  "new-messages_one": "لديك رسالة جديدة",
  "new-messages_two": "لديك رسالتان جداد",
  "new-messages_few": "لديك {{count}} رسائل جديدة",
  "new-messages_many": "لديك {{count}} رسالة جديدة",
  "new-messages_other": "لديك {{count}} رسالة جديدة"
}
With little effort, our app can display plural messages.


🔗 Resource » Get all the code we’ve covered above from our GitHub repo.
How do I localize a React, Angular, or Vue app?
In recent years, declarative frameworks like React, Angular, Vue.js, and others have taken the front-end web world by storm. We cover these frameworks extensively on our blog. As React is the most popular among the heavyweights, we’ll provide a quick guide to localizing React apps in a moment here. And for other declarative frameworks, check out our following in-depth articles.
Angular localization articles
- Translating Angular Applications with the Built-In I18n Module
- What Is the Best Angular Library for Internationalization?
- Angular L10n with I18next
- Angular 10 Tutorial on Localization with Transloco
- Full-Stack I18n with Angular and .NET Core
Vue.js localization articles
- The Ultimate Vue 3 Localization Guide
- Deep Dive: Vue Translation with vue-i18next
- The Only Nuxt.js Tutorial on I18n You’ll Ever Need (Vue-based)
Localization articles for other frameworks
We realize that some of our readers might be using Svelte, Next, or another framework, so we always write about the latest and greatest. Here’s a selection of guides to localizing the app you’re building in your favorite framework:
- How to Localize a Svelte App with svelte-i18n
- A Step-by-Step Guide to Svelte Localization with svelte-i18n v3
- Localizing SolidJS Applications with I18next
- Localizing Mithril Applications
- How to Localize Apps Using the Aurelia Framework
- Localizing StimulusJS Applications With I18next
- Full-Stack JavaScript I18n Step by Step (using Next.js and Sails.js)
🗒 Note » On a more specific note: If you’re going to be working with international phone numbers, make sure you take a look at the libphonenumber library. It’s framework-agnostic!
How do I localize a React App with i18next?
As promised, we’ll blast through a quick guide to localizing our React apps with the i18next library. We’ve covered i18next earlier in this article, so we’ll focus on its React integration here.
🤿 Go deeper » A Guide to React Localization with i18next goes broader and deeper than our brief overview here.
First, we’ll take our trusty demo app and break it up into React components.
import "./App.css";
import Navbar from "./layout/Navbar";
function App() {
  return (
    <div className="container">
      <Navbar />
      <h1>React i18n</h1>
      <p>
        Welcome to my little spot on the interwebs, user
      </p>
      <p>You have count new messages</p>
    </div>
  );
}
export default App;
import LocaleSwitcher from "../features/LocaleSwitcher";
function Navbar() {
  return (
    <nav className="navbar">
      <div className="container">
        <ul className="navbar-list navbar-start">
          <li className="navbar-item">
            <a href="#" className="navbar-link">
              Home
            </a>
          </li>
          <li className="navbar-item">
            <a href="#" className="navbar-link">
              About
            </a>
          </li>
        </ul>
        <div className="navbar-end">
          <LocaleSwitcher />
        </div>
      </div>
    </nav>
  );
}
export default Navbar;
function LocaleSwitcher() {
  return (
    <>
      <img
        alt="Translation icon"
        src="img/translation-icon@2x.png"
        className="translation-icon"
      />
      <select className="locale-switcher">
        <option value="en">English</option>
        <option value="ar">Arabic (العربية)</option>
      </select>
    </>
  );
}
export default LocaleSwitcher;
The locale switcher does little at present time, but we’ll remedy that soon. For now, we have a solid starter to localize.

Library installation
In addition to i18next, we’ll grab the official react-i18next integration framework, which makes using i18next with React a breeze. From the project root, let’s run the following in the command line to install the libraries.
npm install i18next react-i18next
Next, let’s initialize i18next, use()ing the React integration as we do. The most basic way to provide translations to i18next is using the resources option when initializing.
import i18next from "i18next";
import { initReactI18next } from "react-i18next";
i18next.use(initReactI18next).init({
  resources: {
    en: {
      translation: {
        "app-title": "With React",
      },
    },
    ar: {
      translation: {
        "app-title": "مع ريأكت",
      },
    },
  },
  lng: "en",
  debug: true,
  interpolation: {
    escapeValue: false,
  },
});
export default i18next;
🗒 Note » We set the interpolation.escapeValue to false to disable the default escaping that i18next does for protection against XSS attacks, since React does that for us anyway.
Let’s pull our module into our root index.js so we can initialize i18next when our app loads.
import React from "react";
import ReactDOM from "react-dom";
import "./lib/skeleton/normalize.css";
import "./lib/skeleton/skeleton.css";
import "./services/i18n";
import App from "./App";
import reportWebVitals from "./reportWebVitals";
ReactDOM.render(
  <React.StrictMode>
    <App />
  </React.StrictMode>,
  document.getElementById("root"),
);
// ...
Basic translations
The familiar i18next.t() translation function can be used in our React components. We just need to import the useTranslation React hook to make t available.
import { useTranslation } from "react-i18next";
import Navbar from "./layout/Navbar";
import "./App.css";
function App() {
  const { t } = useTranslation();
  return (
    <div className="container">
      <Navbar />
      <h1>{t("app-title")}</h1>
      // ...
    </div>
  );
}
export default App;
When our app reloads, everything should look the same. However, if we change the lng value to "ar" in our src/services/i18n.js initializer, we should see our app title localized to Arabic.

Async translation file loading
Let’s make our app more scalable by breaking up our translations into per-locale files. The handy, official i18next-http-backend plugin makes this a quick job for us. Let’s install it.
npm install i18next-http-backend
The backend will look for files at /locales/{{lng}}/{{ns}}.json by default, where {{lng}} resolves to the active locale, and {{ns}} resolves to the active namespace. Since the default namespace is translation, we can put our English translations messages into public/locales/en/translation.json.
{
  "app-title": "With React",
  "home": "Home",
  "about": "About"
}
Our Arabic file follows the same convention:
{
  "app-title": "مع ريأكت",
  "home": "الرئيسية",
  "about": "نبذة عنا"
}
We now just have to import the backend and use() it as we initialize i18next. We’ll also want to remove our inlined translations under the resources key since the plugin will load our translation messages from the network now.
import i18next from "i18next";
import { initReactI18next } from "react-i18next";
import HttpApi from "i18next-http-backend";
i18next
  .use(initReactI18next)
  .use(HttpApi)
  .init({
    // Remove `resources`
    lng: "en",
    debug: true,
    interpolation: {
      escapeValue: false,
    },
  });
export default i18next;
When our app reloads, we should see the same exact localized rendering. Of course, the active locale’s translations are now piping down the network, so our app is lighter on load, and easier to scale and maintain.

Language switcher
Building a language-switching UI is a breeze with React and i18next. We can update our LocaleSwitcher component, controlling the <select> within to change the active locale to the one the user chooses.
import { useTranslation } from "react-i18next";
function LocaleSwitcher() {
  const { i18n } = useTranslation();
  return (
    <>
      <img
        src="img/translation-icon@2x.png"
        alt="Translation icon"
        className="translation-icon"
      />
      <select
        className="locale-switcher"
        value={i18n.language}
        onChange={(e) =>
          i18n.changeLanguage(e.target.value)
        }
      >
        <option value="en">English</option>
        <option value="ar">Arabic (العربية)</option>
      </select>
    </>
  );
}
export default LocaleSwitcher;
The i18next React integration ensures that translations are re-rendered when the active locale is changed.

🔗 Resource » Get the code for everything we’ve built above from our GitHub repo.
React localization articles
We love writing about React in our blog so we’re happy to give you a selection of our deep dives and React-based framework tutorials, all centered on localization:
- A Guide to React Localization with i18next
- Beginning JavaScript I18n with i18next and Moment.js
- React Redux Tutorial: Internationalization with react-i18n-redux
- Roll Your Own i18n Solution with React and Redux
- Localizing JavaScript & React Apps with LinguiJS
- Localized Server-Side Rendering with React
- Localizing Meteor Applications Powered by React
- A Comprehensive Guide to React Native Localization
- All You Need to Know About i18n with Gatsby (React-based)
- Full-Stack JavaScript I18n Step by Step (using the React-based Next.js)
How do I localize a web page with jQuery and i18next?
While not as hot as it was some years ago, jQuery is still one of the most popular JavaScript libraries in use today. You’ll find localizing jQuery apps is pretty easy with the i18next library. An official i18next jQuery plugin takes very little work to set up, so let’s use it to localize our trusty demo app.
🗒 Note » We’ve covered i18next in more detail earlier in this article, so we’ll focus on jQuery integration here.
If you’ve been reading along, the following starter app will look familiar. It serves as a nice foundation for our localization work.
<!DOCTYPE html>
<html lang="en">
<head>
  <!-- ... -->
</head>
<body>
  <div class="container">
    <nav class="navbar">
      <div class="container">
        <ul class="navbar-list navbar-start">
          <li class="navbar-item">
            <a href="#" data-i18n="home" class="navbar-link">
              Home
            </a>
          </li>
          <li class="navbar-item">
            <a href="#" data-i18n="about" class="navbar-link">
              About
            </a>
          </li>
        </ul>
        <div class="navbar-end">
          <img src="img/translation-icon@2x.png" class="translation-icon" />
          <select data-i18n-switcher class="locale-switcher">
            <option value="en">English</option>
            <option value="ar">Arabic (العربية)</option>
          </select>
        </div>
      </div>
    </nav>
    <h1 data-i18n="app-title">jQuery i18n</h1>
    <p data-i18n="lead" data-i18n-options='{"username": "Jackie"}'>
      Welcome to my little spot on the interwebs, {{username}}!
    </p>
    <p data-i18n="new-messages" data-i18n-options='{"count": 3}'>
      You have {{count}} new messages
    </p>
  </div>
</body>
</html>
🗒 Note » By default, the i18next jQuery plugin uses data-i18n (not our previous data-i18n-key) for its translation keys. This can be changed in the plugin options.

Time to localize? Let’s go!
Installation
The simplest way to install i18next and its jQuery plugin is to download their minified distribution files and include them in our HTML. You can grab the files at the following locations.
🔗 Resource » Check out the official documentation of the i18next jQuery plugin on GitHub.
After downloading the above files, we can place them in a js/lib directory in our project and pull them into our main HTML page.
<!DOCTYPE html>
<html lang="en">
<head>
   <!-- ... -->
</head>
<body>
  <div class="container">
    <!-- ... -->
  </div>
  <script src="./js/lib/jquery-3.6.0.min.js"></script>
  <script src="./js/lib/i18next.min.js"></script>
  <script src="./js/lib/jquery-i18next.min.js"></script>
  <!-- Our custom JavaScript, coming up in a second... -->
  <script src="./js/scripts.js"></script>
</body>
</html>
Basic translations
With our libraries installed, we can now write some setup code to get basic localization working.
// Initialize i18next
i18next.init({
  lng: "en",     // Initial locale
  debug: true,   // Provides helpful console messages
  resources: {   // Translations
    en: {
      translation: {
        "app-title": "jQuery + i18next",
      },
    },
    ar: {
      translation: {
        "app-title": "جي كويري + آي إيتين نيكست",
      },
    },
  },
});
// Initialize i18next jQuery plugin
jqueryI18next.init(i18next, $);
// Translate page elements
$("body").localize();
We’ve covered i18next.init(...) earlier in this article. Note that here we have a jQueryI18next.init(...) call as well. At its most basic, the jQuery i18next plugin init function takes the active i18next instance, as well as a reference to the jQuery object, $.
When the plugin is initialized, it adds a localize() function to jQuery. Calling $(selector).localize() causes the plugin to localize all the elements under the selected hierarchy. For each element, if a data-i18n attribute is found, its corresponding translation in the active locale is swapped in.
For example:
// In our JavaScript
i18next.init({
  lng: "en",
  resources: {
    en: {
      translation: {
        "app-title": "jQuery + i18next",
      },
    },
    ar: {
      translation: {
        "app-title": "جي كويري + آي إيتين نيكست",
      },
    },
  },
});
jqueryI18next.init(i18next, $);
$("#main-title").localize();
// In our HTML
<h1 id="main-title" data-i18n="app-title"></h1>
// Renders to:
<h1 id="main-title" data-i18n="app-title">jQuery + i18next</h1>
Nice and simple 😊

And if we change our initial locale to Arabic by changing lng to "ar", we get an Arabic title instead.

Async translation file loading
What about splitting our translation files into separate files, one per locale? I hear you asking. No worries, the official i18next HTTP backend plugin has us covered.
To install the plugin, we can grab the minified distribution script from GitHub and place it in our js/lib directory. Of course, we’ll want to pull it into our HTML as well.
<!DOCTYPE html>
<html lang="en">
<head>
   <!-- ... -->
</head>
<body>
  <div class="container">
    <!-- ... -->
  </div>
  <script src="./js/lib/jquery-3.6.0.min.js"></script>
  <script src="./js/lib/i18next.min.js"></script>
  <script src="./js/lib/i18nextHttpBackend.min.js"></script>
  <script src="./js/lib/jquery-i18next.min.js"></script>
  <script src="./js/scripts.js"></script>
</body>
</html>
Now we can make our app more scalable by moving our translations into separate JSON files.
{
  "app-title": "With jQuery + i18next",
  "home": "Home",
  "about": "About"
}
{
  "app-title": "مع جي كويري و آي إيتين نيكست",
  "home": "الرئيسية",
  "about": "نبذة عنا"
}
We’ll have to rework our setup code to use() the HTTP plugin as we initialize i18next. We’ll also want to wait for our initial locale’s translation file to download before we attempt to translate our page elements.
// Wait for translations to come down the network
// before initializing the jQuery plugin
async function initI18n() {
  // Use Http backend plugin to download translations
  await i18next.use(i18nextHttpBackend).init({
    lng: "en",
  // Remove `resources` option, since our translations
  // are in JSON files now
  });
  jqueryI18next.init(i18next, $);
}
// Refactor to function
function translatePage() {
  $("body").localize();
}
// Init
(async function () {
  // Wait for i18next to initialize before
  // translating page elements
  await initI18n();
  translatePage();
})();
If we reload our app, we notice no difference in the output. However, a closer look at our dev tools Network tab reveals a more maintainable “download it when you need it” translation file solution.

Language switcher
You may have noticed that we have some HTML looking like a language switcher UI in our demo.
<!DOCTYPE html>
<html lang="en">
<head>
  <!-- ... -->
</head>
<body>
  <div class="container">
    <nav class="navbar">
      <div class="container">
        <!-- ... -->
        <div class="navbar-end">
          <img src="img/translation-icon@2x.png" class="translation-icon" />
          <select data-i18n-switcher class="locale-switcher">
            <option value="en">English</option>
            <option value="ar">Arabic (العربية)</option>
          </select>
        </div>
      </div>
    </nav>
    <!-- ... -->
  </div>
  <!-- ... -->
</body>
</html>
Let’s wire up the <select> element above so that our app switches its translations to ones matching the user-selected locale.
// ...
function bindLocaleSwitcher() {
  const $switcher = $("[data-i18n-switcher]");
  // Initial value
  $switcher.val(i18next.language);
  $switcher.on("change", async function () {
    // Changing the active locale will cause its
    // translations to load from the network, so
    // we wait for that load before refreshing
    // page elements
    await i18next.changeLanguage($switcher.val());
    translatePage();
  });
}
(async function () {
  await initI18n();
  translatePage();
  bindLocaleSwitcher();
})();
Just like that, we have a functional locale switcher.

Interpolation
Handling dynamic values in our translation messages comes out of the box with i18next. We just need to provide a data-i18n-options JSON map in the element we have interpolations for.
<!-- ... -->
    <p data-i18n="lead" data-i18n-options='{"username": "Jackie"}'>
      Welcome to my little spot on the interwebs, {{username}}!
    </p>
<!-- ... -->
The i18next jQuery plugin doesn’t look for data-i18n-options by default; we have to use its useOptionsAttr config option to enable automatic interpolation.
async function initI18n() {
  await i18next.use(i18nextHttpBackend).init({ lng: "en" });
  jqueryI18next.init(i18next, $, { useOptionsAttr: true });
}
// ...
Of course, we’ll want to ensure that we have the {{variable}} placeholders that i18next expects in our translation messages.
{
  "app-title": "With jQuery + i18next",
  "home": "Home",
  "about": "About",
  "lead": "Welcome to my little spot on the interwebs, {{username}}!"
}
{
  "app-title": "مع جي كويري و آي إيتين نيكست",
  "home": "الرئيسية",
  "about": "نبذة عنا",
  "lead": "أهلاً بك في مكاني الصغير على النت يا {{username}}."
}
There we go. Interpolations interpolated.


Plurals
We use the same data-i18n-options attribute to provide a special count number variable when we have plural messages.
🗒 Note » Check out the earlier i18next ➞ Plurals section for more details on how the library works with plurals.
<!-- ... -->
    <p data-i18n="new-messages" data-i18n-options='{"count": 3}'>
      You have {{count}} new messages
    </p>
<!-- ... -->
We use a key_form convention when specifying our plural messages. English has two plural forms, one and other.
{
  // ...
  "new-messages_one": "You have {{count}} new message",
  "new-messages_other": "You have {{count}} new messages"
}
Arabic has six plural forms, and they’re handled automatically by i18next.
{
  // ...
  "new-messages_zero": "لا توجد لديك رسائل جديدة",
  "new-messages_one": "لديك رسالة جديدة",
  "new-messages_two": "لديك رسالتان جداد",
  "new-messages_few": "لديك {{count}} رسائل جديدة",
  "new-messages_many": "لديك {{count}} رسالة جديدة",
  "new-messages_other": "لديك {{count}} رسالة جديدة"
}
So with no additional code, our app has complex plural support.


🔗 Resource » Get the full working code for the app above from our GitHub repo.
🔗 Resource » If you’re looking for an alternative to i18next, check out The Advanced Guide to jQuery i18n which uses the jQuery.i18n library.
How do I localize a web page with the ICU format using Globalize?
If you want the near-exhaustive localization coverage of the International Components for Unicode (ICU) and the Unicode Common Locale Data Repository (CLDR) in your JavaScript app, the Globalize library will certainly get the job done. Let’s run through how to install Globalize and localize our humble demo app with it.
🔗 Resource » The Missing Guide to the ICU Message Format covers what the ICU and CLDR are in more detail.
🗒 Note » Unlike many other libraries we cover in this article, Globalize does support Internet Explorer 9+.
What demo? you say. Our trusty one-pager, of course.
<!DOCTYPE html>
<html lang="en">
<head>
  <!-- ... -->
</head>
<body>
  <div class="container">
    <nav class="navbar">
      <div class="container">
        <ul class="navbar-list navbar-start">
          <li class="navbar-item">
            <a href="#" data-i18n-key="home" class="navbar-link">
              Home
            </a>
          </li>
          <li class="navbar-item">
            <a href="#" data-i18n-key="about" class="navbar-link">
              About
            </a>
          </li>
        </ul>
        <div class="navbar-end">
          <img src="img/translation-icon@2x.png" class="translation-icon" />
          <select data-i18n-switcher class="locale-switcher">
            <option value="en">English</option>
            <option value="ar">Arabic (العربية)</option>
          </select>
        </div>
      </div>
    </nav>
    <h1 data-i18n-key="app-title">With Globalize</h1>
    <p data-i18n-key="lead" data-i18n-opt='{"username": "Stella"}'>
      Welcome to my little spot on the interwebs, {username}!
    </p>
    <p data-i18n-key="new-messages" data-i18n-opt='{"count": 100}'>
      You have # new messages
    </p>
  </div>
</body>
</html>

Let’s start localizing.
Installation
Globalize is very modular, so it can be a bit cumbersome to install with plain JavaScript. Still, it’s a relatively simple recipe.
- Download the latest Globalize release
- Download the latest CLDR traverser (cldr.js) release
- Download the latest CLDR JSON data release—make sure to download the
-fullvariant from the release list to follow along here
This should get us three ZIP files. Let’s unzip them, rename their unzipped top-level directories, and move them to our project directory. I’ve placed mine under a /lib directory in my project, so my project now looks like:
.
├── css/
├── img/
├── lib/
│   ├── cldr/          << renamed from cldr-x.x.x
│   ├── cldr-json/     << renamed from cldr-x.x.x-json-full
│   └── globalize/     << renamed from globalize.x.x
└── index.html
🔗 Resource » The official docs go through different ways to install Globalize.
Using the requirements tool to determine required scripts
We always need some parts of Globalize and cldr.js; others will depend on the localization features of our app. A handy tool, So What’cha Want, can let us know which files to pull into our project depending on our selected features. We can start by deselecting all features except for message.

Note the two file lists near the bottom of the page. The list on the left tells which files to pull in from Globalize and cldr.js; we can use <script> tags for these.
<!DOCTYPE html>
<html lang="en">
<head>
  <!-- ... -->
</head>
<body>
  <div class="container">
    <!-- ... -->
  </div>
  <!-- Globalize requirements -->
  <script src="./lib/cldr/dist/cldr.js"></script>
  <script src="./lib/cldr/dist/cldr/event.js"></script>
  <script src="./lib/cldr/dist/cldr/supplemental.js"></script>
  <script src="./lib/globalize/dist/globalize.js"></script>
  <script src="./lib/globalize/dist/globalize/message.js"></script>
  <!-- Our app entry point -->
  <script src="./index.js"></script>
</body>
</html>
The list at the bottom-right of So What’cha Want has CLDR JSON data that we need. This JSON we’ll want to fetch in our code and feed to Globalize via its load() function.
// We'll add more to this list as we go
const supplementals = ["likelySubtags"];
async function loadIntoGlobalize(featureUrls) {
  await Promise.all(
    featureUrls.map((url) => fetchJson(url))
  ).then((downloaded) =>
    downloaded.forEach((feature) => Globalize.load(feature))
  );
}
function supplementalUrlsFor(options) {
  return options.map(
    (feature) =>
      `/lib/cldr-json/cldr-core/supplemental/${feature}.json`
  );
}
async function fetchJson(url) {
  const response = await fetch(url);
  return await response.json();
}
(async function () {
  // Load supplemental requirements
  await loadIntoGlobalize(
    supplementalUrlsFor(supplementals)
  );
})();
That’s about it for setup. OK, not the easiest library to install, but for a project that needs bulletproof localization, it’s worth the effort.
Basic translations
Using Globalize to translate page elements is a simple three-step process.
// ...
(async function () {
  await loadIntoGlobalize(
    supplementalUrlsFor(supplementals)
  );
  // 1. Load translation messages
  Globalize.loadMessages({
    en: {
      "app-title": "Hello Globalize!",
    },
    ar: {
      "app-title": "أهلاً جلوبالايز",
    },
  });
  // 2. Set the default locale
  Globalize.locale("en");
  // 3. Use formatMessage() to get translation by key
  document.querySelector(
    "[data-i18n-key='app-title']"
  ).textContent = Globalize.formatMessage("app-title");
})();
🔗 Resource » The official Globalize docs have a handy API section that lists available functions.
Disco. Our title is displayed using our default locale’s translations.

If we change the above call, so that it reads Globalize.locale("ar"), we get our app title in Arabic.

Handling missing message errors
Let’s generalize the code that translates page elements by writing a translatePageElements() function. Unlike other i18n libraries, Globalize will throw an error and stop if it encounters a missing message for a given key to formatMessage(). Nothing a little try/catch won’t soften, though.
// ...
function translatePageElements() {
  const elements = document.querySelectorAll(
    "[data-i18n-key]"
  );
  elements.forEach((element) => {
    const key = element.getAttribute("data-i18n-key");
    try {
      element.innerHTML = Globalize.formatMessage(key);
    } catch (error) {
      if (error.code === "E_MISSING_MESSAGE") {
        // Show console warnings on missing message
        // instead of grinding to a halt.
        console.warn(error.message);
        // Show key value on page for missing message
        element.innerHTML = key;
      } else {
        console.error(error);
      }
    }
  });
}
(async function () {
  // ...
  Globalize.loadMessages(/* ... */);
  Globalize.locale("en");
  translatePageElements();
})();
Less “crash on missing message”, more “show key value and warn in console”.
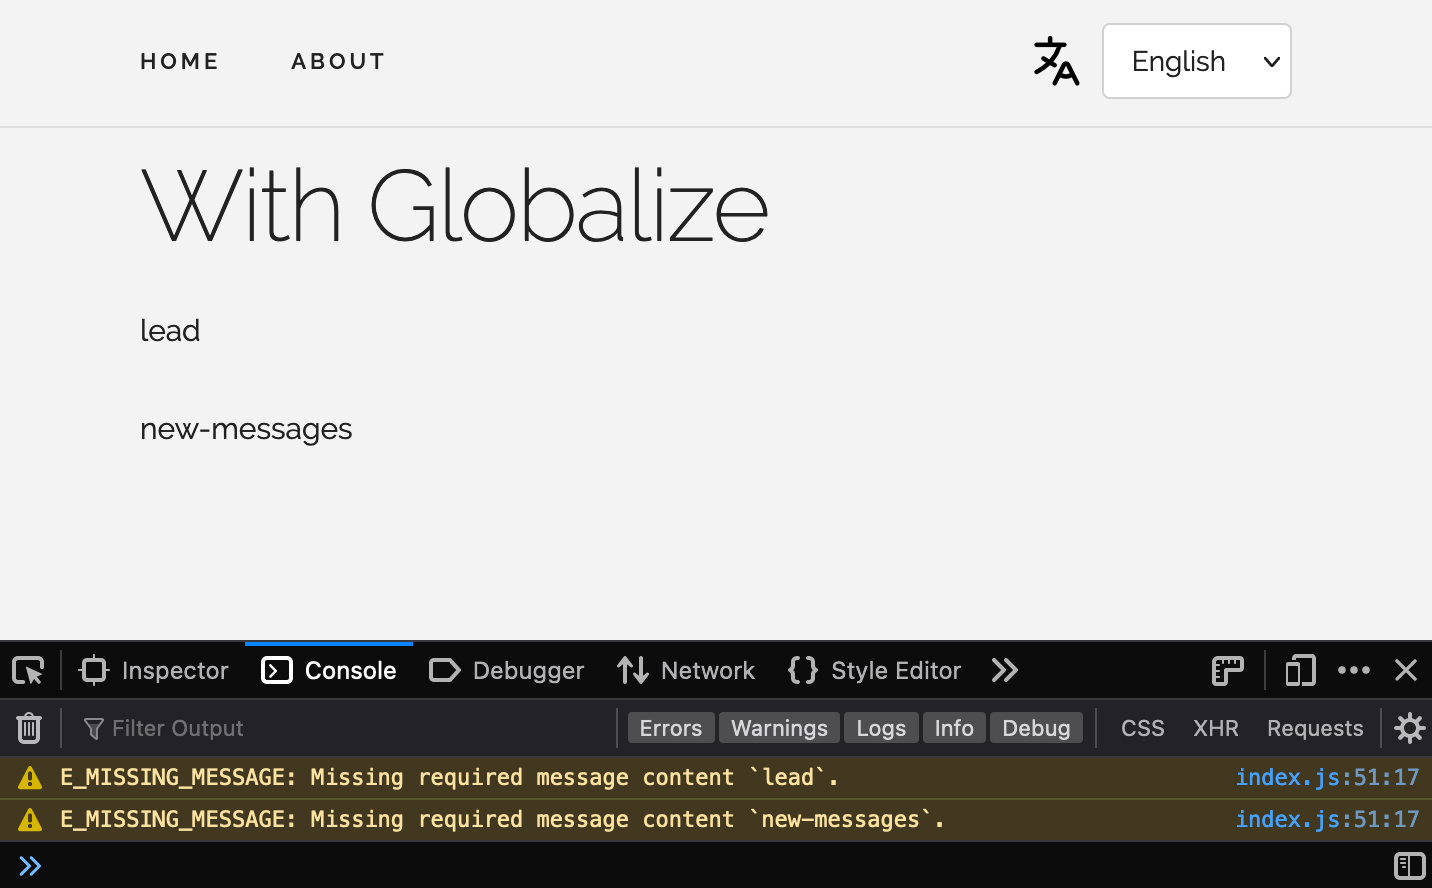

Async translation file loading
As we’ve done with other solutions in this article, let’s break up our translation messages into per-locale JSON files for scalability and maintainability.
{
  // Globalize expects the locale code to be the top-level key
  "en": {
    "app-title": "With Globalize",
    "home": "Home",
    "about": "About"
  }
}
{
  "ar": {
    "app-title": "مع جلوبالايز",
    "home": "الرئيسية",
    "about": "نبذة عنا"
  }
}
A reusable setLocale() function can load our translation file, configure Globalize, and re-render our page elements.
const defaultLocale = "en";
// ...
 async function setLocale(locale) {
  const messages = await fetchJson(`/lang/${locale}.json`);
  Globalize.loadMessages(messages);
  Globalize.locale(locale);
  translatePageElements();
}
// ...
(async function () {
  await loadIntoGlobalize(
    supplementalUrlsFor(supplementals)
  );
  setLocale(defaultLocale);
})();
Async translation file loading: done and dusted.
Language switcher
We can use the setLocale() function we just wrote to get our language switching UI working. You may remember that our demo app already has some HTML for the switcher.
<!DOCTYPE html>
<html lang="en">
<head>
  <!-- ... -->
</head>
<body>
  <div class="container">
    <nav class="navbar">
      <div class="container">
        <!-- ... -->
        <div class="navbar-end">
          <img src="img/translation-icon@2x.png" class="translation-icon" />
          <select data-i18n-switcher class="locale-switcher">
            <option value="en">English</option>
            <option value="ar">Arabic (العربية)</option>
          </select>
        </div>
      </div>
    </nav>
    <!-- ... -->
  </div>
  <!-- ... -->
  <script src="./index.js"></script>
</body>
</html>
Some JavaScripting will get the switcher switching.
const defaultLocale = "en";
// ...
function bindLocaleSwitcher() {
  const switcher = document.querySelector(
    "[data-i18n-switcher]"
  );
  // Globalize.locale() returns the active locale
  switcher.value = Globalize.locale().locale;
  switcher.onchange = (e) => {
    setLocale(e.target.value);
  };
}
(async function () {
  await loadIntoGlobalize(
    supplementalUrlsFor(supplementals)
  );
  await setLocale(defaultLocale);
  bindLocaleSwitcher(defaultLocale);
})();
And with that, our users can pick their language of choice.

Showing locale display names in the active locale
One of the most powerful features of using an ICU library like Globalize is the access to an immensely rich variety of CLDR localization data. For example, we can show the languages in our locale switcher in the active locale—English would be “الإنجليزية” in Arabic, for example. We would need to pull in the main CLDR data and then update our select > option text.
const defaultLocale = "ar";
const mains = {
    localenames: ["languages"],
};
const supplementals = "likelySubtags"];
async function setLocale(locale) {
  const messages = await fetchJson(`/lang/${locale}.json`);
  Globalize.loadMessages(messages);
  await loadIntoGlobalize(mainUrlsFor(mains, locale));
  Globalize.locale(locale);
  translatePageElements();
  setLocaleSwitcherDisplayNames();
}
// Given options = {
//   localenames: ["languages"],
//   dates: ["ca-generic", "ca-gregorian"],
// }
// and, locale = "en", returns an array like
// [
//    "/lib/cldr-json/cldr-localenames-full/main/en/languages.json",
//    "/lib/cldr-json/cldr-dates-full/main/en/ca-generic.json",
//    "/lib/cldr-json/cldr-dates-full/main/en/ca-gregorian.json"
// ]
function mainUrlsFor(options, locale) {
  const result = [];
  Object.keys(options).forEach((key) => {
    options[key].forEach((collection) => {
      result.push(
        `/lib/cldr-json/cldr-${key}-full/main/${locale}/${collection}.json`
      );
    });
  });
  return result;
}
function setLocaleSwitcherDisplayNames() {
  const options = document.querySelectorAll(
    "[data-i18n-switcher] option"
  );
  options.forEach((option) => {
    const localeCode = option.value;
    // Get CLDR main data by path
    option.textContent = Globalize.cldr.main(
      `localeDisplayNames/languages/${localeCode}`
    );
  });
}
// ...
We can use our main JSON loading code whenever we want to pull in CLDR JSON main data. Otherwise, just a bit of DOM manipulation when a new locale is chosen gets us localized locale names (so meta!).

🔗 Resource » The official cldr.js docs go through how to retrieve CLDR JSON data in more detail.
Interpolation
Handling dynamic values in our message is handled by the ICU message format via a {variable} syntax.
{
  "en": {
    // ...
    "lead": "Welcome to my little spot on the interwebs, {username}!"
  }
}
{
  "ar": {
    // ...
    "lead": "أهلاً بك في مكاني الصغير على النت يا {username}."
  }
}
We can provide key/value substitution pairs in our HTML.
<!-- ... -->
    <p data-i18n-key="lead" data-i18n-opt='{"username": "Stella"}'>
      Welcome to my little spot on the interwebs, {username}!
    </p>
<!-- ... -->
And now we just need to read those key/value pairs and feed them to Globalize.formatMessage().
// ...
function translatePageElements() {
  const elements = document.querySelectorAll(
    "[data-i18n-key]"
  );
  elements.forEach((element) => {
    const key = element.getAttribute("data-i18n-key");
    const interpolations =
      element.getAttribute("data-i18n-opt");
    const parsedInterpolations = interpolations
      ? JSON.parse(interpolations)
      : {};
    try {
      element.innerHTML = Globalize.formatMessage(
        key,
        parsedInterpolations
      );
    } catch (error) {
      if (error.code === "E_MISSING_MESSAGE") {
        console.warn(error.message);
      } else {
        console.error(error);
      }
    }
  });
}
// ...
No problemo.


Plurals
Plural handling in the ICU format is second to none and covers complex plural forms like those in Russian or Arabic. We’ll need to set up the plural feature before we can use it.
Adding plural requirements
Let’s head over to So What’cha Want to figure out what we’ll need to pull in if we enable plural.

Not too bad: first we’ll need to add a <script> tag for the feature.
<!DOCTYPE html>
<html lang="en">
<head>
  <!-- ... -->
</head>
<body>
  <div class="container">
    <!-- ... -->
  </div>
  <script src="./lib/cldr/dist/cldr.js"></script>
  <script src="./lib/cldr/dist/cldr/event.js"></script>
  <script src="./lib/cldr/dist/cldr/supplemental.js"></script>
  <script src="./lib/globalize/dist/globalize.js"></script>
  <script src="./lib/globalize/dist/globalize/message.js"></script>
  <script src="./lib/globalize/dist/globalize/plural.js"></script>
  <script src="./index.js"></script>
</body>
</html>
We’ll also need the plurals supplemental JSON, and likely the ordinals if we want to cover formatting like “3rd” and “4th” in our messages. We’ll just need to add the requirements to our supplementals config array. Our app is already set up to load the corresponding JSON for us on load.
const defaultLocale = "ar";
const supplementals = [
  "likelySubtags",
  "plurals",
  "ordinals",
];
// ...
Now we can add our plural messages. The ICU plural syntax is largely intuitive: a count variable determines the chosen plural form, and a special # symbol is replaced with the count value on render.
{
  "en": {
    // ...
    "new-messages": [
      // We can call `count` anything we want, as long as we
      // match the key in our call to formatMessage()
      "You have {count, plural,",
      "    one {# new message}",
      "  other {# new messages}",
      "}"
    ]
  }
}
🗒 Note » Globalize allows us to break up multiline messages by using arrays.
The six plural forms in Arabic are handled by the ICU format.
{
  "ar": {
    // ...
    "new-messages": [
      "{count, plural, ",
      "   zero {لا توجد لديك رسائل جديدة}",
      "    one {لديك رسالة جديدة}",
      "    two {لديك رسالتان جداد}",
      "    few {لديك # رسائل جديدة}",
      "   many {لديك # رسالة جديدة}",
      "  other {لديك # رسالة جديدة}",
      "}"
    ]
  }
}
🤿 Go deeper » We cover ICU plurals in more detail in The Missing Guide to the ICU Message Format.
Of course, we need to make sure that count is supplied to Globalize.formatMessage().
<!-- ... -->
    <p data-i18n-key="new-messages" data-i18n-opt='{"count": 110}'>
      You have # new messages
    </p>
<!-- ... -->
And that’s plurals basically done.


🗒 Note » Globalize’s ICU implementation covers comprehensive date and number formatting. Take a gander at the official documentation for more info.
🔗 Resource » We cover more Globalize installation options and use cases in JS I18n with Globalize.js.
Wrapping up our JavaScript localization guide
And that about does it for this one. We hope you’ve enjoyed this foray into some of the most popular JavaScript localization solutions.
🔗 Resource » If you work with Ruby on Rails, you might enjoy Localizing JavaScript in Rails Apps.
And if you’re looking to take your localization process to the next level, take a look at Phrase. Phrase supports the ICU format, all other translation formats we’ve covered here, and many more. With its CLI and Bitbucket, GitHub, and GitLab sync, your i18n can be on autopilot. The fully-featured Phrase web console, with machine learning and smart suggestions, is a joy for translators to use. Once translations are ready, they can sync back to your project automatically. You set it and forget it, leaving you to focus on the code you love.
Check out all Phrase features for developers and see for yourself how it can streamline your software localization workflows.


