
Vue continues to impress us with its thoughtful developer experience—it manages to be both intuitive and feature-complete. This design elegance carries over to Nuxt, the Vue-based framework that gives our Vue projects SSR, file-based routing, SEO, and more.
Nuxt also enjoys a decent number of third-party modules, including Nuxt I18n, used for internationalization (i18n) and localization (l10n). Nuxt I18n will be our main tool in this guide. We’ll build a small Nuxt app and localize it with Nuxt I18n, covering everything from setup to advanced localization topics.
🔗 Resource » i18n and l10n allow us to make our apps available in different languages and to different regions, often profitably. If you’re new to i18n, check out our guide to the ins and outs of internationalization.
🤿 Go deeper » If you’re interested in Vue localization (without Nuxt), our Comprehensive Guide to Vue Localization has you covered.
Library versions used
We’re using the following NPM packages in the article (versions in parentheses):
| Library | Version used | Description |
| nuxt | 3.5 | the intuitive Vue framework |
| @nuxtjs/i18n | 8.0.0-beta.12 | used to localize our app |
| @nuxtjs/tailwindcss | 6.7 | used for styling; optional for our purposes |
✋ Heads up » At the time of writing, the Nuxt I18n version 8 beta is the one that works with Nuxt 3. By the time you’re reading this, there may be changes to the Nuxt I18n API that didn’t make it into this article. Please refer to the Nuxt I18n documentation in case of any discrepancy.
Our demo app
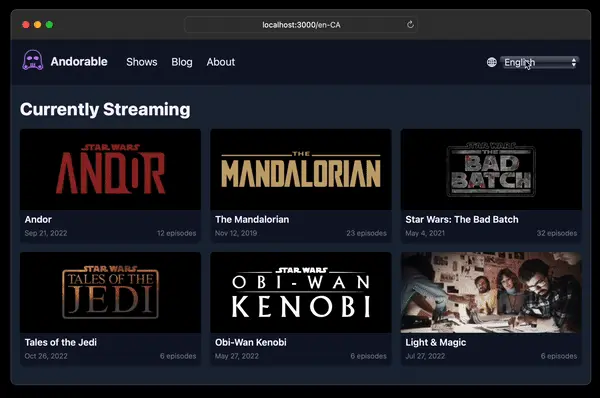
A fictional haven for Star Wars geeks, our demo app, Andorable, celebrates Star Wars TV shows that you can currently stream.

📣 Shout out » Thanks to Peter Emil van den Berg from The Noun Project for their cute Storm Trooper icon, which we’ve used as our brand logo here.
We can spin up the app from the command line:
% npx nuxi init andorable
% cd andorable
% npm installCode language: Bash (bash)
🗒️ Note » Feel free to install Tailwind CSS at this point. We’ll generally omit styling in this article to keep the focus on i18n. Get the complete code for our start app (before i18n), including styling, from our GitHub repo.
Nuxt installed, let’s remove the stock app.vue file and add a default layout for our whole site:
<!-- layouts/default.vue -->

<!-- CSS omitted for brevity -->
<template>
  <Body>
    <header>
      <nav>
        <NuxtLink to="/">
          <img src="/img/brand-logo.svg" alt="Andorable logo"/>
          Andorable
        </NuxtLink>

        <ul>
          <li><NuxtLink to="/">Shows</NuxtLink></li>
          <li><NuxtLink to="/blog">Blog</NuxtLink></li>
          <li><NuxtLink to="/about">About</NuxtLink></li>
        </ul>
      </nav>
    </header>

    <main>
      <slot />
    </main>
  </Body>
</template>Code language: HTML, XML (xml)
Now let’s build the home page, which lists Star Wars shows, pulling them from a mock API. We’ll add the API endpoint first:
// server/api/shows/index.ts

export default defineEventHandler(async (_event) => {
  return [
    {
      id: 1,
      name: "Andor",
      img: "/img/shows/andor.png",
      premieredAt: "2022-09-21",
      episodeCount: 12,
      source: "https://en.wikipedia.org/wiki/Andor_(TV_series)",
      description: "Andor, also known as Star Wars: Andor...",
    },
    {
      id: 2,
      name: "The Mandalorian",
      img: "/img/shows/mandalorian.png",
      premieredAt: "2019-11-12",
      episodeCount: 23,
      source: "https://en.wikipedia.org/wiki/The_Mandalorian",
      description: "The Mandalorian is an American space Western...",
    },
    // ...
  ]
})Code language: JavaScript (javascript)
We can create a new home page and pull this data into it.
<!-- pages/index.vue -->

<script setup lang="ts">
const { data: shows } = await useFetch("/api/shows")
</script>

<template>
  <div>
    <Head>
      <Title>Andorable - Star Wars Shows</Title>
      <Meta
        name="description"
        content="Andorable is a curated list and blog..."
      />
    </Head>

    <h1>Currently Streaming</h1>

    <section>
      <div v-for="show in shows" :key="show.id">
        <NuxtLink :to="`/shows/${show.id}`">
          <img :src="show.img" :alt="`Image for ${show.name}`" />

          <h3>{{ show.name }}</h3>

          <div>
            <p>{{ show.premieredAt }}</p>
            <p>{{ show.episodeCount }} episodes</p>
          </div>
        </NuxtLink>
      </div>
    </section>
  </div>
</template>Code language: HTML, XML (xml)
🔗 Resource » We’ll skip the code for the single show details page, /shows/[id].vue, and its associated API endpoint. We’ll also skip building the About page. These will be easy to build for any Nuxt developer, and again we want to keep the focus on i18n here. You can get the code for our whole app from our GitHub repo.
Let’s localize, shall we?
How do I set up Nuxt I18n?
First, let’s install the module.
% npm install @nuxtjs/i18n@next --save-devCode language: Bash (bash)✋ Heads up » We’re using @next here to install the beta version of Nuxt I18n; the beta is the only version that works with Nuxt 3 at the time of writing. By the time you’re reading this, a stable version of Nuxt I18n may be ready for Nuxt 3. You won’t need to add @next in that case.
After installation, we need to register and configure Nuxt I18n in our nuxt.config.ts file.
// nuxt.config.ts

export default defineNuxtConfig({
  // 👇 Register the module
  modules: ["@nuxtjs/i18n"],

  // 👇 Configure the module
  i18n: {
    // Adding English-Canada and Arabic-Egypt
    // as our supported locales. You can add as
    // many locales as you want here.
    locales: ["en-CA", "ar-EG"],

    // Used when active locale is not explicitly defined
    defaultLocale: "en-CA",

    // Disabling automatic locale detection (see below)
    detectBrowserLanguage: false,
  },
})Code language: TypeScript (typescript)
We’ll work with English-Canada, and Arabic-Egypt, as our supported locales in this article. You can use any locales you want here. Just be sure to list their ISO 639-1 language codes or language and region codes under the locales option.
🗒️ Note » If you’re planning on localizing dates or numbers, use a language and a region code (en-CA), as opposed to just a language code (en). Dates and numbers are always region-specific.
With the above configuration, Nuxt I18n automatically creates localized routes for our app. We can run our app and visit http://localhost:3000/ar-EG. Notice that we don’t get a 404 error and the home page loads just fine. This means Nuxt I18n is correctly installed and configured.
🗒️ Note » By default, Nuxt I18n uses a route locale “prefix except default” strategy i.e. /foo has en-CA content, /ar-EG/foo has ar-EG content. We’ll tackle localized routes in detail a bit later.
A note on locale detection
By default, Nuxt I18n attempts to detect the visitor’s locale from the HTTP request or browser; it then redirects to the closest localized route that matches the visitor’s locale. For example, if a user has Arabic prioritized in her browser language preferences, when she hits our / route she would get redirected to /ar-EG.
However, at the time of writing, there are major issues with this feature in Nuxt I18n. So we’re disabling it here with detectBrowserLanguage: false. This may have been fixed by the time you’re reading this, so check the GitHub issue page if you’re interested in using locale detection.
Configuring Vue I18n
Localized routes aren’t useful by themselves. We want to have translated content appear for each active locale. To achieve this, we need to add another config file, i18n.config.ts.
// i18n.config.ts

export default defineI18nConfig(() => ({
  // We'll fill this in momentarily
}))Code language: TypeScript (typescript)
We need to pull this new file into nuxt.config.ts:
// nuxt.config.ts

export default defineNuxtConfig({
  modules: ["@nuxtjs/i18n"],
  i18n: {
    locales: ["en-CA", "ar-EG"],
    defaultLocale: "en-CA",
    detectBrowserLanguage: false,
+   // 👇 Reference the Vue I18n config file
+   vueI18n: "./i18n.config.ts",
  },
})Code language: Diff (diff)
Underneath the hood, Nuxt I18n uses Vue I18n, a general-purpose i18n library for Vue. Nuxt I18n adds localized SSR and routing support, among other things, on top of Vue I18n. But Vue I18n does much of the localization work. Our i18n.config.ts file configures the underlying Vue I18n instance.
🗒️ Note » In case you’re curious, @nuxtjs/i18n@8.0.0-beta.12, which we’re using in this article, lists vue-i18n@9.3.0-beta.17 as an internal dependency.
Vue 3 introduced the Composition API, and Nuxt 3 seems to be Composition-centric, so we’ll use that API here. We can set legacy: false in i18n.config.ts to tell Vue I18n to use the Composition API.
// i18n.config.ts

export default defineI18nConfig(() => ({
+ // 👇 Use Vue I18n's Composition API
+ legacy: false,
}))Code language: JavaScript (javascript)
Boilerplate taken care of, let’s add our first translated messages.
// i18n.config.ts

export default defineI18nConfig(() => ({
  legacy: false,

+ // 👇 Add translations
+ messages: {
+   "en-CA": {
+     // 👇 Note that we use the same keys here...
+     app_title: "Andorable",
+     nav_shows: "Shows",
+     nav_blog: "Blog",
+     nav_about: "About",
+   },
+   "ar-EG": {
+     // 👇 ...and here
+     app_title: "أندورابل",
+     nav_shows: "برامج",
+     nav_blog: "المدونة",
+     nav_about: "نبذة عنا",
+   },
  },
}))Code language: Diff (diff)
Now let’s use these messages into our default layout.
 <!-- layouts/default.vue -->

 <template>
   <Body>
     <header>
       <nav>
         <NuxtLink to="/">
           <!-- ... -->

+           <!-- 👇 Use Vue I18n's auto-loaded $t() function
+                to display a translated message -->
+           {{ $t("app_title") }}
         </NuxtLink>

			   <ul>
           <li>
             <NuxtLink to="/">
+              {{ $t("nav_shows") }}
             </NuxtLink>
           </li>
           <li>
             <NuxtLink to="/blog">
+              {{ $t("nav_blog") }}
             </NuxtLink>
           </li>
           <li>
             <NuxtLink to="/about">
+              {{ $t("nav_about") }}
             </NuxtLink>
           </li>
         </ul>
       </nav>
     </header>

     <!-- ... -->
   </Body>
 </template>Code language: Diff (diff)
Let’s run our app. If we visit the / route, we see that nothing has changed.

However, if we visit /ar-EG, lo and behold!

🗒️ Note » Arabic is naturally laid out right-to-left. We’ll address this a bit later.
What is the basic Nuxt I18n localization workflow?
Now that we’ve set up Nuxt I18n, let’s outline how to use it to localize our Nuxt app. Here’s the basic recipe:
- Add translation messages for each supported locale
- Pull translation messages into our components and layouts using the
$t()function - Localize dates and numbers using the respective
$d()and$n()functions - Use localized links via
useLocalePath()
We’ve already added translation messages and used them in components and layouts. We’ll cover dates and numbers a bit later. Let’s look at localized routes and links next.
How do I localize routes?
Nuxt I18n automatically created an /ar-EG route in our app. Nested routes have been localized as well. If we visit /ar-EG/shows/1 we should see the page for Star Wars: Andor with the Arabic nav bar.

You may have noticed that visiting /en-CA doesn’t work, though we registered en-CA as a supported locale in our nuxt.config.ts.
// nuxt.config.ts

export default defineNuxtConfig({
  // ...

  i18n: {
    locales: ["en-CA", "ar-EG"], // 👈
    defaultLocale: "en-CA",      // 👈
    detectBrowserLanguage: false,
    vueI18n: "./i18n.config.ts",
  },
}) Code language: TypeScript (typescript)
This is because Nuxt I18n defaults to a “prefix except default” route localization strategy. This means that our configured default locale, en-CA, won’t have a route prefix but all of our other locales will. Here are some examples to illustrate:
| Routes | Behaviour |
| / | Loads index page; en-CA is active |
| /en-CA | 404 Not Found |
| /ar-EG | Loads index page; ar-EG is active |
We can change this behavior by adding a strategy option to our config. In this guide we’ll use the prefix strategy, which forces all locales to have a route prefix. We’ll also remove the default locale momentarily.
// nuxt.config.ts

export default defineNuxtConfig({
  // ...

  i18n: {
    locales: ["en-CA", "ar-EG"],
- 	defaultLocale: "en-CA",
+   strategy: "prefix",
    detectBrowserLanguage: false,
    vueI18n: "./i18n.config.ts",
  },
}) Code language: Diff (diff)
With the prefix strategy and without a default locale, we get the following behavior:
| Routes | Behaviour |
| / | 404 Not Found |
| /en-CA | Loads index page; en-CA is active |
| /ar-EG | Loads index page; ar-EG is active |
It’s a good idea to always have a defaultLocale, however, since the default locale is used by Nuxt when redirecting home from a 404 Not Found.
We can change this behavior by adding a strategy option to our config. In this guide we’ll use the prefix strategy, which forces all locales to have a route prefix. We’ll also remove the default locale momentarily.
// nuxt.config.ts

export default defineNuxtConfig({
  // ...

  i18n: {
    locales: ["en-CA", "ar-EG"],
- 	defaultLocale: "en-CA",
+   strategy: "prefix",
    detectBrowserLanguage: false,
    vueI18n: "./i18n.config.ts",
  },
}) Code language: Diff (diff)
Let’s add the default locale back.
// nuxt.config.ts

export default defineNuxtConfig({
  // ...

  i18n: {
    locales: ["en-CA", "ar-EG"],
    strategy: "prefix",
+   defaultLocale: "en-CA",
    detectBrowserLanguage: false,
    vueI18n: "./i18n.config.ts",
  },
})Code language: Diff (diff)
With the default locale set, we get the following behavior:
| Routes | Behaviour |
| / | Loads index page; en-CA is active |
| /en-CA | Loads index page; en-CA is active |
| /ar-EG | Loads index page; ar-EG is active |
How do I create localized links?
If we visit /ar-EG and then click the About link in the nav bar, we’re taken to the /about English route. That’s not exactly what we want.

We’d like to continue seeing Arabic content once we’ve switched our language to Arabic. We can do this by localizing our links. Let’s do this in our nav bar.
 <!-- layouts/default.vue -->

+  <script setup lang="ts">
+  // 👇 Use Nuxt I18n's auto-imported composable
+  const localePath = useLocalePath()
+  </script>

 <template>
   <Body>
     <header>
       <nav>
+        <!-- 👇 Update all our links to use localePath -->
-        <NuxtLink to="/">
+        <NuxtLink :to="localePath('/')">
           {{ $t("app_title") }}
         </NuxtLink>

         <ul>
           <!-- ... -->

           <li>
-            <NuxtLink to="/blog">
+            <NuxtLink :to="localePath('/blog')">
               {{ $t("nav_blog") }}
             </NuxtLink>
           </li>
           <li>
-            <NuxtLink to="/about">
+            <NuxtLink :to="localePath('/about')">
               {{ $t("nav_about") }}
             </NuxtLink>
           </li>
         </ul>
       </nav>
     </header>

     <!-- ... -->
   </Body>
 </template>Code language: Diff (diff)
Now, when we switch to Arabic and click the About link, we’re taken to /ar-EG/about. We just need to make sure to always use localePath() when passing a path to <NuxtLink>.

A localized link component
It can be tedious to remember to use localePath() everywhere we have an internal link. A little wrapper component can help here.
<!-- components/LocLink.vue -->

<script setup lang="ts">
defineProps(["to"])

const localePath = useLocalePath()
</script>

<template>
  <NuxtLink :to="localePath(to)"><slot /></NuxtLink>
</template>Code language: HTML, XML (xml)
Now we can use <LocLink> as a drop-in replacement for <NuxtLink>:
 <!-- In our pages, layouts, and components:-->

 <li>
-  <NuxtLink :to="localePath('/about')">{{ $t("nav_about") }}</NuxtLink>
+	 <LocLink :to="/about">{{ $t("nav_about") }}</LocLink>
 </li>Code language: Diff (diff)
Redirecting to the default locale root
All localized English URLs look like /en-CA/about and /en-CA/shows/1. Because we set the default locale to English (see above), our root route / has no en-CA prefix. We can keep our routes consistent by adding a simple redirect to our nuxt.config.ts.
// nuxt.config.ts

export default defineNuxtConfig({
  modules: ["@nuxtjs/i18n"],
+ // 👇 Add the redirect
+ routeRules: {
+   "/": { redirect: "/en-CA" },
+ },
  i18n: {
    // ...
  },
})Code language: Diff (diff)
Now whenever we hit the / route, we’re automatically redirected to /en-CA.
How do I set the language and page direction in the document?
Any Arabic readers following along will have been weirded out at seeing Arabic pages presented left-to-right (ltr). Arabic, Hebrew, Farsi, Urdu, and other languages are laid out right-to-left (rtl). Let’s account for these languages in our app. Luckily, Nuxt I18n makes this fairly painless.
First, let’s update our locales config, converting each locale entry to an object, and adding iso and dir properties.
// nuxt.config.ts

export default defineNuxtConfig({
  modules: ["@nuxtjs/i18n"],

  // ...

  i18n: {
+   // 👇 Converting locale entries from strings to
+   //    objects
    locales:
-     "en-CA",
+     { code: "en-CA", iso: "en-CA", dir: "ltr" },
-     "ar-EG",
+     { code: "ar-EG", iso: "ar-EG", dir: "rtl" },
    ],
    // ...
  },
})Code language: Diff (diff)
We can use this new config along with Nuxt’s <Html> component to customize the document’s language and direction.
 <!-- layouts/default.vue -->

+  <script setup lang="ts">
+  // 👇 Use Nuxt I18n's auto-imported
+  //    composable
+  const head = useLocaleHead({
+    addDirAttribute: true,      // Adds dir
+    addSeoAttributes: true,     // Adds lang
+  })
+  const htmlAttrs = computed(() => head.value.htmlAttrs!)
+  </script>

 <template>
+  <!-- 👇 Add Html component. `iso` in our
+          locales config becomes `lang` here . -->
+  <Html :lang="htmlAttrs.lang" :dir="htmlAttrs.dir">
     <Body>
       <!-- ... -->
     </Body>
+  </Html>
 </template>Code language: Diff (diff)
With that in place, our <html> tag will have lang and dir attributes based on the active locale.


The <html dir> attribute largely takes care of layout direction; our Arabic pages are laid out in the language’s native direction.

🤿 Go deeper » Nuxt I18n’s useLocaleHead() can do a lot more, including help add <link rel=”alternate” hreflang> meta tags and other SEO meta data.
How do I get or set the active locale?
Nuxt I18n’s useI18n() composable makes it easy to get or set the active locale.
<!-- In components, pages, or layouts: -->

<script setup lang="ts">
const { locale, setLocale } = useI18n()

if (locale.value === "en-CA") {
  // Do something when locale is English
}

// Set active locale to Arabic ie. show Arabic
// translations in our pages
setLocale("ar-EG")
</script>Code language: HTML, XML (xml)
// In composables or utils:
export const useFoo = () => {
const { locale, setLocale } = useI18n()
// Same as above
}Code language: TypeScript (typescript)🗒️ Note » Of course, we automatically set the active locale when we visit one of its routes. For example, hitting /ar-EG/about sets the active locale to Arabic (Egypt).
How do I create a language switcher?
We often want to give our visitors a UI that allows selecting the language of their choice. In our app, the source of truth for the active language is the locale segment of the URL. When we visit /en-CA/foo, we’re looking at the foo page in English. If we wanted its Arabic version, we would visit /ar-EG/foo.
Luckily, Nuxt I18n provides a useSwitchLocalePath() composable that helps us switch locales by going from /en-CA/foo to /ar-EG/foo. Let’s use it to create a <LangSwitcher> component.
✋ Heads up » We won’t use the setLocale() function (mentioned in the last section) in our language switcher—setLocale() will switch the active locale, but it won’t update the URL in the browser. This means we could be at /en-CA/about and see content in Arabic. To keep things predictable for our visitors, we’ll stick to updating the URL to set the locale.
<!-- components/LangSwitcher.vue -->

<script setup lang="ts">
// Used for type casting
import { LocaleObject } from "@nuxtjs/i18n/dist/runtime/composables"

// Get active locale and supported locales
const { locale, locales } = useI18n()
// Cast to avoid TypeScript errors in template
const supportedLocales = locales.value as Array<LocaleObject>

const router = useRouter()
const switchLocalePath = useSwitchLocalePath()

// When the visitor selects a new locale, route to
// to the new locale's path e.g. /en-CA/foo → /ar-EG/foo
function onLocaleChanged(event: Event) {
  const target = event.target as HTMLInputElement

  // switchLocalePath('ar-EG') will return Arabic equivalent
  // for the *current* URL path e.g. if we're at /en-CA/about,
  // switchLocalePath('ar-EG') will return '/ar-EG/about'
  router.push({ path: switchLocalePath(target.value) })
}
</script>

<template>
  <div>
    🌐
    <select :value="locale" @change="onLocaleChanged">
      <option v-for="loc in supportedLocales" :key="loc.code" :value="loc.code">
        {{ loc.name }}
      </option>
    </select>
  </div>
</template>Code language: HTML, XML (xml)
<!-- layouts/default.vue -->
<template>
<Html>
<!-- ... -->
<Body>
<header>
<nav>
<!-- ... -->
<div>
<ul>
<li>
<LocLink to="/">{{ $t("nav.shows") }}</LocLink>
</li>
<!-- ... -->
</ul>
+ <LangSwitcher />
</div>
</nav>
</header>
<!-- ... -->
</Body>
</Html>
</template>Code language: Diff (diff)In our layouts/default.vue, we can place this component in our nav bar to make it available to our visitors.
 <!-- layouts/default.vue -->

 <template>
   <Html>
     <!-- ... -->
     <Body>
       <header>
         <nav>
           <!-- ... -->

           <div>
             <ul>
               <li>
                 <LocLink to="/">{{ $t("nav.shows") }}</LocLink>
               </li>

               <!-- ... -->
             </ul>

+            <LangSwitcher />
           </div>
         </nav>
       </header>

       <!-- ... -->
     </Body>
   </Html>
</template>Code language: Diff (diff)With the switcher in place, we give our visitors an easy way to select the language of their choice.

How do I load translation messages asynchronously?
Our translation messages are all embedded in the i18n.config.ts file. This is fine when our app is small, but it doesn’t scale well. As more locales and translations are added, the i18n.config.ts file, and our main app bundle, will get quite bloated.
We can address this bloat by breaking up our translations into one file per locale. We then only download the file for the active locale (that’s the asynchronous part). The nice thing is that Nuxt I18n can handle much of this for us; we just need to update our configuration.
Let’s start by migrating our translations. We’ll create a new lang directory in our project, add two new files to it, and move our translation messages to these new files:
// lang/en-CA.ts

export default {
  app_title: "Andorable",
  nav: {
    shows: "Shows",
    blog: "Blog",
    about: "About",
  },
  // ...all other en-CA translations
}Code language: TypeScript (typescript)
// lang/ar-EG.ts
export default {
app_title: "أندورابل",
nav: {
shows: "برامج",
blog: "المدونة",
about: "نبذة عنا",
},
// ...all other ar-EG translations
}Code language: TypeScript (typescript)Next, let’s remove the translations from i18n.config.ts.
// i18n.config.ts

export default defineI18nConfig((_nuxt) => ({
  legacy: false,
- messages: {
-   "en-CA": {
-     app_title: "Andorable",
-     // ...
-   },
-   "ar-EG": {
-     app_title: "أندورابل",
-     // ...
-   },
- },
}))Code language: Diff (diff)
Finally, let’s update our Nuxt I18n config to let the library know that we want to load translations asynchronously. We’ll also have to tell it where our new files are.
// nuxt.config.ts

export default defineNuxtConfig({
  modules: ["@nuxtjs/tailwindcss", "@nuxt/content", "@nuxtjs/i18n"],
  routeRules: {
    "/": { redirect: "/en-CA" },
  },
  i18n: {
    locales: [
      {
        code: "en-CA",
        name: "English",
        iso: "en-CA",
        dir: "ltr",
+       file: "en-CA.ts", // add file name for each locale
      },
      {
        code: "ar-EG",
        name: "العربية (Arabic)",
        iso: "ar-EG",
        dir: "rtl",
+       file: "ar-EG.ts",
      },
    ],
+   // Tell Nuxt I18n to load translations asynchronously
+   lazy: true,
+   // Let Nuxt I18n know the root directory of our translations
+   langDir: "lang",
    strategy: "prefix",
    detectBrowserLanguage: false,
    vueI18n: "./i18n.config.ts",
  },
})Code language: Diff (diff)
That’s it! If we load our app now we should see it behave exactly the same as before. However, if we open our browser’s dev tools and look at the Network tab, we can see that our translations are only loaded when needed.


With relatively little effort, we’ve made our app much more scalable. We can add as many locales as we want without bloating our main app bundle.
How do I translate basic strings?
We’ve covered this before, but it bears brief repeating: It’s the foundation of all the string localization techniques we’ll cover in upcoming sections. Let’s say we have a string in one of our pages or components.
<template>
  <h2>About us</h2>
</template>Code language: HTML, XML (xml)
To localize this string, we first add its translations to our translation files:
// lang/en-CA.ts
export default {
  "about_us: "About us"
}Code language: TypeScript (typescript)
// lang/ar-EG.ts
export default {
"about_us: "نبذة عنا"
}Code language: PHP (php)We then use the $t() function provided by Nuxt I18n to display the translation in our page or component.
 <template>
-  <h2>About us</h2>
+  <h2>{{ $t("about_us") }}</h2>
 </template>Code language: HTML, XML (xml)
When the active locale is English, the above header will read “About us”. When the locale is Arabic, it will read “نبذة عنا”.
How do I use dynamic values in translation messages?
We sometimes need to inject a value into a string at runtime e.g. You received an email from ${username}. A dynamic value can be placed in a different location in a sentence depending on the language. So we want to be able to specify where to inject a runtime value in each of our translation messages.
We can use Nuxt I18n’s special {variable} syntax to accomplish this.
// lang/en-CA.ts
export default {
  // ...
  hello_user: "Hello, {username}!",
}Code language: TypeScript (typescript)
// lang/ar-EG.ts
export default {
// ...
hello_user: "أهلاً {username}!",
}Code language: TypeScript (typescript)In our template, we can use the second parameter to the $t() function to provide the runtime value.
<template>
  <p>{{ $t("hello_user", { username: "Mary" }) }}</p>
</template>Code language: HTML, XML (xml)
We can have as many interpolated variables in a message as we want. A notification component in our demo app can serve as an example. We’ll mock up an alert for the current visitor when a new episode of a show they like is released. First, let’s add the messages.
// lang/en-CA.ts

export default {
  app_title: "Andorable",
  // ...
  about: {
    title: "About",
    body: "Andorable is all about streaming Star Wars shows...",
  },
+ notifications: {
+   new_episode: "Hello, {username}. A new episode of {show} just landed!",
+ },
}Code language: Diff (diff)
// lang/ar-EG.ts
export default {
app_title: "أندورَبل",
// ...
about: {
title: "نبذة عنا",
body: "أندورَبل هو موقع عن كل شيء متعلق بعروض بث حرب النجوم...",
},
+ notifications: {
+ new_episode: "أهلاً {username}، حلقة جديدة من {show} نزلت!",
+ },
}Code language: Diff (diff)And we can use the second param to $t() to plug in our dynamic values.
 <!-- layouts/default.vue -->

 <template>
   <Html>
     <!-- ... -->
     <Body>
       <!-- ... -->

       <main>
+        <Notification>{{
+          $t("notifications.new_episode", { username: "Mary", show: "Andor" })
+        }}</Notification>
         <slot />
       </main>
     </Body>
   </Html>
 </template>

 <!-- ... -->Code language: Diff (diff)
🔗 Resource » If you’re curious, you can get the code for our notification component from our GitHub repo.
🤿 Go deeper » Read more about interpolation in Vue I18n’s documentation.
How do I work with plurals in translation messages?
Languages have different plural rules. Take the following message in English: “24 episodes have been released”. English has two plural forms, one and other (the zero case is covered under other):
| English form | Message |
| one | 1 episode has been released |
| other | 24 episodes have been released |
Handling simple plurals like those in English is relatively straightforward with Nuxt I18n. Let’s localize the episode count in our show listings to demonstrate.

We can add the 2 English plural forms to a message separated by a | character.
// lang/en-CA.ts

export default {
  app_title: "Andorable",
  // ...
  about: {
    title: "About",
    body: "Andorable is all about streaming Star Wars shows...",
  },
+ show: {
+   episodes: "{n} episode | {n} episodes",
+ },
  notifications: {
    new_episode: "Hello, {username}. A new episode of {show} just landed!",
  },
}Code language: Diff (diff)
✋ Heads up » Order matters here: We add the one form followed by the other form.
In our template, we can use the second parameter to $t() to provide an integer value for the special n counter.
 <!-- pages/index.vue -->

 <template>
   <div>
     <!-- ... -->

     <h1>{{ $t("home.header") }}</h1>

     <section>
       <div v-for="show in shows" :key="show.id">
         <LocLink :to="`/shows/${show.id}`">
           <img :src="show.img" :alt="`Image for ${show.name}`" />
           <h3>{{ show.name }}</h3>
           <div>
             <p>{{ show.premieredAt }}</p>
-            <p>{{ show.episodeCount }} episodes</p>
+            <p>{{ $t("show.episodes", show.episodeCount) }}</p>
           </div>
         </LocLink>
       </div>
     </section>
   </div>
 </template>

 <!-- ... -->Code language: Diff (diff)
Nuxt I18n is smart enough to know that an integer passed as the second param to $t() means we’re selecting a plural form. It will also interpolate the integer, replacing the {n} placeholders when displaying the plural form.

🗒️ Note » If you want to use a separate form for the zero case, you can do so by providing the form before the one form e.g. No episodes | {n} episode | {n} episodes.
We can interpolate runtime values in our plural messages as well. Here’s an example:
// lang/en-CA.ts

export default {
  plural_w_variable: "{n} new {show} episode | {n} new {show} episodes",
}Code language: TypeScript (typescript)
<!-- In our components, pages, or layouts -->
<template>
<p>{{ $t("plural_w_variable", { show: "Andor" }, 4) }}</p>
</template>Code language: HTML, XML (xml)The above would render, “4 new Andor episodes.”
Handling complex plurals
Arabic has 6 plural forms. So does Welsh. To handle languages with many plural forms, Nuxt I18n allows custom plural resolvers that we can specify per locale. We’ll add a resolver for Arabic in a moment. First, let’s add the Arabic translation for the episode count message. We’ll add the Arabic forms (zero, one, two, few, many, other) separated by a | character.
// lang/ar-EG.ts

export default {
  app_title: "أندورَبل",
  // ...
  about: {
    title: "نبذة عنا",
    body: "أندورَبل هو موقع عن كل شيء متعلق بعروض بث حرب النجوم...",
  },
+ show: {
+   episodes: `
+   لا توجد حلقات
+   |
+   حلقة {n}
+   |
+   حلقتين {n}
+   |
+   {n} حلقات
+   |
+   {n} حلقة
+   |
+   {n} حلقة
+   `,
+ },
  notifications: {
    new_episode: "أهلاً {username}، حلقة جديدة من {show} نزلت!",
  },
}Code language: JavaScript (javascript)
Now let’s add our Arabic plural resolver. This is a function that takes the integer counter passed into $t() and returns an integer index used to select the plural form from our message. Let’s add an i18n directory to our project to house custom internationalization logic, and place our resolver in there.
// i18n/plurals.ts

export const arabicPlurals = (choice: number): number => {
  const name = new Intl.PluralRules("ar-EG").select(choice)

  return { zero: 0, one: 1, two: 2, few: 3, many: 4, other: 5 }[name]
}Code language: TypeScript (typescript)
We’re using JavaScript’s built-in Intl.PluralRules to make our jobs easier. Given a locale (ar-EG) and an integer counter (choice), Intl.PluralRules.select returns a string representing the appropriate plural form.
For example, the Arabic plural form for a choice value of 9 would be the "few" form. Nuxt I18n needs an integer index to select the form from our message, so we map the string to its index before we return it from our resolver. The "few" form would map to the 3 index.
✋ Heads up » We have to specify all forms that a language supports in each plural message for this solution to work. Otherwise, we could get an index from our resolver that doesn’t correctly match a form in our message.
Now we just have to wire up our resolver to the Vue I18n config.
// i18n.config.ts

+ import { arabicPlurals } from "./i18n/plurals"

export default defineI18nConfig(() => ({
  legacy: false,
  fallbackLocale: "en-CA",
+ pluralRules: {
+   "ar-EG": arabicPlurals,
+ },
}))Code language: Diff (diff)
✋ Heads up » Use the pluralRules config option when you’re using the Composition API (legacy: false). Otherwise, use the pluralizationRules option for the Options API. Learn more in the Vue I18n documentation.
With that in place, our Arabic plurals work like a charm.

🗒️ Note » The astute reader may have noticed that the rendered plural Arabic messages are using Western Arabic numerals (1, 2, 3) and not Arabic’s native Eastern Arabic numerals (١، ٢، ٣). This issue has been reported and may be fixed by the time you read this.
How do I localize dates?
Nuxt I18n provides a $d() function that outputs a date in the native format of the active locale. Let’s use this to localize the premiere date in our show listings.
 <!-- pages/index.vue -->

 <template>
   <div>
     <!-- ... -->

     <section >
       <div v-for="show in shows" :key="show.id">
         <LocLink :to="`/shows/${show.id}`">
           <img :src="show.img" :alt="`Image for ${show.name}`" />
           <h3>{{ show.name }}</h3>
           <div>
-            <p>{{ show.premieredAt }}</p>
+            <p>{{ $d(Date.parse(show.premieredAt)) }}</p>
             <p>{{ $t("show.episodes", show.episodeCount) }}</p>
           </div>
         </LocLink>
       </div>
    </section>
  </div>
 </template>

 <!-- ... -->Code language: Diff (diff)
🗒️ Note » We had to parse our string date (”2022-09-21”) to a Date object to pass it to $d(). It seems that $d() can technically accept a string here, but at the time of writing the TypeScript signatures for the function didn’t allow for this. It’s probably safe to assume that $d(value: Date) will always work.
The above will output each show’s premiere date in the default date format of the active locale.

✋ Heads up » For some locales, we might get the server and the client defaulting to different date formats. For example, at the time of writing, my Node environment was defaulting to 9/21/2022 for en-CA, whereas browsers typically default to 2022-09-21 for the same locale. This would result in a “Hydration text content mismatch” warning in the browser console—Nuxt’s server-rendered page and its hydrated browser equivalent wouldn’t match. One fix for this is using custom formats for our locales, which would be the same for both server and client. We cover those next.
Using custom date formats
What if we wanted finer control over how our dates looked? Under the hood, Nuxt I18n uses JavaScript’s native Intl.DateTimeFormat to display localized dates. We can specify formats for Intl.DateTimeFormat through the Vue I18n datetimeFormats config option. This allows us to completely customize our date formats. Let’s use custom date formatting to update the display of our shows’ premier date.
First, let’s create a file under the i18n directory for our new formats.
// i18n/datetime-formats.ts

export const datetimeFormats = {
  "en-CA": {
    // 👇 Give a key for each format...
    short: {
      year: "numeric",
      month: "short",
      day: "numeric",
    },
    // We can have as many formats here as
    // want e.g. long, footer_copyright, etc.
  },
  "ar-EG": {
    // 👇 ...use the same keys for each locale
    short: {
      year: "numeric",
      month: "long",
      day: "numeric",
    },
  },
} as const // 👈 Cast to avoid TypeScript errorsCode language: TypeScript (typescript)
The options we provide (e.g. year, month, day) are exactly what the Intl.DateTimeFormat constructor takes in its options parameter. To use our new formats, we just need to wire them up to the Vue I18n instance.
// i18n.config.ts

  import { arabicPlurals } from "./i18n/plurals"
+ import { datetimeFormats } from "./i18n/datetime-formats"

 export default defineI18nConfig(() => ({
   legacy: false,
   fallbackLocale: "en-CA",
   pluralRules: {
     "ar-EG": arabicPlurals,
   },
+  datetimeFormats,
 }))Code language: Diff (diff)
Now we can use our custom short format in our templates by specifying it as the second parameter to $d().
 <!-- pages/index.vue -->

 <template>
   <div>
     <!-- ... -->

     <section >
       <div v-for="show in shows" :key="show.id">
         <LocLink :to="`/shows/${show.id}`">
           <img :src="show.img" :alt="`Image for ${show.name}`" />
           <h3>{{ show.name }}</h3>
           <div>
-            <p>{{ $d(Date.parse(show.premieredAt)) }}</p>
+            <p>{{ $d(Date.parse(show.premieredAt), "short") }}</p>
             <p>{{ $t("show.episodes", show.episodeCount) }}</p>
           </div>
         </LocLink>
       </div>
    </section>
  </div>
 </template>

 <!-- ... -->Code language: Diff (diff)
🔗 Resource » Learn more about datetime formatting in the Vue I18n docs.
How do I localize numbers?
Localizing numbers with Nuxt i18n is very similar to localizing dates. A locale-aware $n(value: number): string function makes our lives easy here.
<!-- In our templates -->

<template>
  <p>{{ $n(24.89) }}</p>
  <!-- => "24.89" when locale is en-CA -->
  <!-- => "٢٤٫٨٩" when locale is ar-EG -->
</template>Code language: HTML, XML (xml)
Using custom number formats
As you may have guessed, we can provide custom formats to Nuxt I18n and use them in our templates. Let’s add a new file just for that.
// i18n/number-formats.ts

export const numberFormats = {
  "en-CA": {
    currency: {
      style: "currency",
      currency: "USD",
      notation: "standard",
    },
    decimal: {
      style: "decimal",
      minimumFractionDigits: 2,
      maximumFractionDigits: 2,
    },
    percent: {
      style: "percent",
      useGrouping: false,
    },
  },
  "ar-EG": {
    currency: {
      style: "currency",
      currency: "USD",
      notation: "standard",
    },
    decimal: {
      style: "decimal",
      minimumFractionDigits: 2,
      maximumFractionDigits: 2,
    },
    percent: {
      style: "percent",
      useGrouping: false,
    },
  },
} as const // 👈 Cast to avoid TypeScript errorsCode language: TypeScript (typescript)
Each format we provide (currency, decimal, percent) is an object passed as the options parameter to JavaScript’s Intl.NumberFormat. Let’s plug these formats into our Vue I18n config so we can use them.
// i18n.config.ts

  import { arabicPlurals } from "./i18n/plurals"
+ import { numberFormats } from "./i18n/number-formats"
  import { datetimeFormats } from "./i18n/datetime-formats"

  export default defineI18nConfig(() => ({
    legacy: false,
    fallbackLocale: "en-CA",
    pluralRules: {
     "ar-EG": arabicPlurals,
    },
+   numberFormats,
    datetimeFormats,
  }))Code language: Diff (diff)
We can now use our custom formats in our templates.
<template>
  <div>
    <h2>{{ $t("numbers") }}</h2>
    <ul>
      <li>{{ $n(23.99, "currency") }}</li> <!-- 👈 -->
      <li>{{ $n(0.42, "decimal") }}</li>   <!-- 👈 -->
      <li>{{ $n(0.8999, "percent") }}</li> <!-- 👈 -->
    </ul>
  </div>
</template>Code language: HTML, XML (xml)
🔗 Resource » Learn more about number formatting in the Vue I18n docs.
How do I localize strings in JavaScript/TypeScript?
Outside of templates, we can call Vue I18n’s useI18n() composable to access localization functions.
<!-- In Vue component scripts (pages, components, layouts) -->

<script lang="ts" setup>
const { t, d, n } = useI18n()

const translatedAppTitle = t("app_title")
const localizedDate = d(new Date(), "short")
const localizedNumber = n(28.99, "currency")
</script>Code language: HTML, XML (xml)
// In composables, or utils

export const myComposable = () => {
  const { t, d, n } = useI18n()

	const translatedAppTitle = t("app_title")
  const localizedDate = d(new Date(), "short")
  const localizedNumber = n(28.99, "currency")
}Code language: TypeScript (typescript)
🔗 Resource » Read more about the useI18n() composable in the Vue I18n docs.
More in the GitHub repo
That about rounds out this guide. While outside the scope of this article, we’ve taken the Nuxt I18n demo app further in the accompanying GitHub repo. Check out the following commits:
- Localizing server API endpoints
- Adding a simple Express server (for testing i18n with static generation)
- Localizing Markdown content (created with the Nuxt Content module)
🔗 Resource » Our Comprehensive Guide to Vue Localization covers localizing Vue apps without Nuxt.
Adios for now
We hope you’ve enjoyed this Nuxt i18n guide and learned a few things along the way. And if you’re looking to take your localization workflow to the next level, look no further than Phrase Strings, the dedicated software localization platform within the Phrase Localization Platform.
Intuitive and efficient, Phrase Strings streamlines your software localization process with native integrations and a robust API—it all seamlessly plugs into your tech stack. Automate your workflows, set up custom integrations, and even update translations for your mobile apps over the air, ensuring your users always have the latest content.
Whatever your workflow looks like, Phrase Strings can adapt to it. Let Phrase Strings do the heavy lifting for your localization and stay focused on the code you love. Sign up for a free 14-day trial today and experience the difference for yourself!

Phrase Strings
Take your web or mobile app global without any hassle
Adapt your software, website, or video game for global audiences with the leanest and most realiable software localization platform.


