Software localization
The Ultimate Guide to iOS Localization
The iOS operating system keeps growing and becoming better each year. For developers, Apple’s increased attention to internationalization means that it’s easier to make apps that are ready for global markets.
With the App Store available in 175 countries and counting over half a billion visitors each week, making an application available in as many regions and languages as possible is one sure way to app success, and the ease of doing it now means there’s barely any excuse to skip it.
This step-by-step guide will show you how much simpler it is to open your application to the world. We’ll go through localization in both UIKit and SwiftUI, which makes this suitable for all types of teams.
Installation and setup
In this tutorial, we’ll be working on “Sleepy,” an iOS app that sells albums that help you sleep. The demo app will allow us to showcase all key steps in iOS localization. Sleepy is inspired by Uladzislau Luchkouski’s case study on Sleepy sounds. While Sleepy uses Swift 5, we’ll use Xcode Version 13.3.1 with SwiftUI 3 on iOS 15.
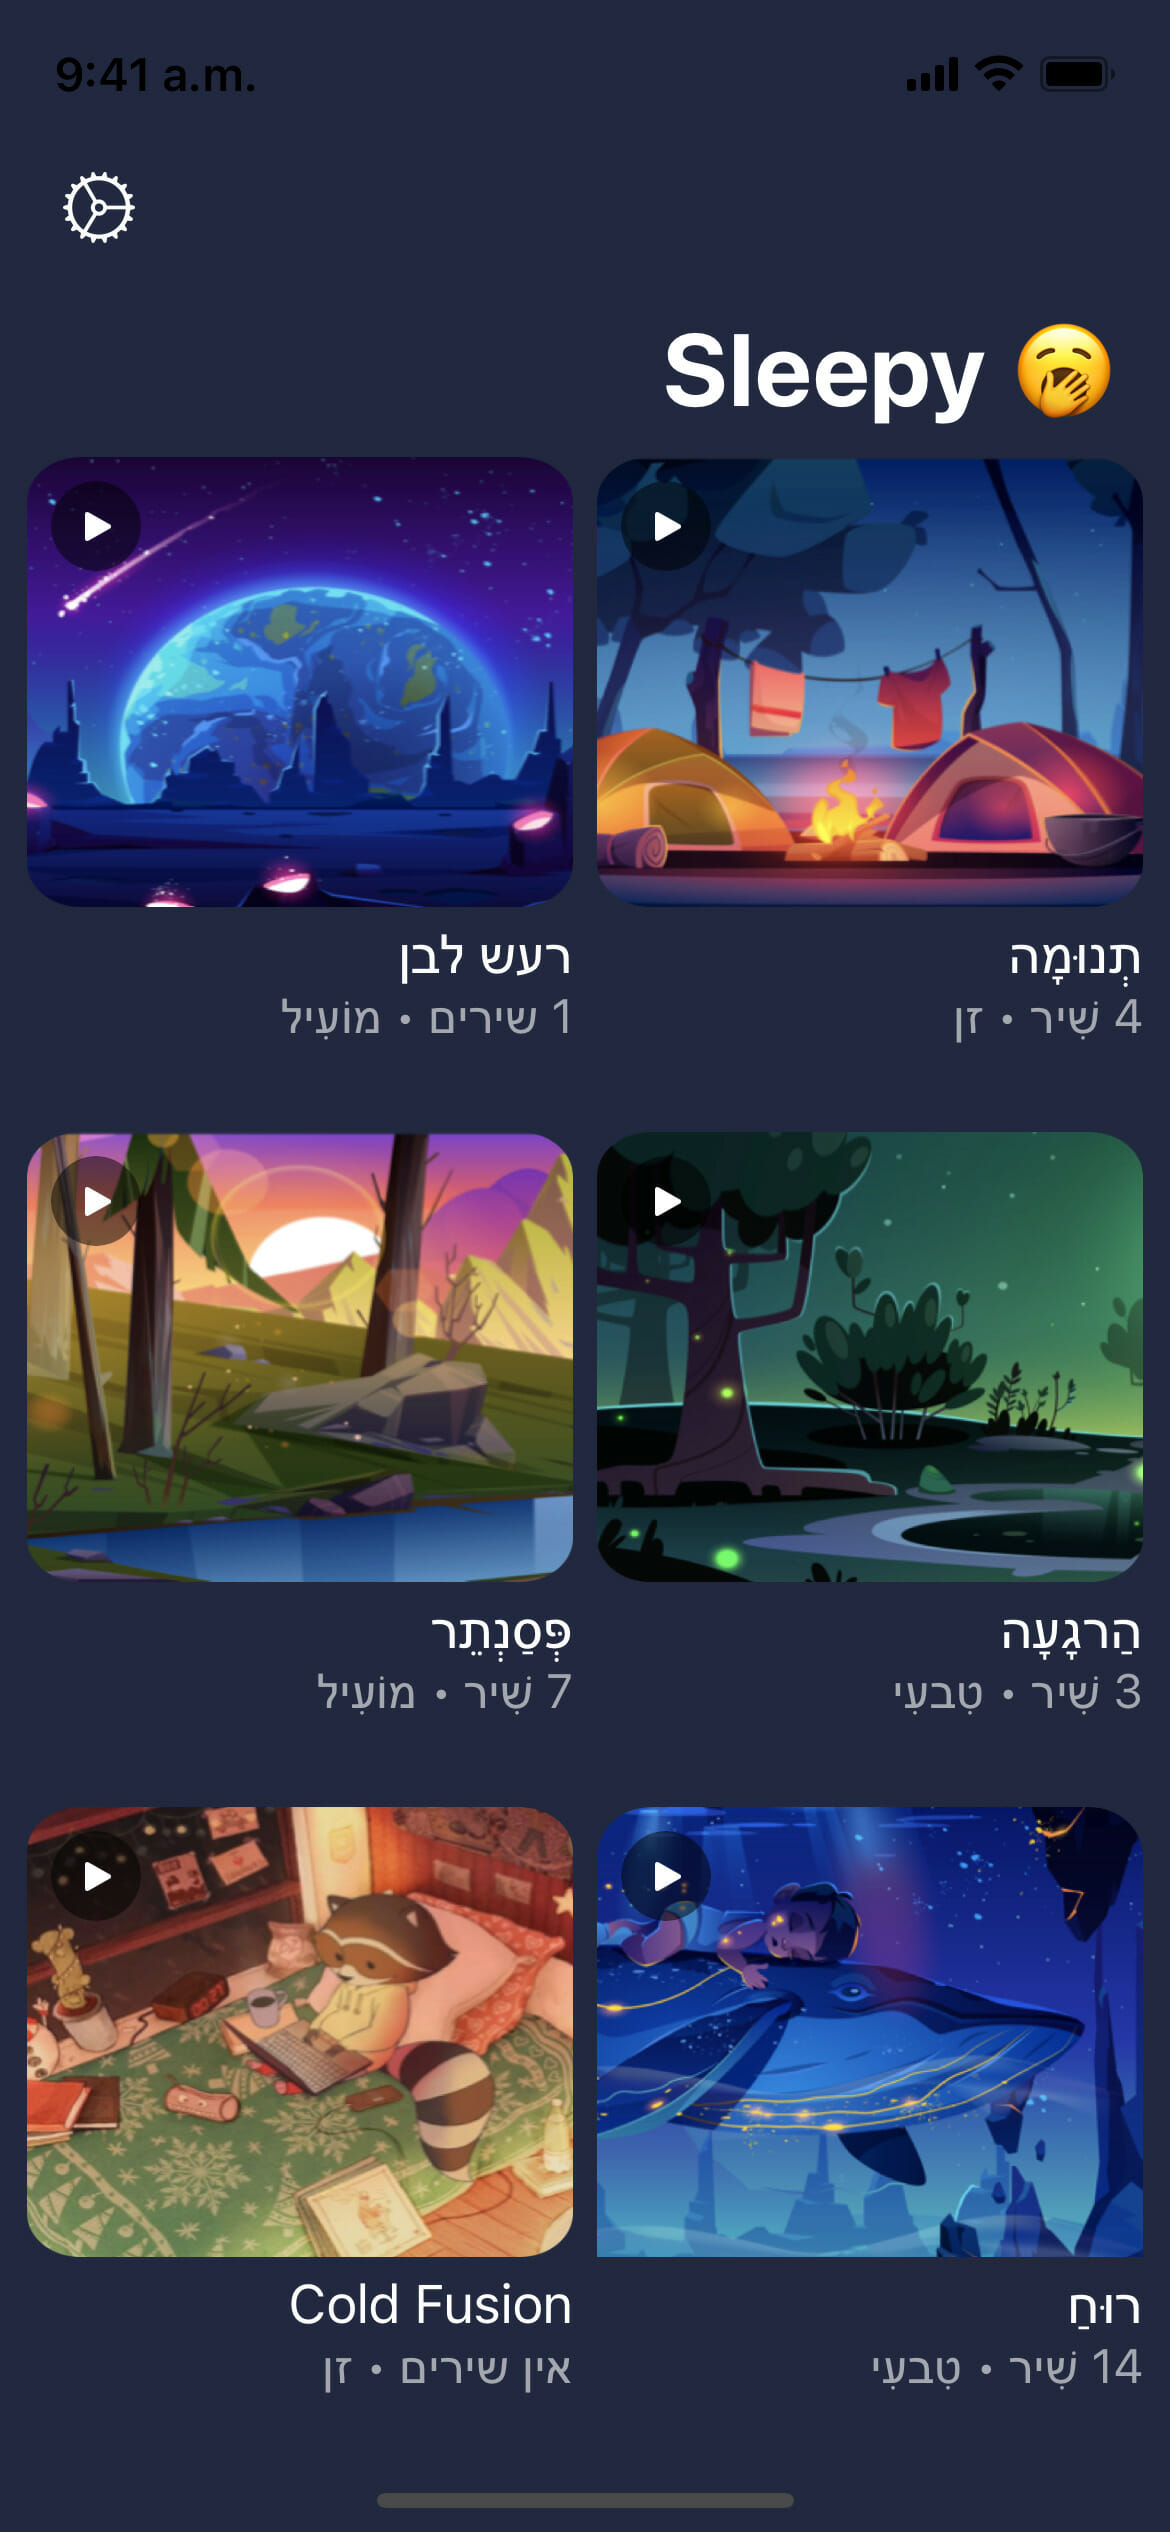
Now that our environment is ready, we’re ready to build our dream application. The first step is to think about the languages you’d like to support. In this case, Sleepy will have English as the base language, and it will also support Spanish and Hebrew—Hebrew will help in dealing with Right-To-Left (RTL) languages. You’re free to add as many languages as it makes sense for your app—and the same process can be repeated each time.
Creating a project
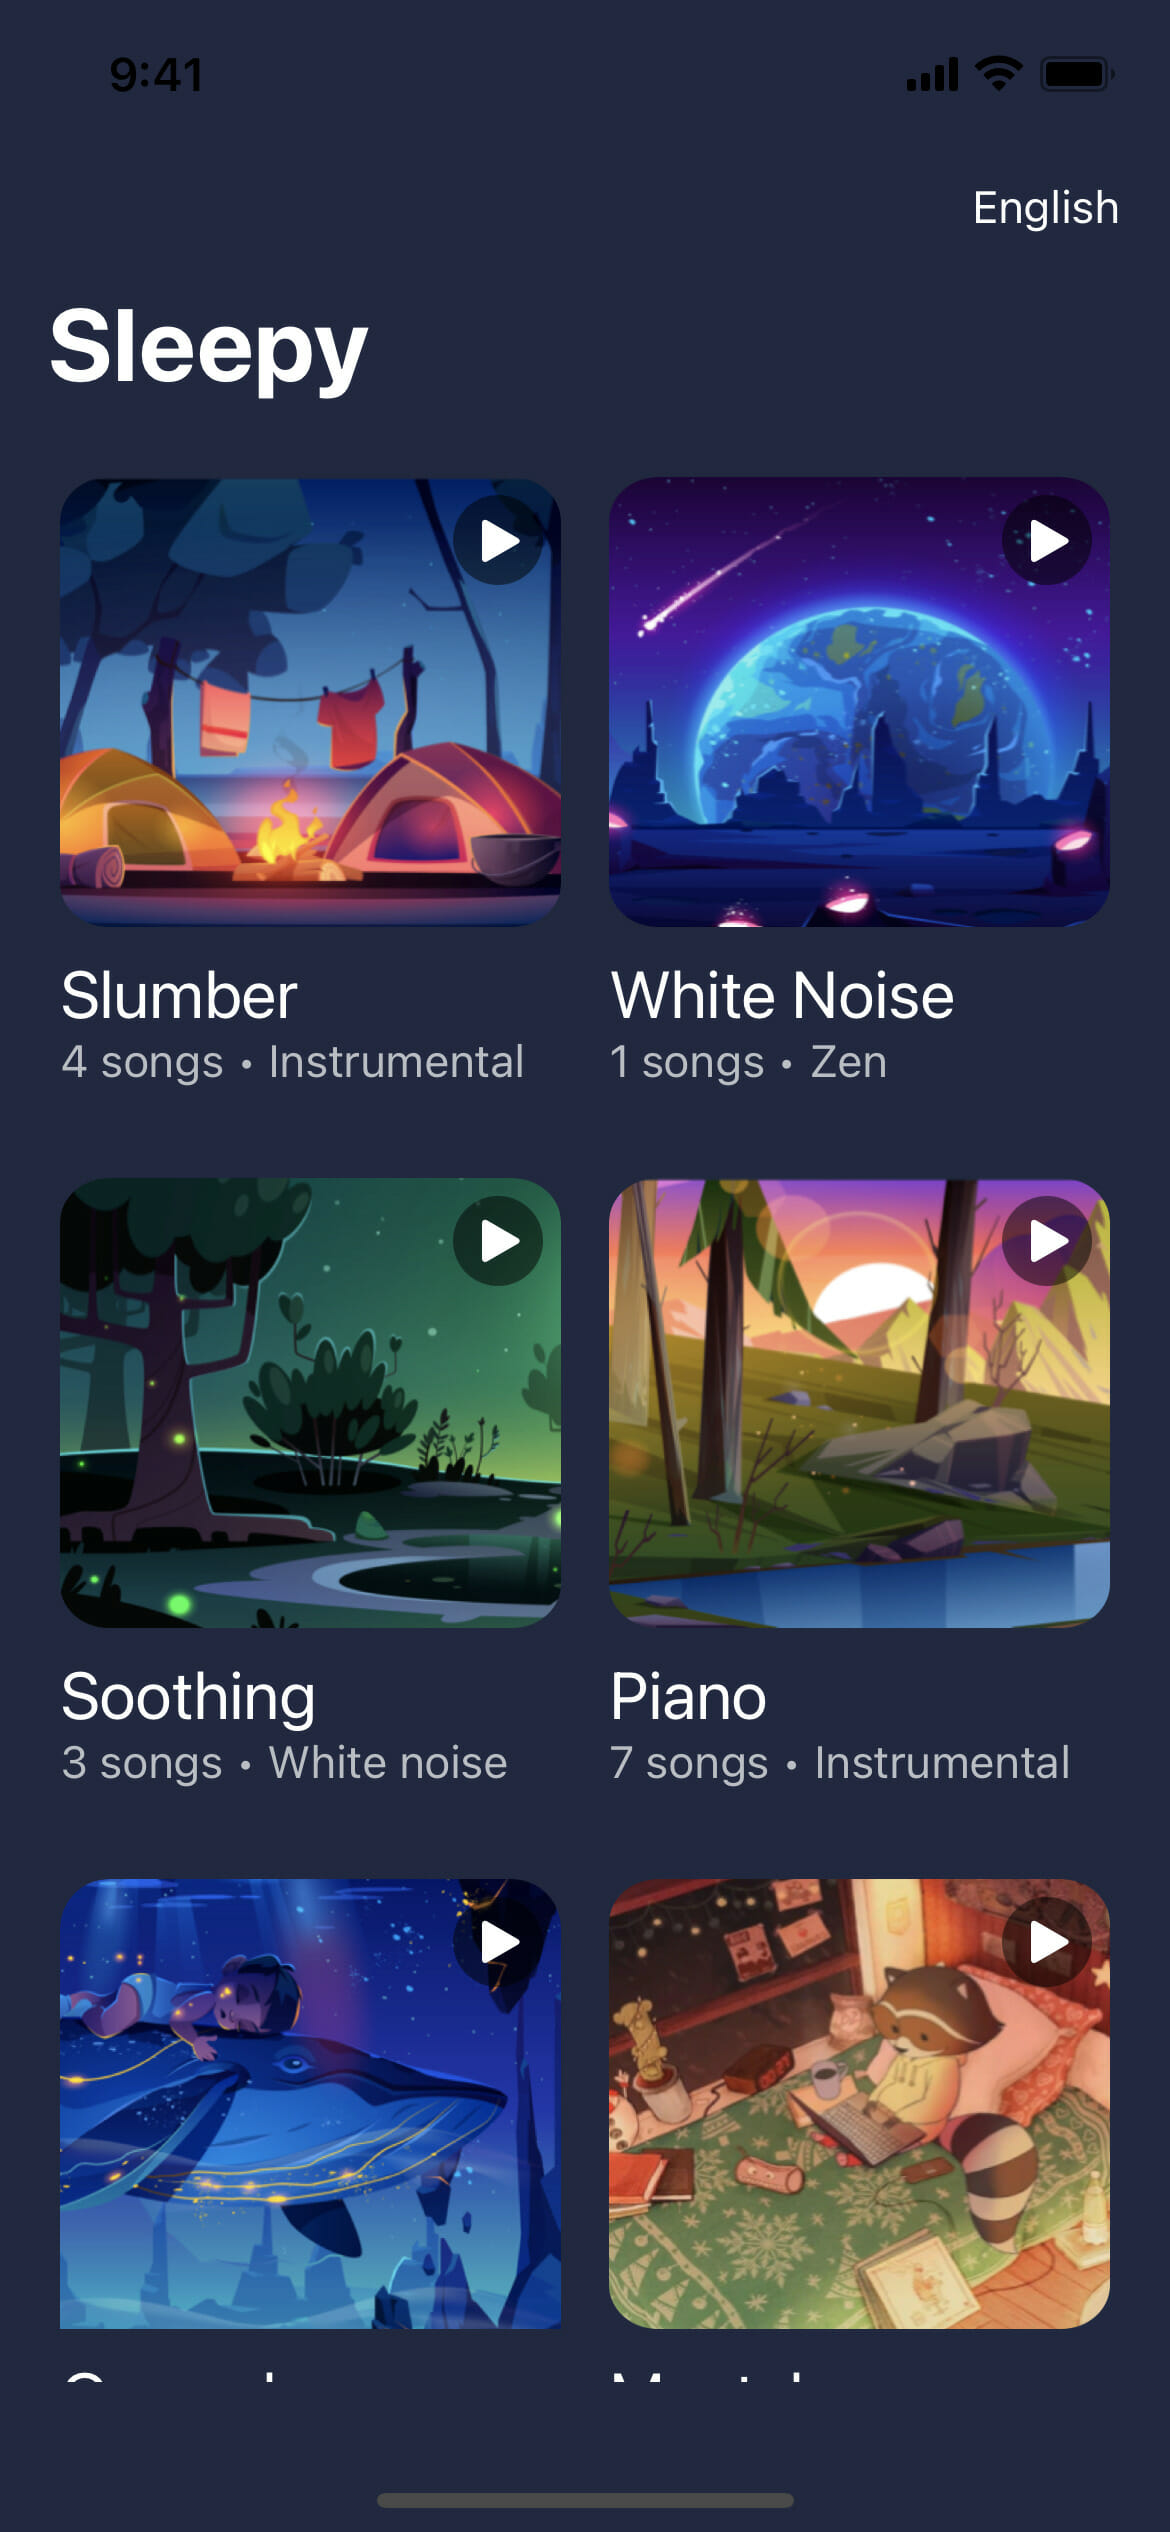
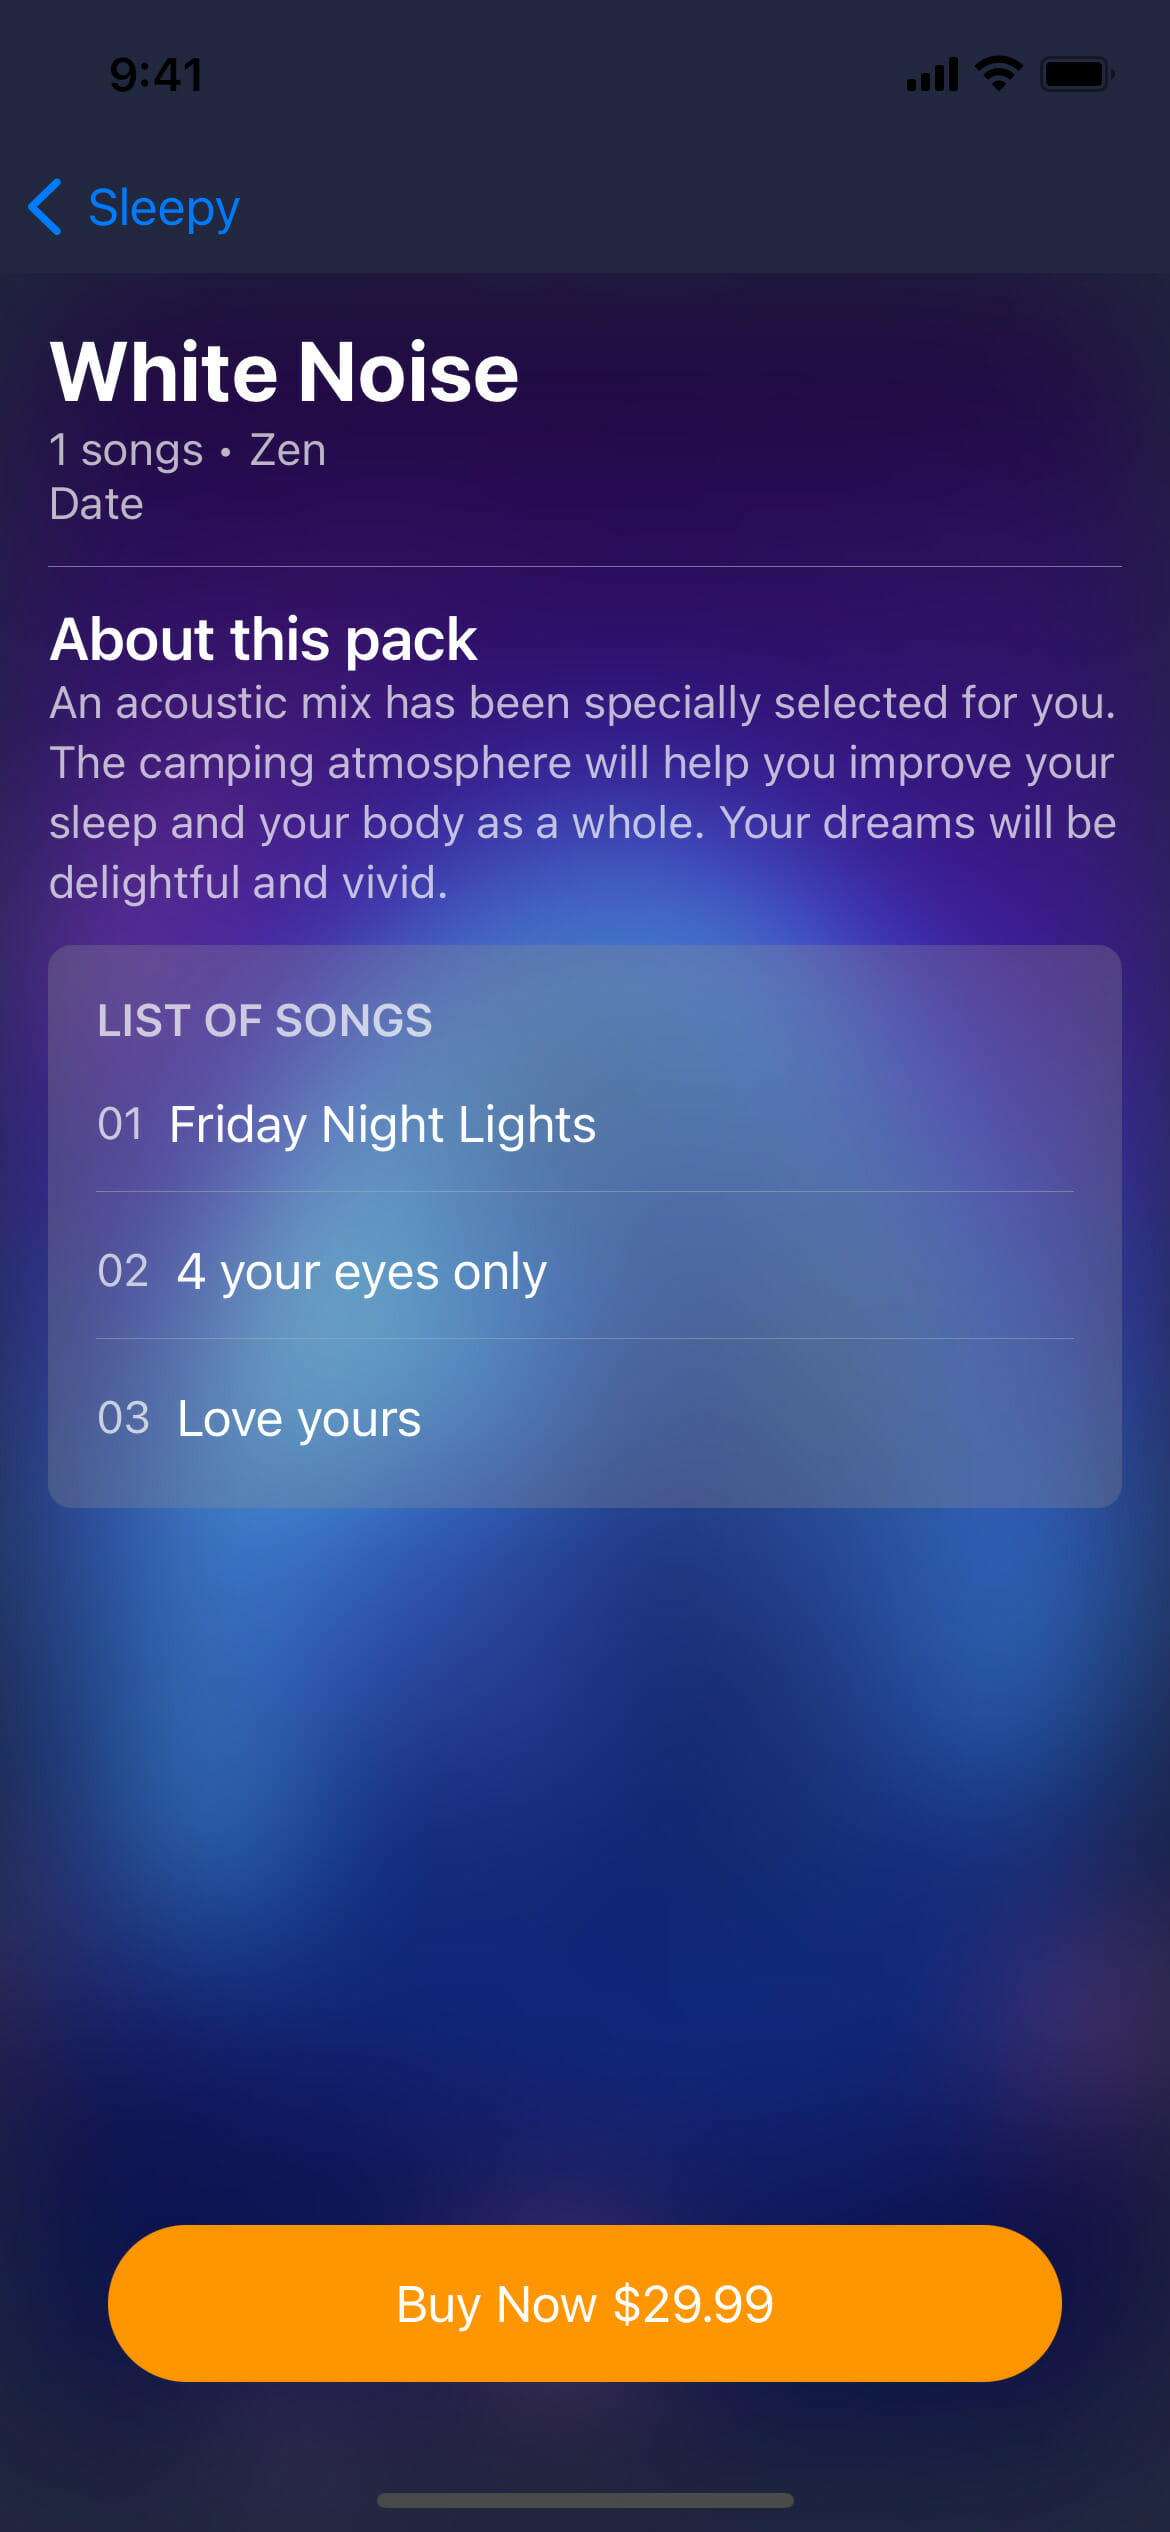
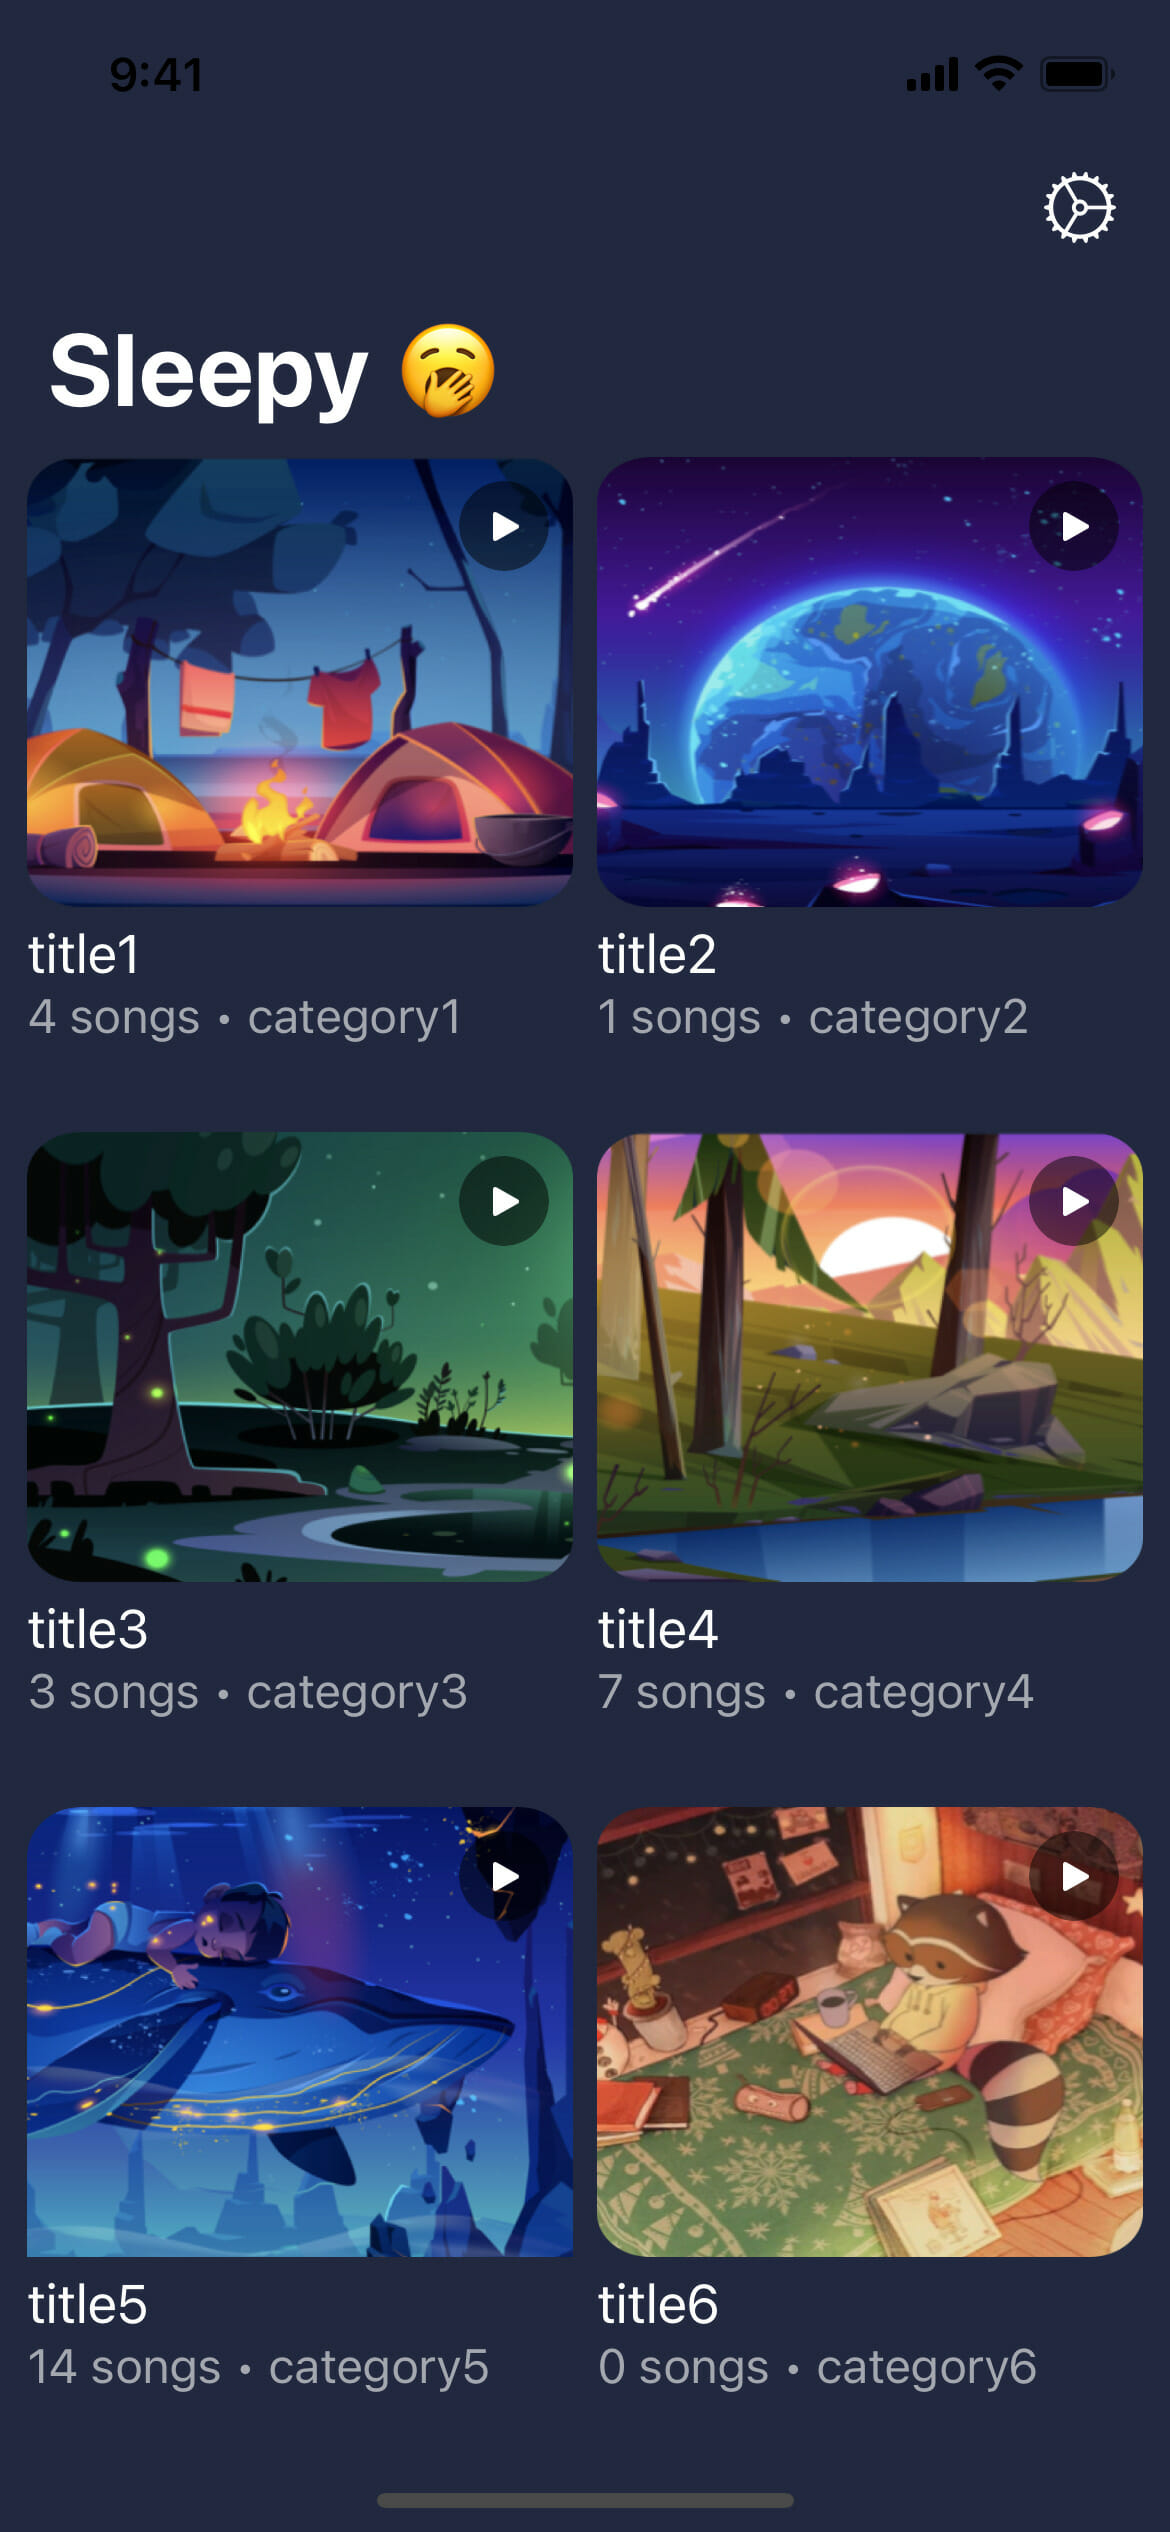
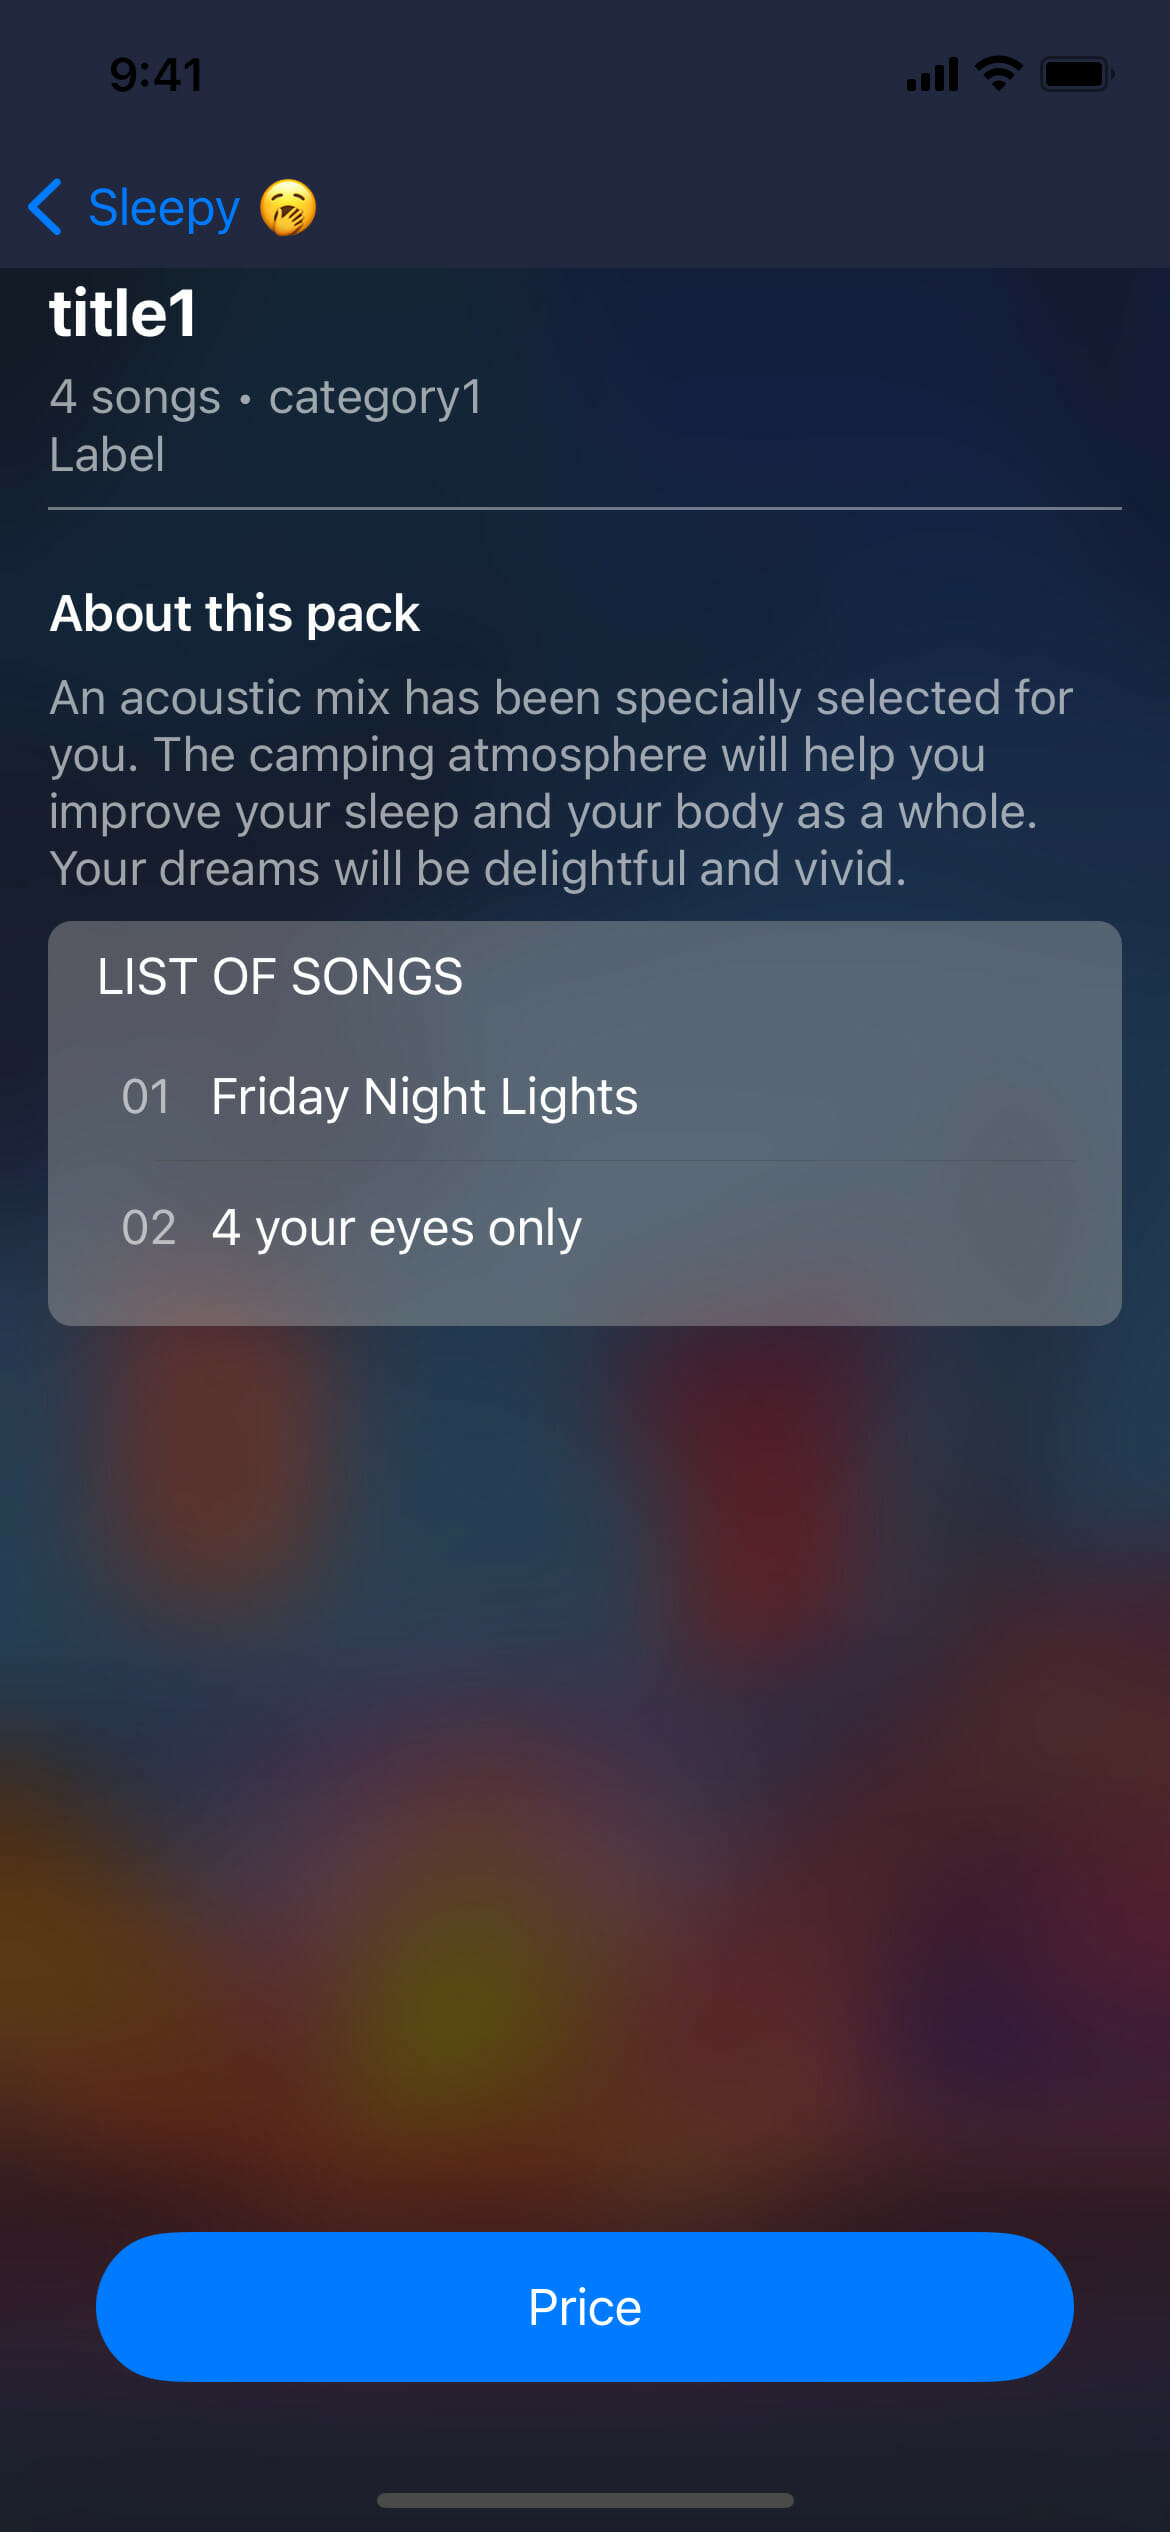
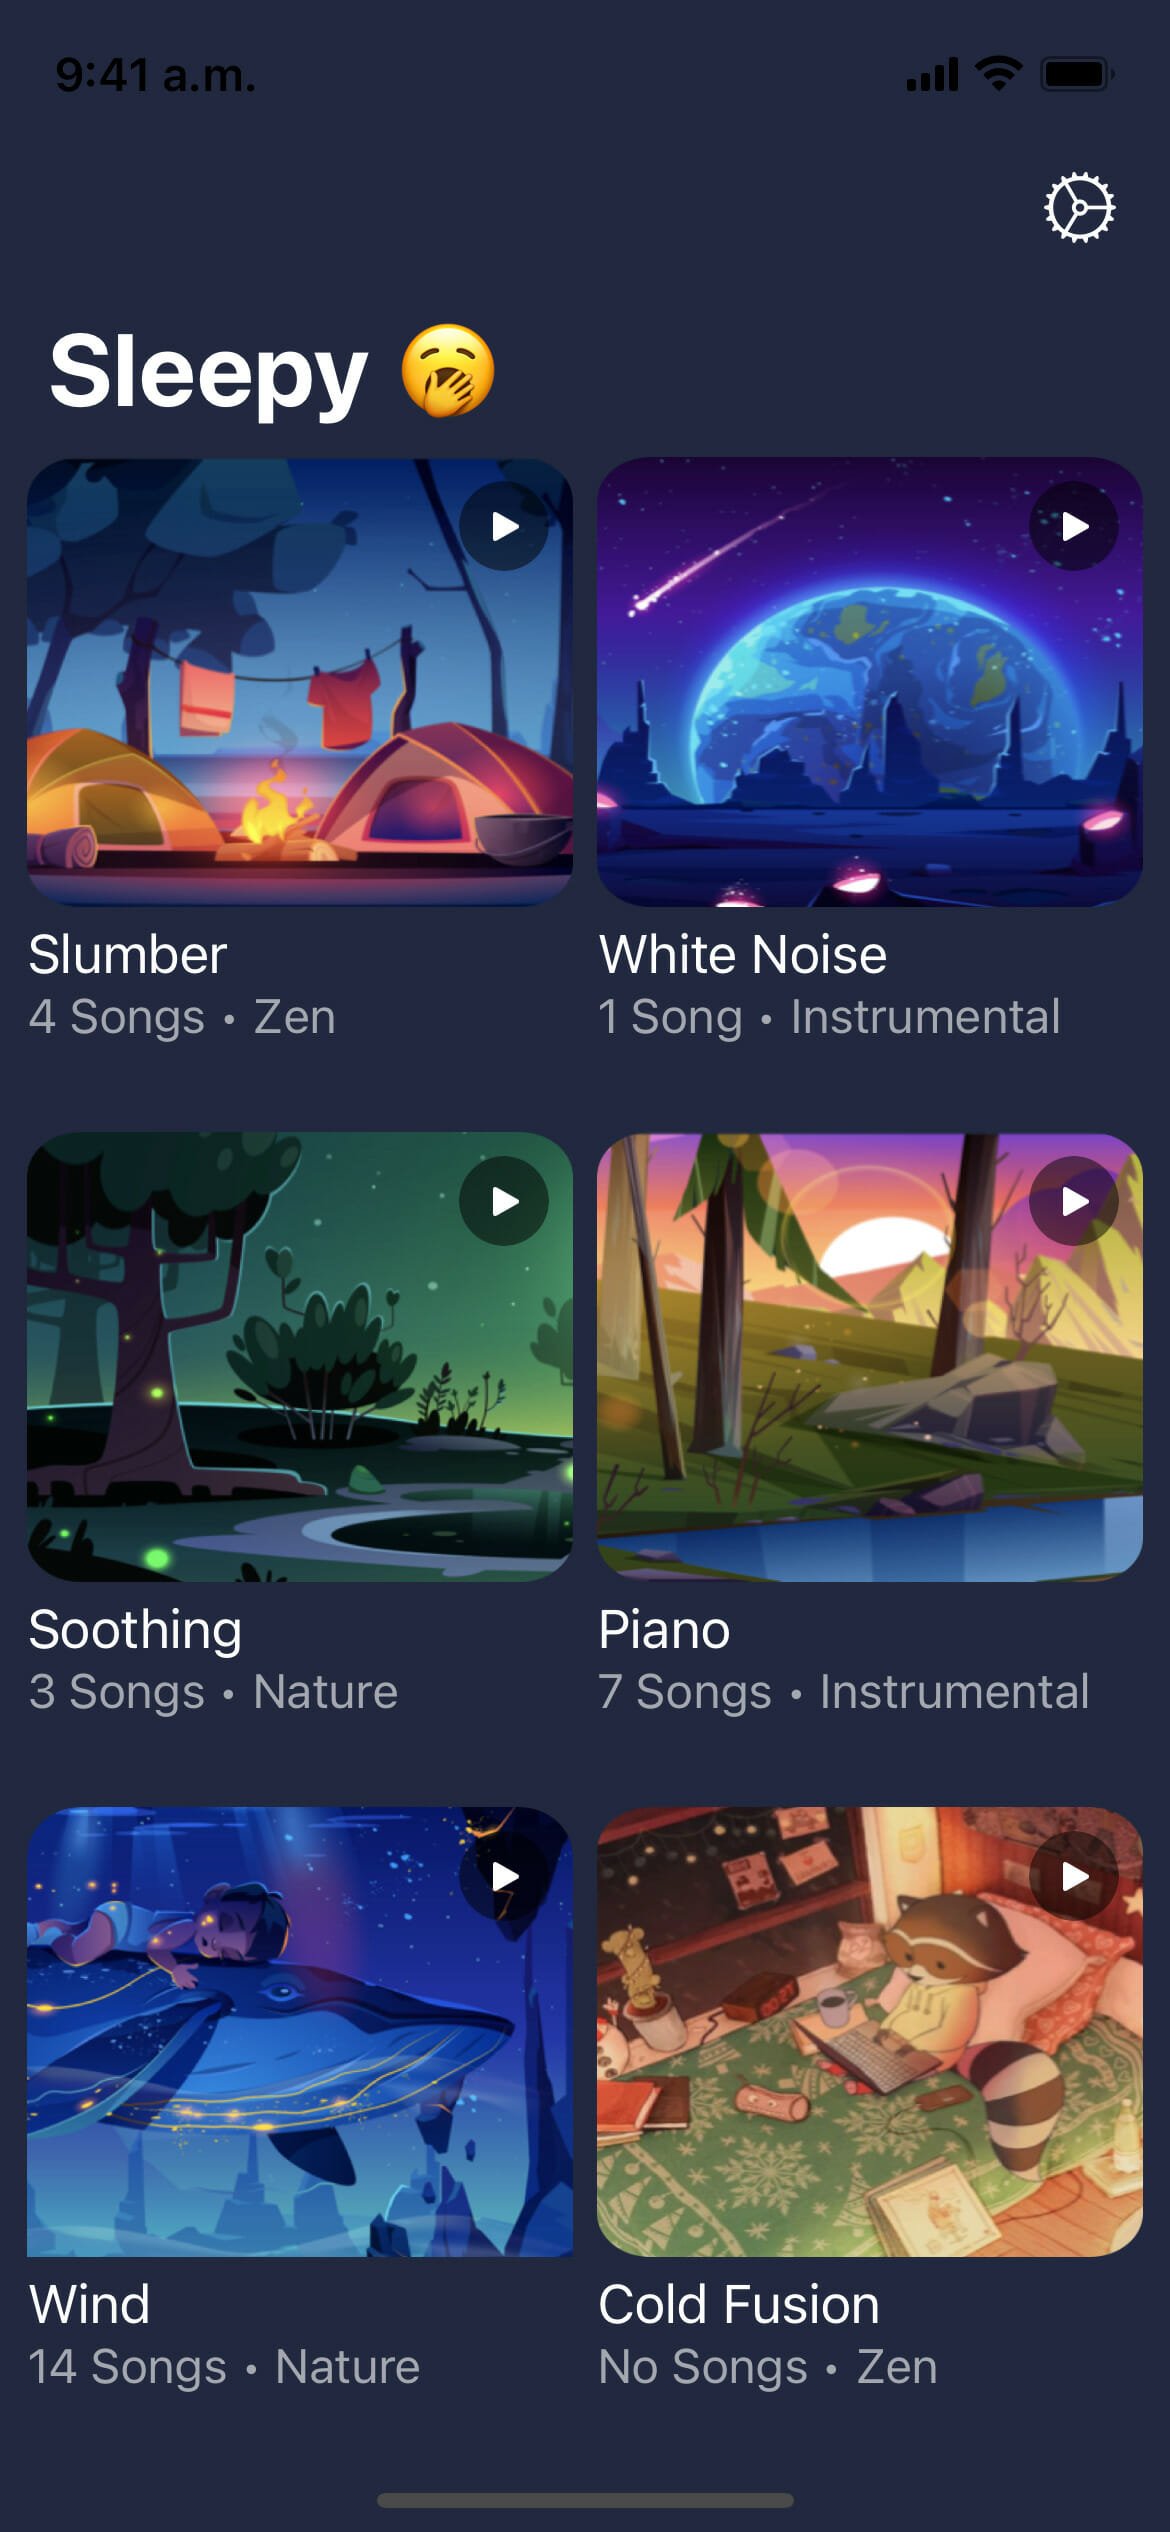
The principles learned from localizing this simple application can be applied to any type of application, regardless of size. You can get the full project here in UIKit and SwiftUI. When you successfully run the project, you should be able to see the list of sleep sounds. Clicking on any album will show more details.
How do I add supported languages to my app?
iOS can be localized into over 100 locales and regions. iOS uses the two-letter ISO 639-1 standard to represent languages e.g en for English, fr for French, etc.
🗒️ Note » If an ISO 639-1 code is not available for a particular language, use the ISO 639-2 code instead. For example, there is no ISO 639-1 code for the Hawaiian language, so use the ISO 639-2 code, haw.
Apple provides more information on language codes in its documentation. These identifiers are what tell the iOS system which languages your application is localized in, and show the user that language.
Now that our project is ready, let’s move to the fun part: localization.
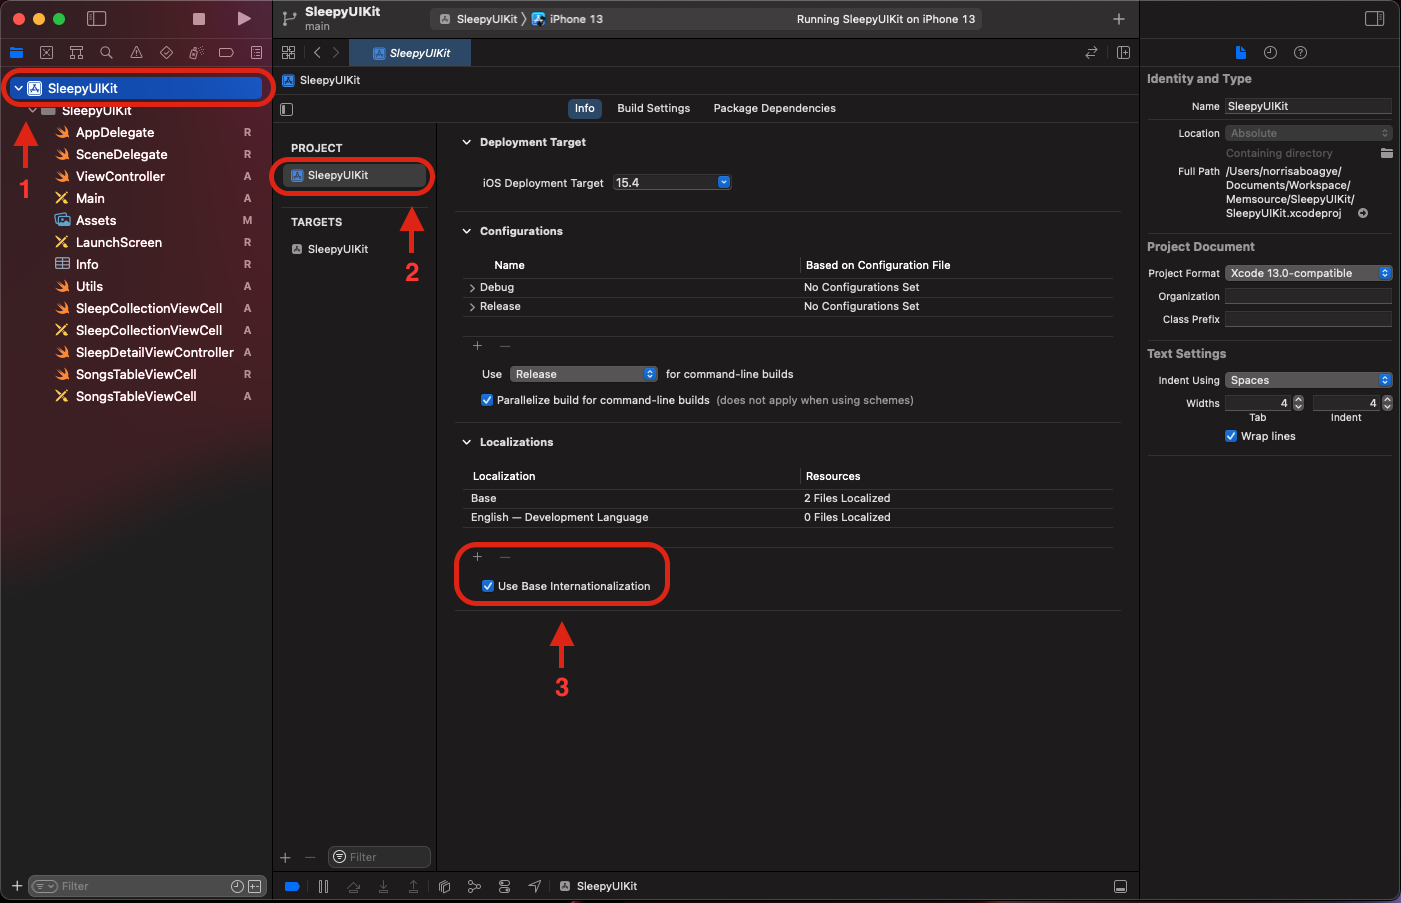
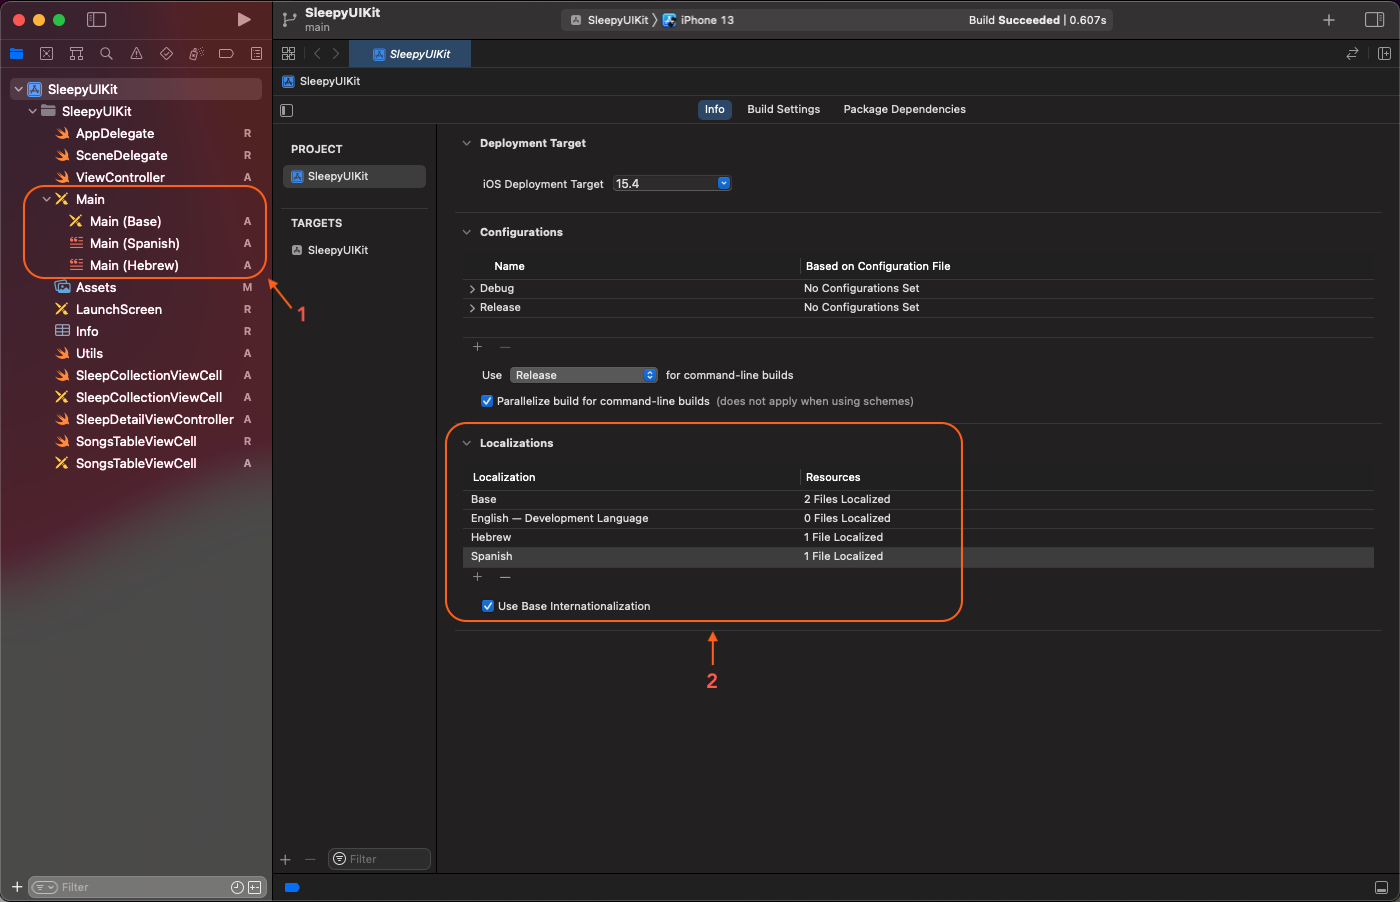
From the Project Navigator, select the project name. Then check Use Base Internationalization if it’s not checked.
Base internationalization separates user-facing strings from .storyboard and .xib files. It relieves localizers of the need to modify .storyboard and .xib files in Interface Builder. When you check the Use Base Internationalization option, Xcode transfers the Main.storyboard and LaunchScreen.storyboard into the Base.lproj folder for the default language. You’ll remember that our base language in this tutorial is English.
🗒️ Note » You will have to manually manage all localization files and folder structure if you don’t enable Use Base Internationalization. The official guide is a handy read if you need to manage localization files yourself.
Adding languages for localization
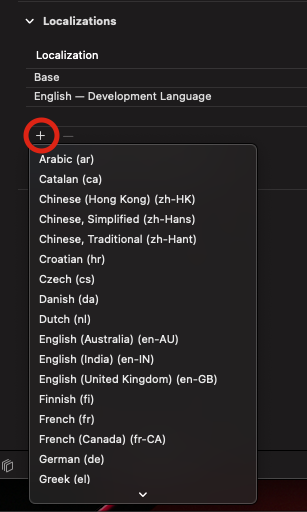
The next thing is to add the languages that you want to support. In our case, we’ll add Spanish and Hebrew. From the Project Navigator ➞ Select the project name. Under Localizations, click the plus (+) symbol to add the languages and regions you want to support. A list of languages will show for you to select your language of choice, let’s start with Spanish.
After you select your language (Spanish in our case), a choose files and reference language to create your desired language localization sheet will show. Uncheck LaunchScreen.storyboard. Apple allows only static assets in the LaunchScreen and does not support localization in the LaunchScreen.
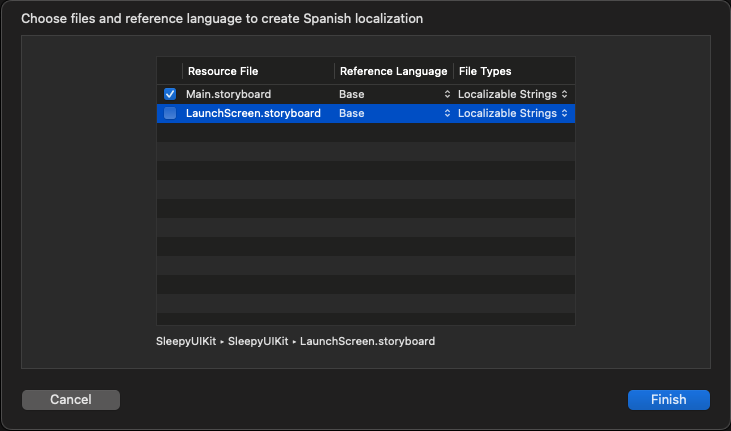
In the screen above, 2 things require your attention:
- Reference Language—the Base language in which we have designed our application, which is by-default English. It’s recommended to keep it in English (or your team’s native/fluent language). Changing this to another language will create all localization files using the keys from that language. Since the base language should be the guide for localization, it’s advisable to leave keep it that way.
- File Types—make sure that all files are set to Localizable Strings.
- Click Finish as shown in the screenshot above.
Repeat these same steps for any number of languages the app should support.
Changes in the project after adding language support
After adding all your supported languages, you’ll realize some changes in your project. Let’s go over these changes, and what it means for our goal of localization.
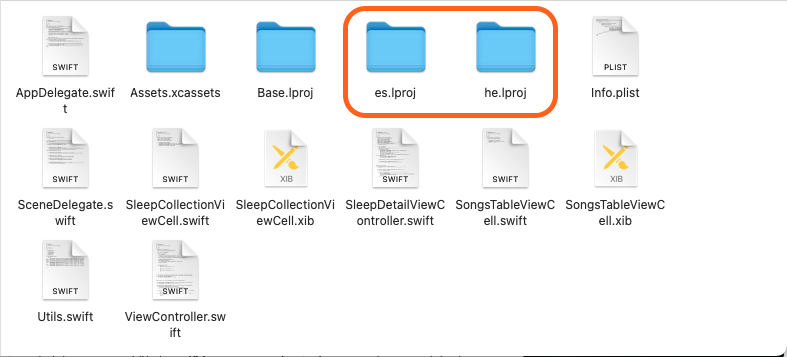
- Language folders: Xcode will create
es.lprojandhe.lprojthat contains theMain.stringsfor Spanish and Hebrew respectively. - Storyboard:
Main.storyboardshould now be a folder containing the baseMain.storyboardandMain.stringsof supported languages.
How do I work with translation files?
In our localization journey, we’ll come across different files that all help us achieve our goal.
- Strings Files: A strings file contains the translations of localized user-facing strings for one language with optional comments. The syntax for each string in the strings file is a key-value pair in which
keyis the identifier for looking up thevaluethat contains the translation. lprojfolder: is a directory that stores language-specific resources e.ges.lproj,he.lproj.- XLIFF: is an XML-based bitext format that standardizes how localizable data is passed between tools during a localization process.
🔗 Resource » Learn more about the XLIFF format in Apple’s documentation.
How do I handle language fallback?
I know you might be asking yourself, what happens if a user is using a language your app doesn’t support or your app supports the language but not every string for that particular language is localized?
- With the languages that aren’t supported at all, iOS will default to a base language or the development language.
- For partially translated languages, Apple uses an algorithm to help determine which language the user should see. Below is the algorithm in pseudocode:
func determineTheLanguageToUse() {
    for each user's preferredLanguages
      if app supports the language
        return the language
      if app supports a more generic dialect
        return the generic language

     // Exhausted preferredLanguages and still cannot determine..
     return CFBundleDevelopmentRegion
}Code language: Swift (swift)
🗒️ Note » A user’s preferredLanguages are those listed in iOS’s Settings App ➞ General ➞ Language & Region.
Generic Dialects
The pseudocode for language selection is quite straightforward, except it doesn’t cover generic dialects. There are languages that iOS supports in more than one dialect. en for English can have different dialects, like en-GB for English (United Kingdom), en-US for English (United States), en-IE for English (Ireland), etc. In our current app, if the user prefers en-GB, en will be used because it’s the closest generic dialect to en-GB.
✋ Heads up » The other way round is not true. If the app supports en-GB (and not en), then if a user prefers en, then en-GB will not be the fallback because en-GB is not more generic. In this case it defaults to CFBundleDevelopmentRegion, which is the default language and region for the application.
🤿 Go Deeper » The official documentation has more details on how locale matching and fallback decisions are made.
Programmatic fallback
To prevent any unexpected behavior, we can create an extension function that encapsulates NSLocalizedString with the desired defaultLanguage to fall back on when the preferred language isn’t found. This will be used throughout the project.
/*
Utils.swift
*/

extension String {

     func localize(comment: String = "") -> String {
         let defaultLanguage = "en"
         let value = NSLocalizedString(self, comment: comment)
         if value != self || NSLocale.preferredLanguages.first == defaultLanguage {
             return value // String localization was found
         }

				 // Load resource for default language to be used as
         // the fallback language
         guard let path = Bundle.main.path(forResource: defaultLanguage, ofType: "lproj"), let bundle = Bundle(path: path) else {
             return value
         }

         return NSLocalizedString(self, bundle: bundle, comment: "")
    }
}Code language: Swift (swift)
We can use localize() as follows.
// Prints the translation of the key localised to the user's
// language or default to English
print("translation.key".localize()) Code language: Swift (swift)
Working with Localizable.strings
Localizable.strings stores the strings to be used in the application as key-value pairs and will be used for localizing in the languages that you support.
Let’s create Localizable.strings by going to File ➞ New ➞ File or just press Cmd+N. Search for “strings” and you will see Strings File in the Resource pane.
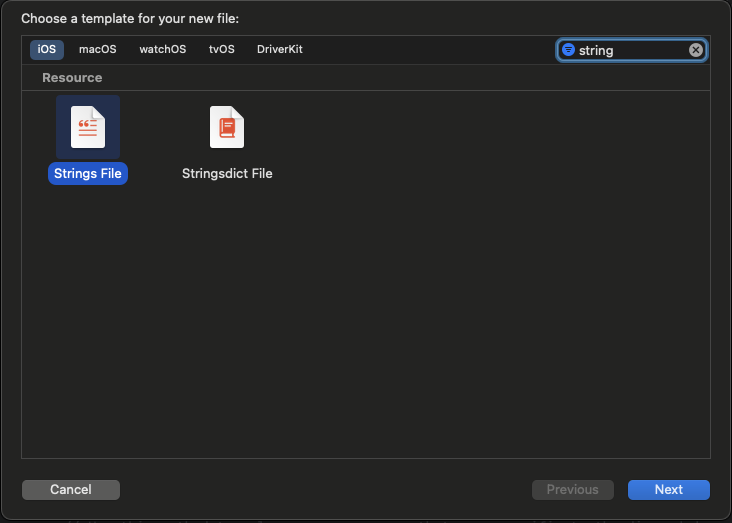
Select the Strings File as shown in the image above and click Next. Name the file Localizable and Create the file.
Click on the newly created Localizable.strings file and click on Localize in the Inspector. On the alert that appears, click Localize to create the localization file for English.
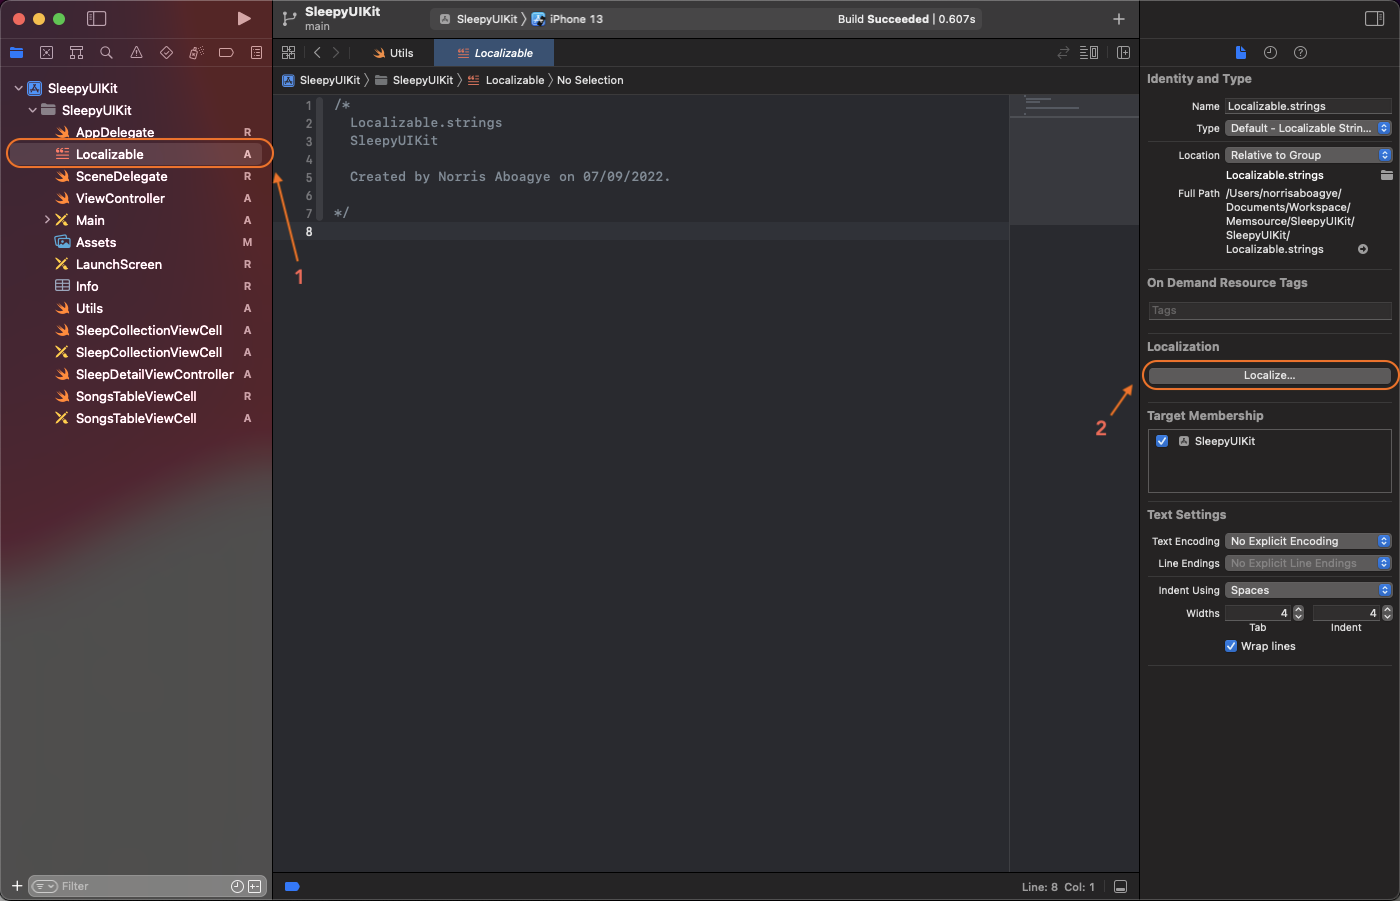
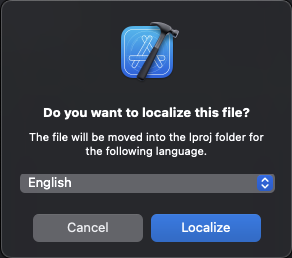
In the Inspector, check all the other supported localizations for your application under the Localization section to create the localization strings for those languages.

Exporting Localizable files for Translators
Localization can be a lot of work. Direct translations from Google aren’t good enough all the time. You might need experts like Phrase who can solve that headache for you so you can focus on building the product. You can export your strings for a translator. After the translation is completed by experts, simply import the translated strings back to use in your application.
In this method, we shall see how to export localizable files for the localizers (translators). To do so, first create a separate folder for Localization (as shown below):
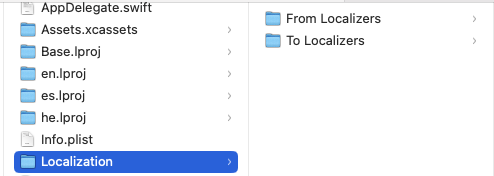
As you can see, there are two folders within the Localization folder. To Localizers is the folder where we, being the developers, export our localizable files for translators. From Localizers is the folder from where we would import the localized files from translators to our project. After creating the folders, go back to our Xcode project and open the root folder Info settings again. Let’s export by going to Product Menu ➞ Export Localizations.
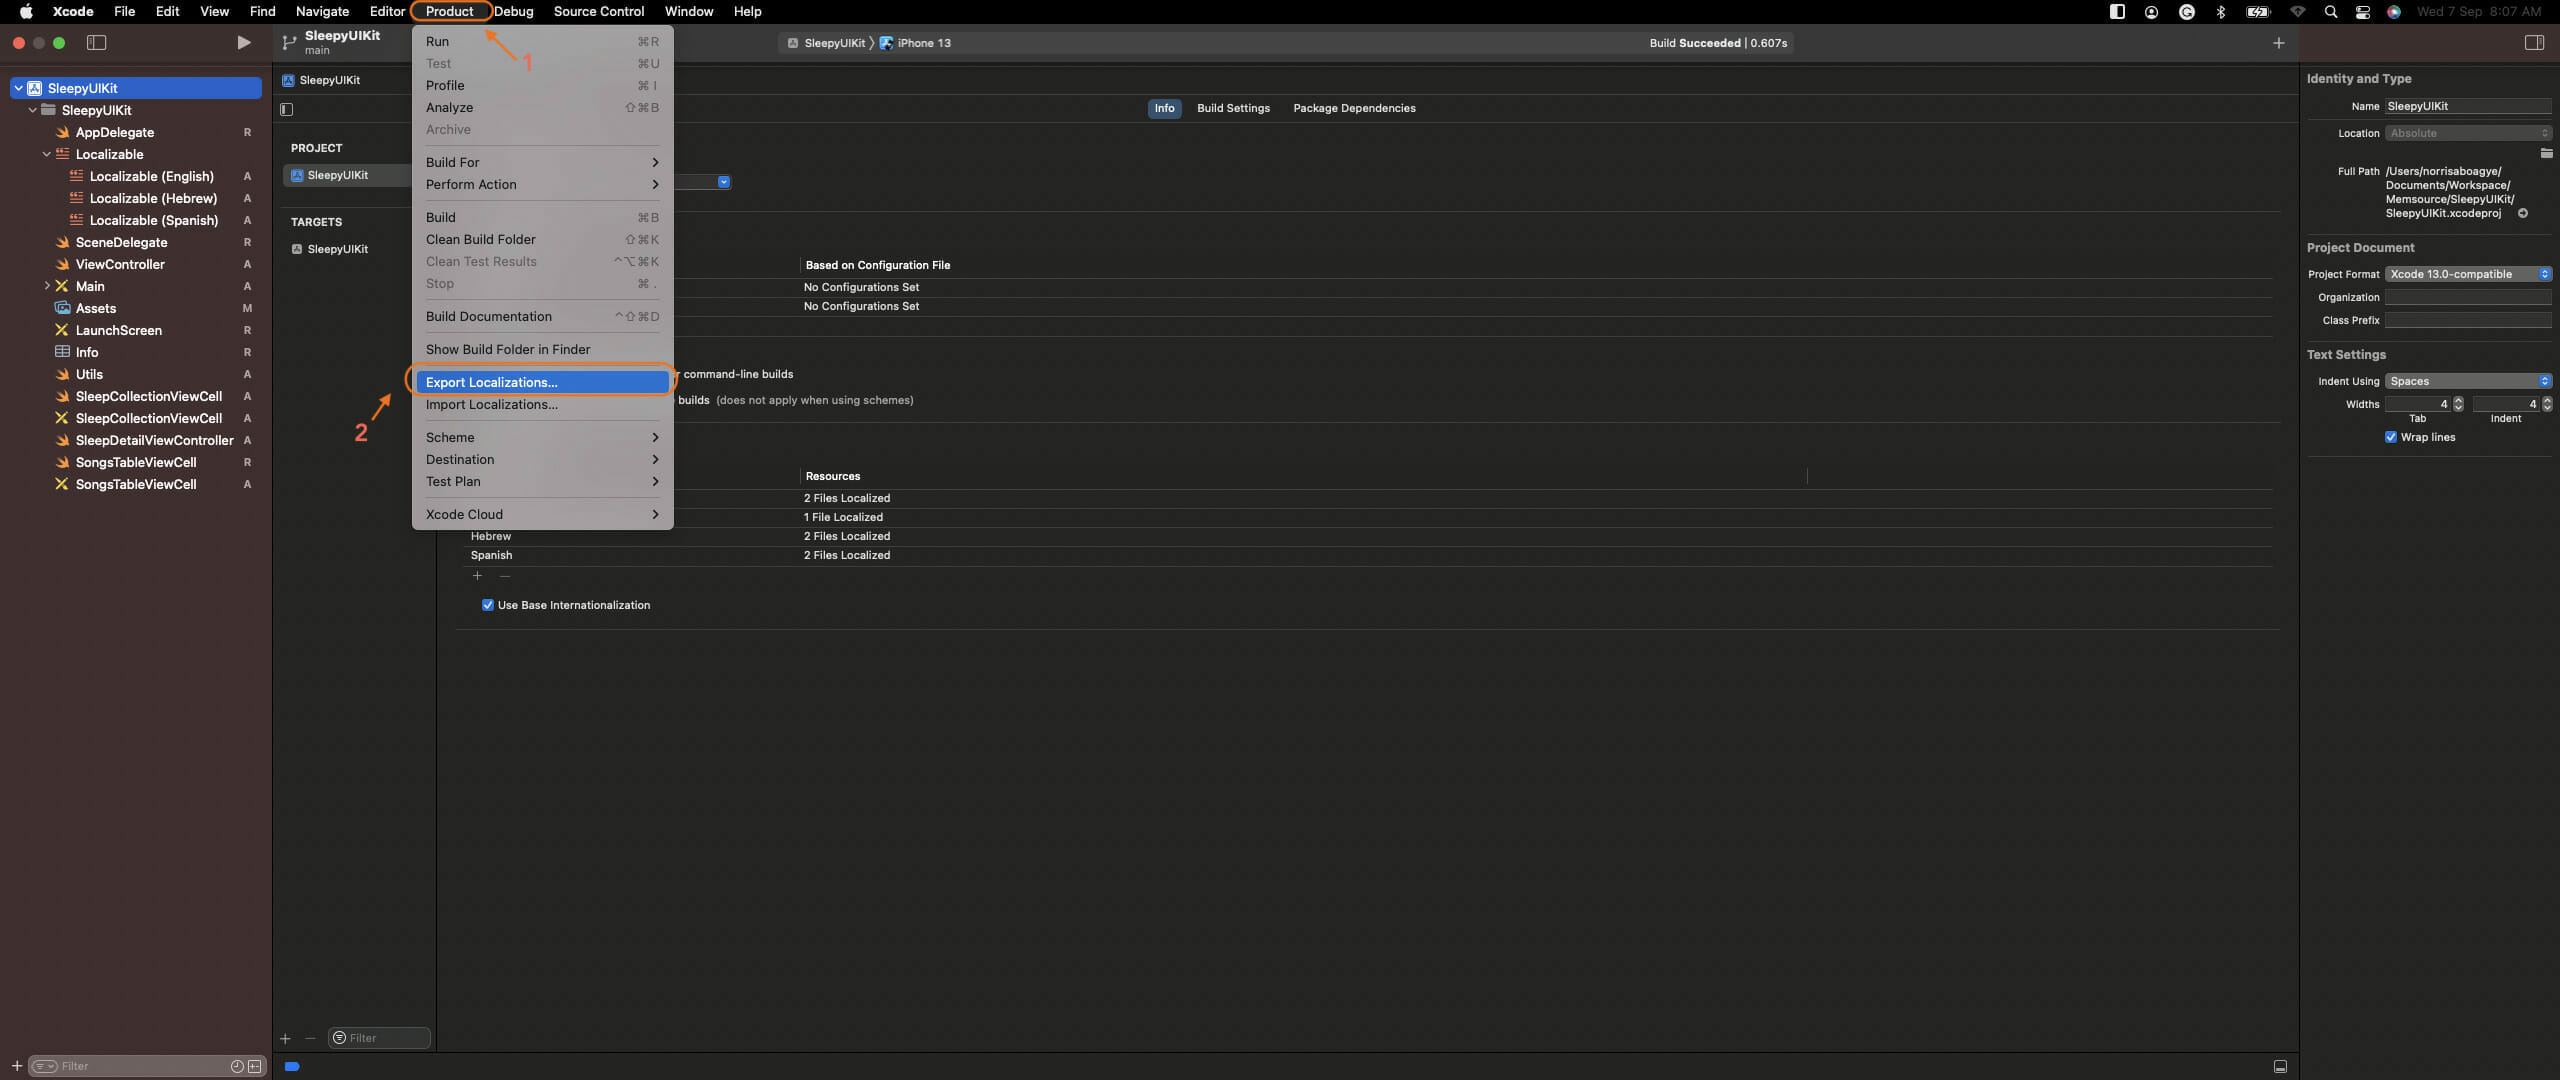
Once you click the Export Localizations option, Xcode will ask you to save the localizable files to your specified folder as shown below:
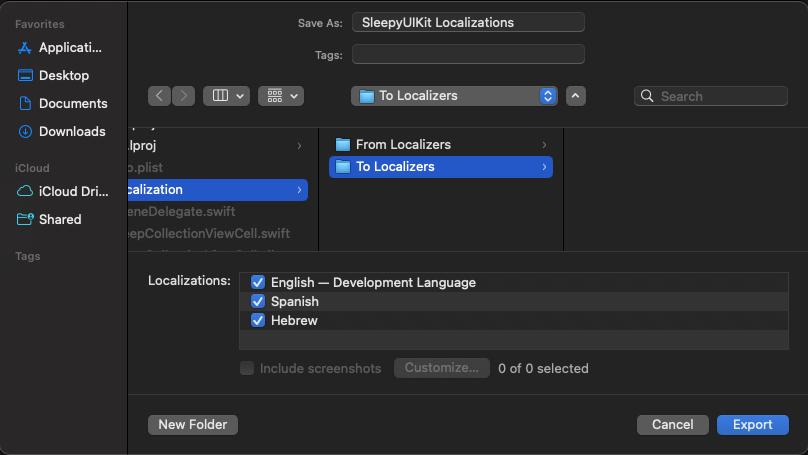
This will export all selected localizations in XLIFF format that localizers can use to localize your application. When translators are done they’ll send an XLIFF file back that you should save in From Localizers to be imported. To import the localization, go to Product Menu ➞ Import Localizations ➞ Select file in From Localizers.
How do I localize my storyboards?
Localization can be done on mainly 2 levels in UIKit. Localize directly on the storyboard, mostly for static text, and programmatically. We will start with how to localize storyboards directly.
We have already laid the groundwork for localizing storyboards in our setup steps. In the Changes in the Project After Language Support section, we saw that Main.strings was created for our non-base supported languages. These Main.strings contain ids for labels in the storyboards.
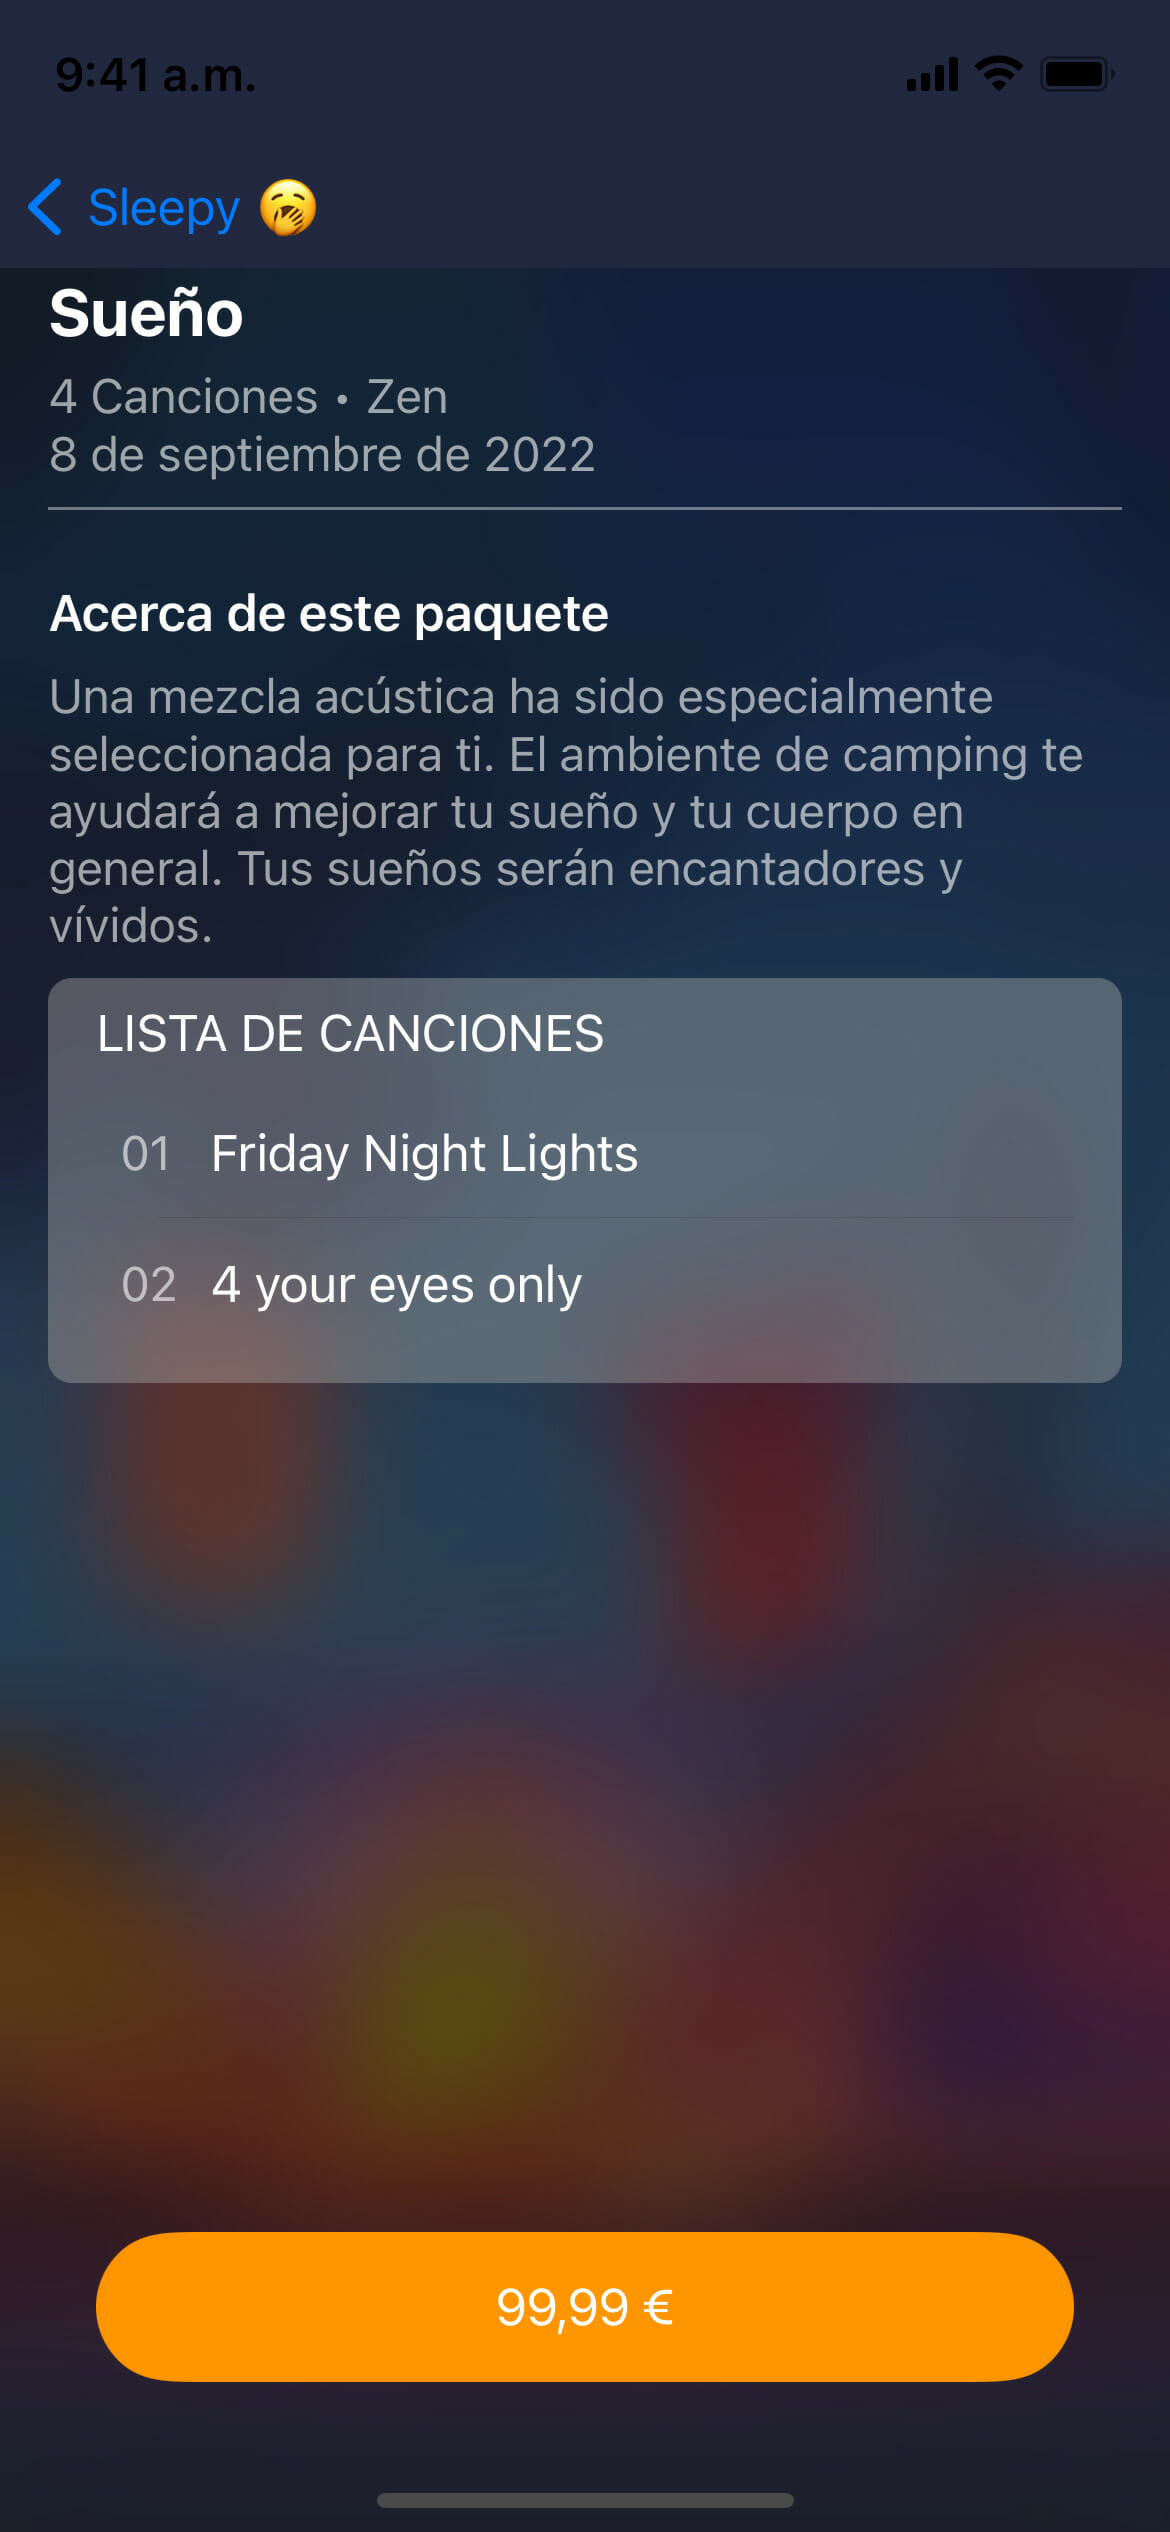
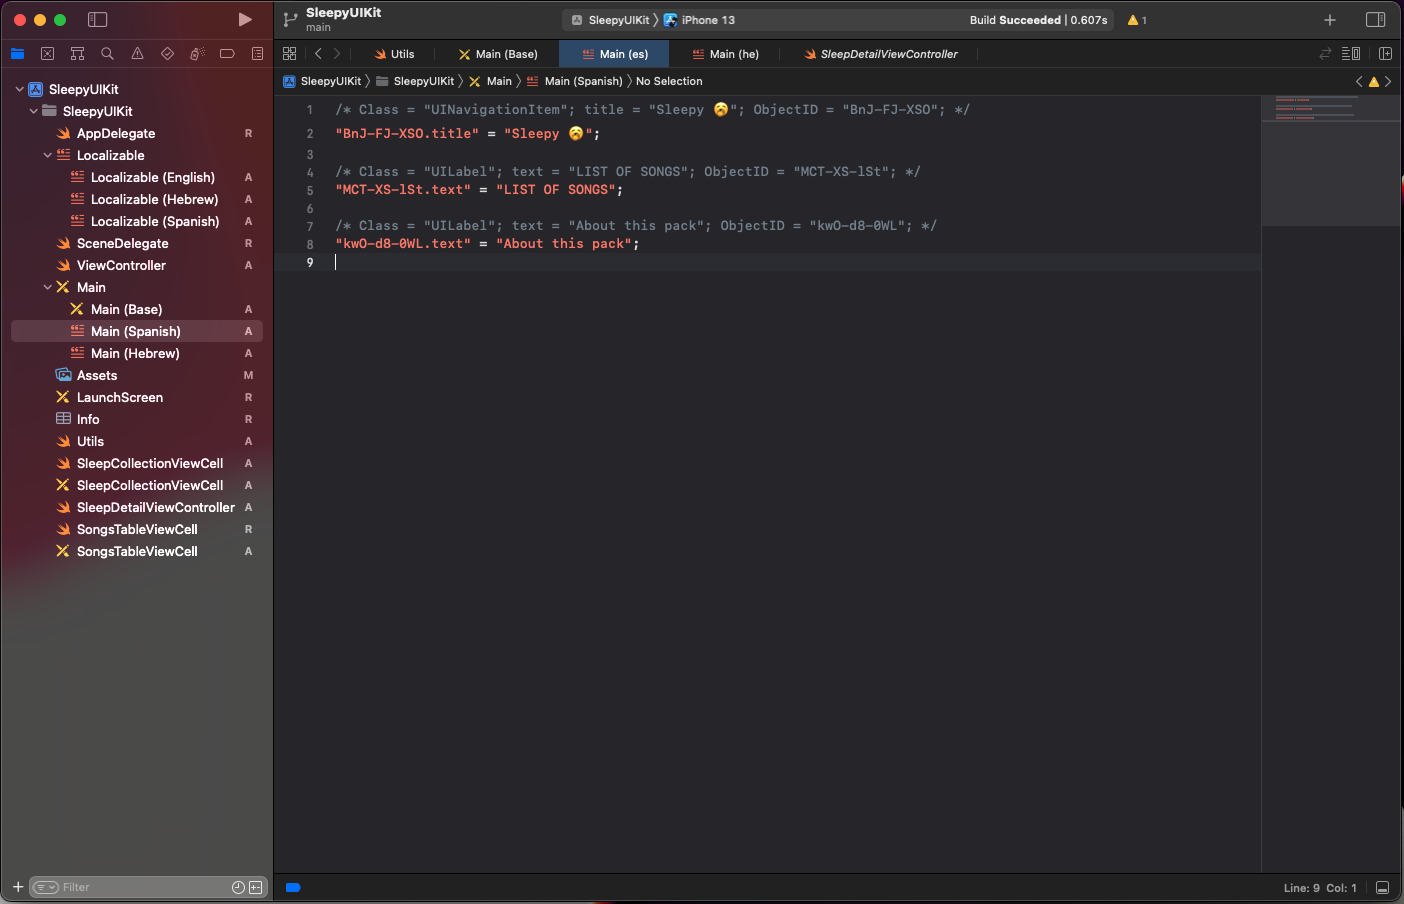
When we select the Main(Spanish) file, we see the key-value pairs of object ids and their text, representing how these strings will display in Spanish. As you can see, it’s still in English so we’ll have to localize it to Spanish.
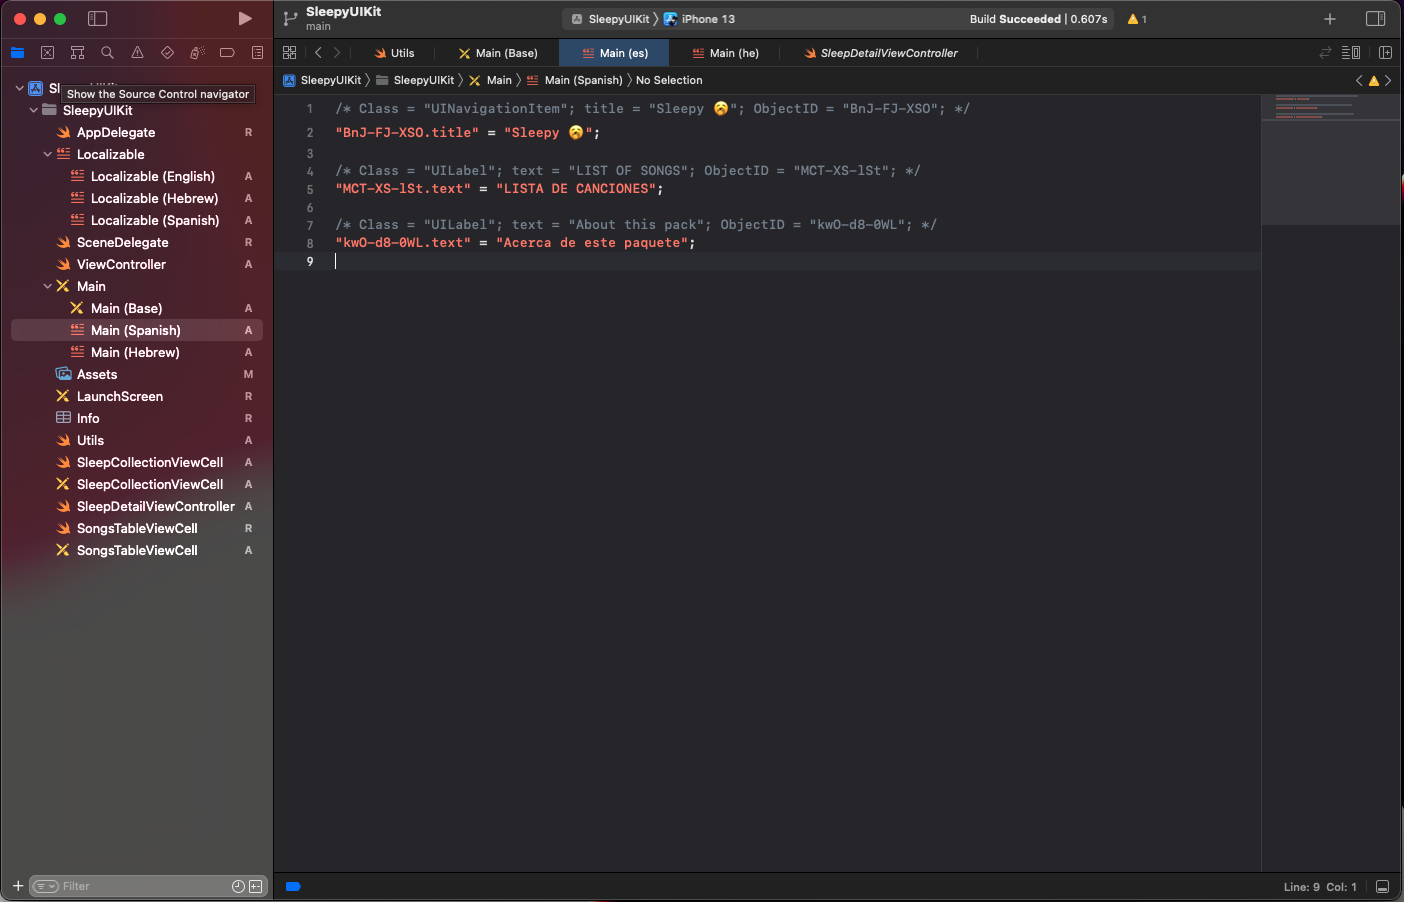
After translation.
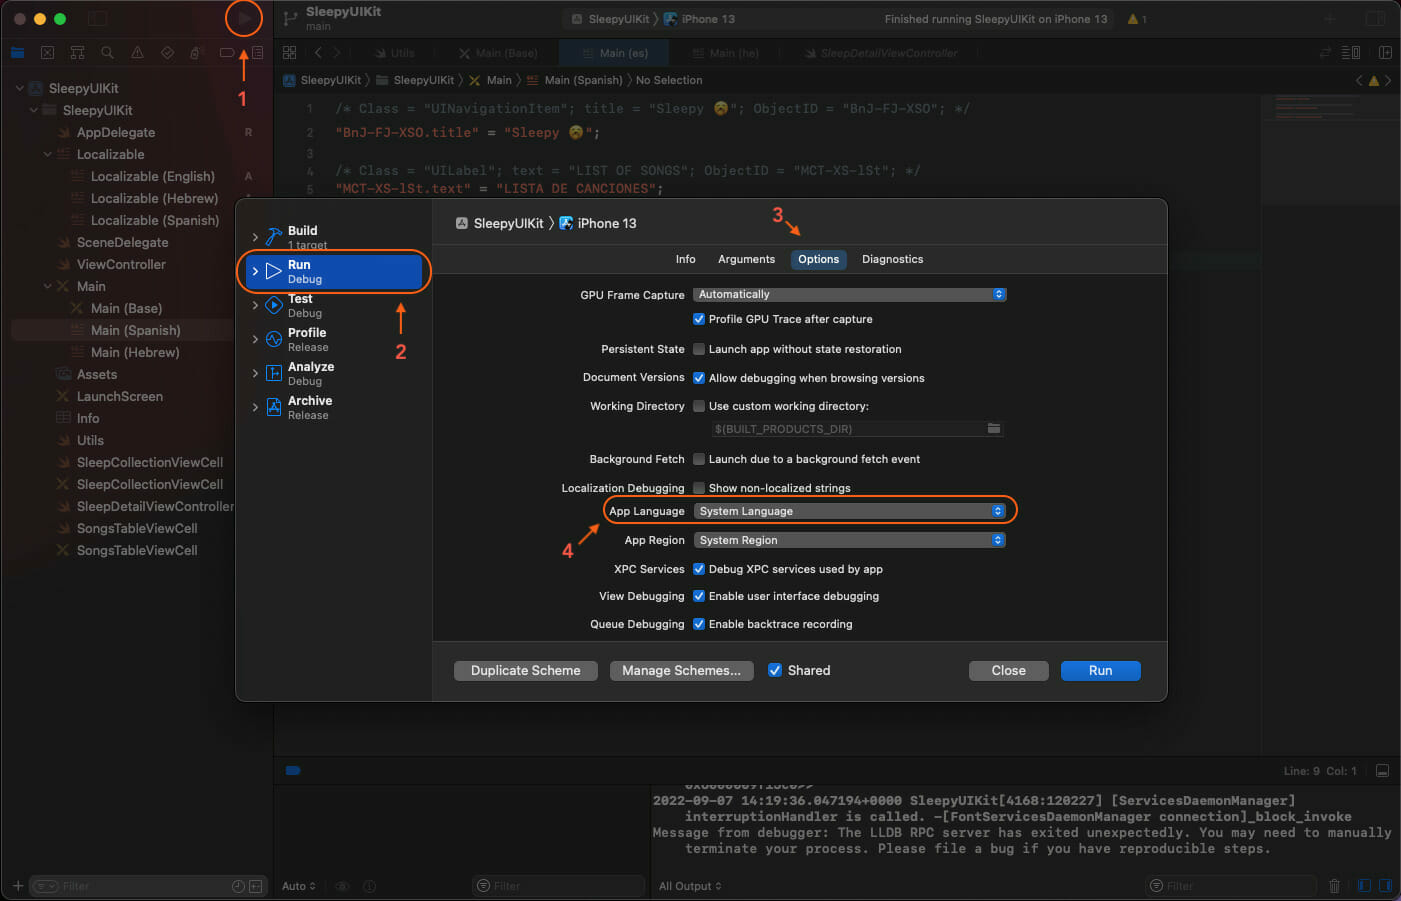
Now let’s run the application in Spanish to see if our localization worked. By default, every time you run the application, it uses the base language. You can run your application using different locales by Option + Clicking on the (Play) Start active scheme button, then going to Run → Options → App Language → Change to a supported language (Spanish in this case) → Click Run.
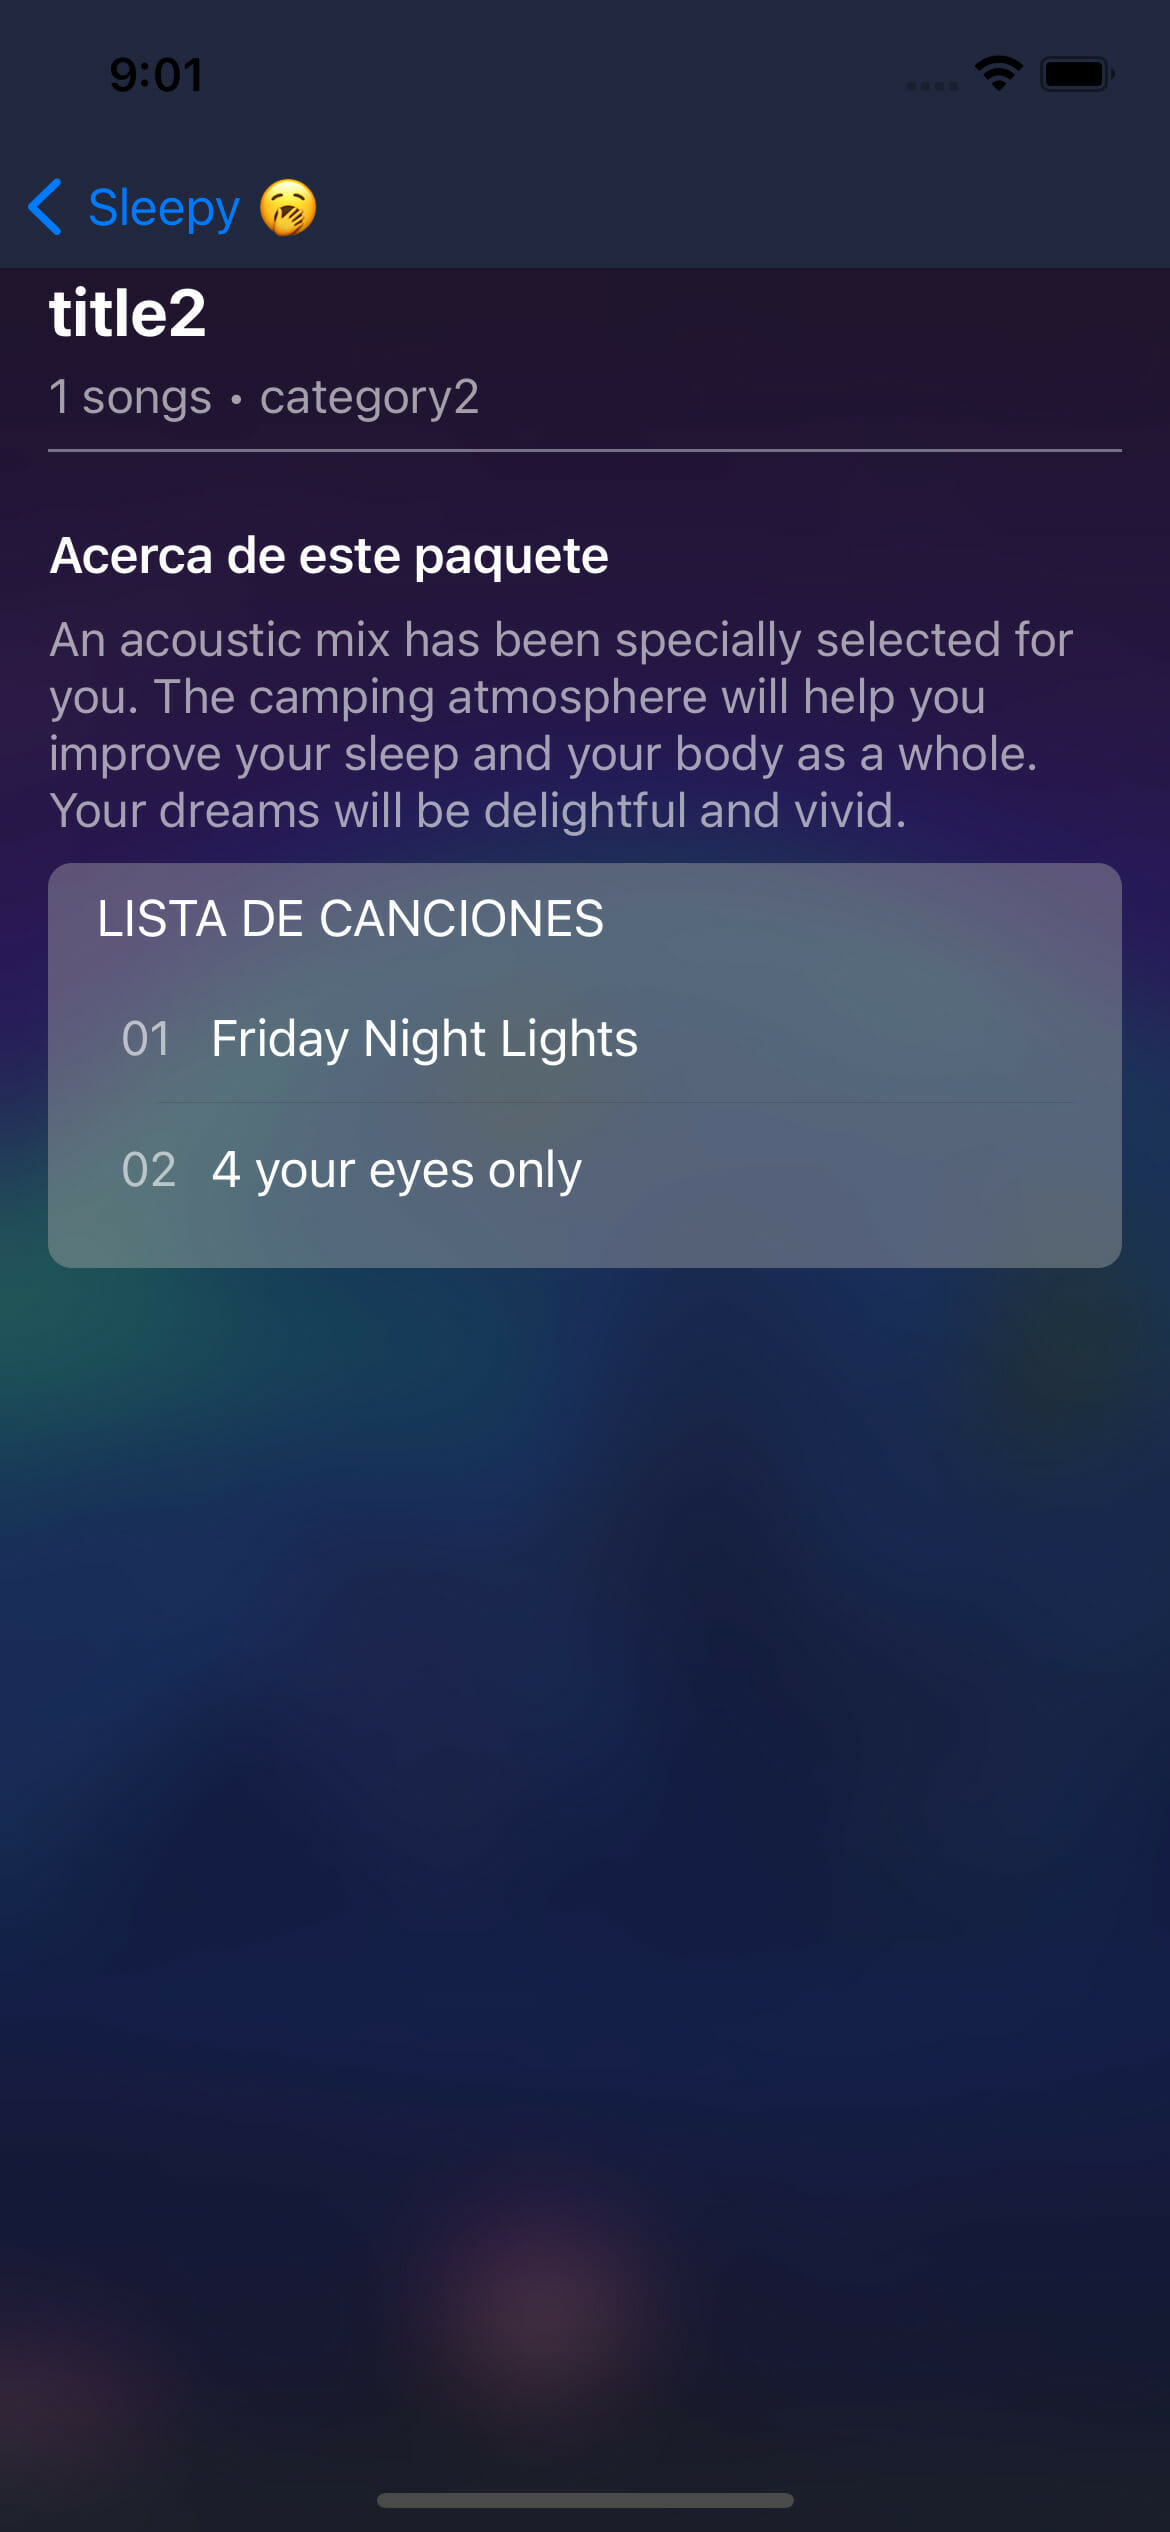
The Main(Spanish) file is translated. The rest of the app will gradually be translated as we move. Now that we’ve just learned how to localize storyboards, you can follow the same steps and localize the storyboard for Hebrew.
How do I localize strings in my Swift code?
We can also localize our application programmatically using the Localizable files. Localizable files also use key-value pairs in the format "key" = "value"; for localization. In the Localizable(English) file, we’ll add the rest of the strings representing the music data.
/*
Localizable.strings
*/

/* Titles of Sleep albums */
"slumber" = "Slumber";
"white.noise" = "White Noise";
"soothing" = "Soothing";
"paino" = "Piano";
"wind" = "Wind";
"cold.fusion" = "Cold Fusion";

/* Categories of Sleep albums */
"zen" = "Zen";
"instrumental" = "Instrumental";
"nature" = "Nature";

/* About of Sleep albums */
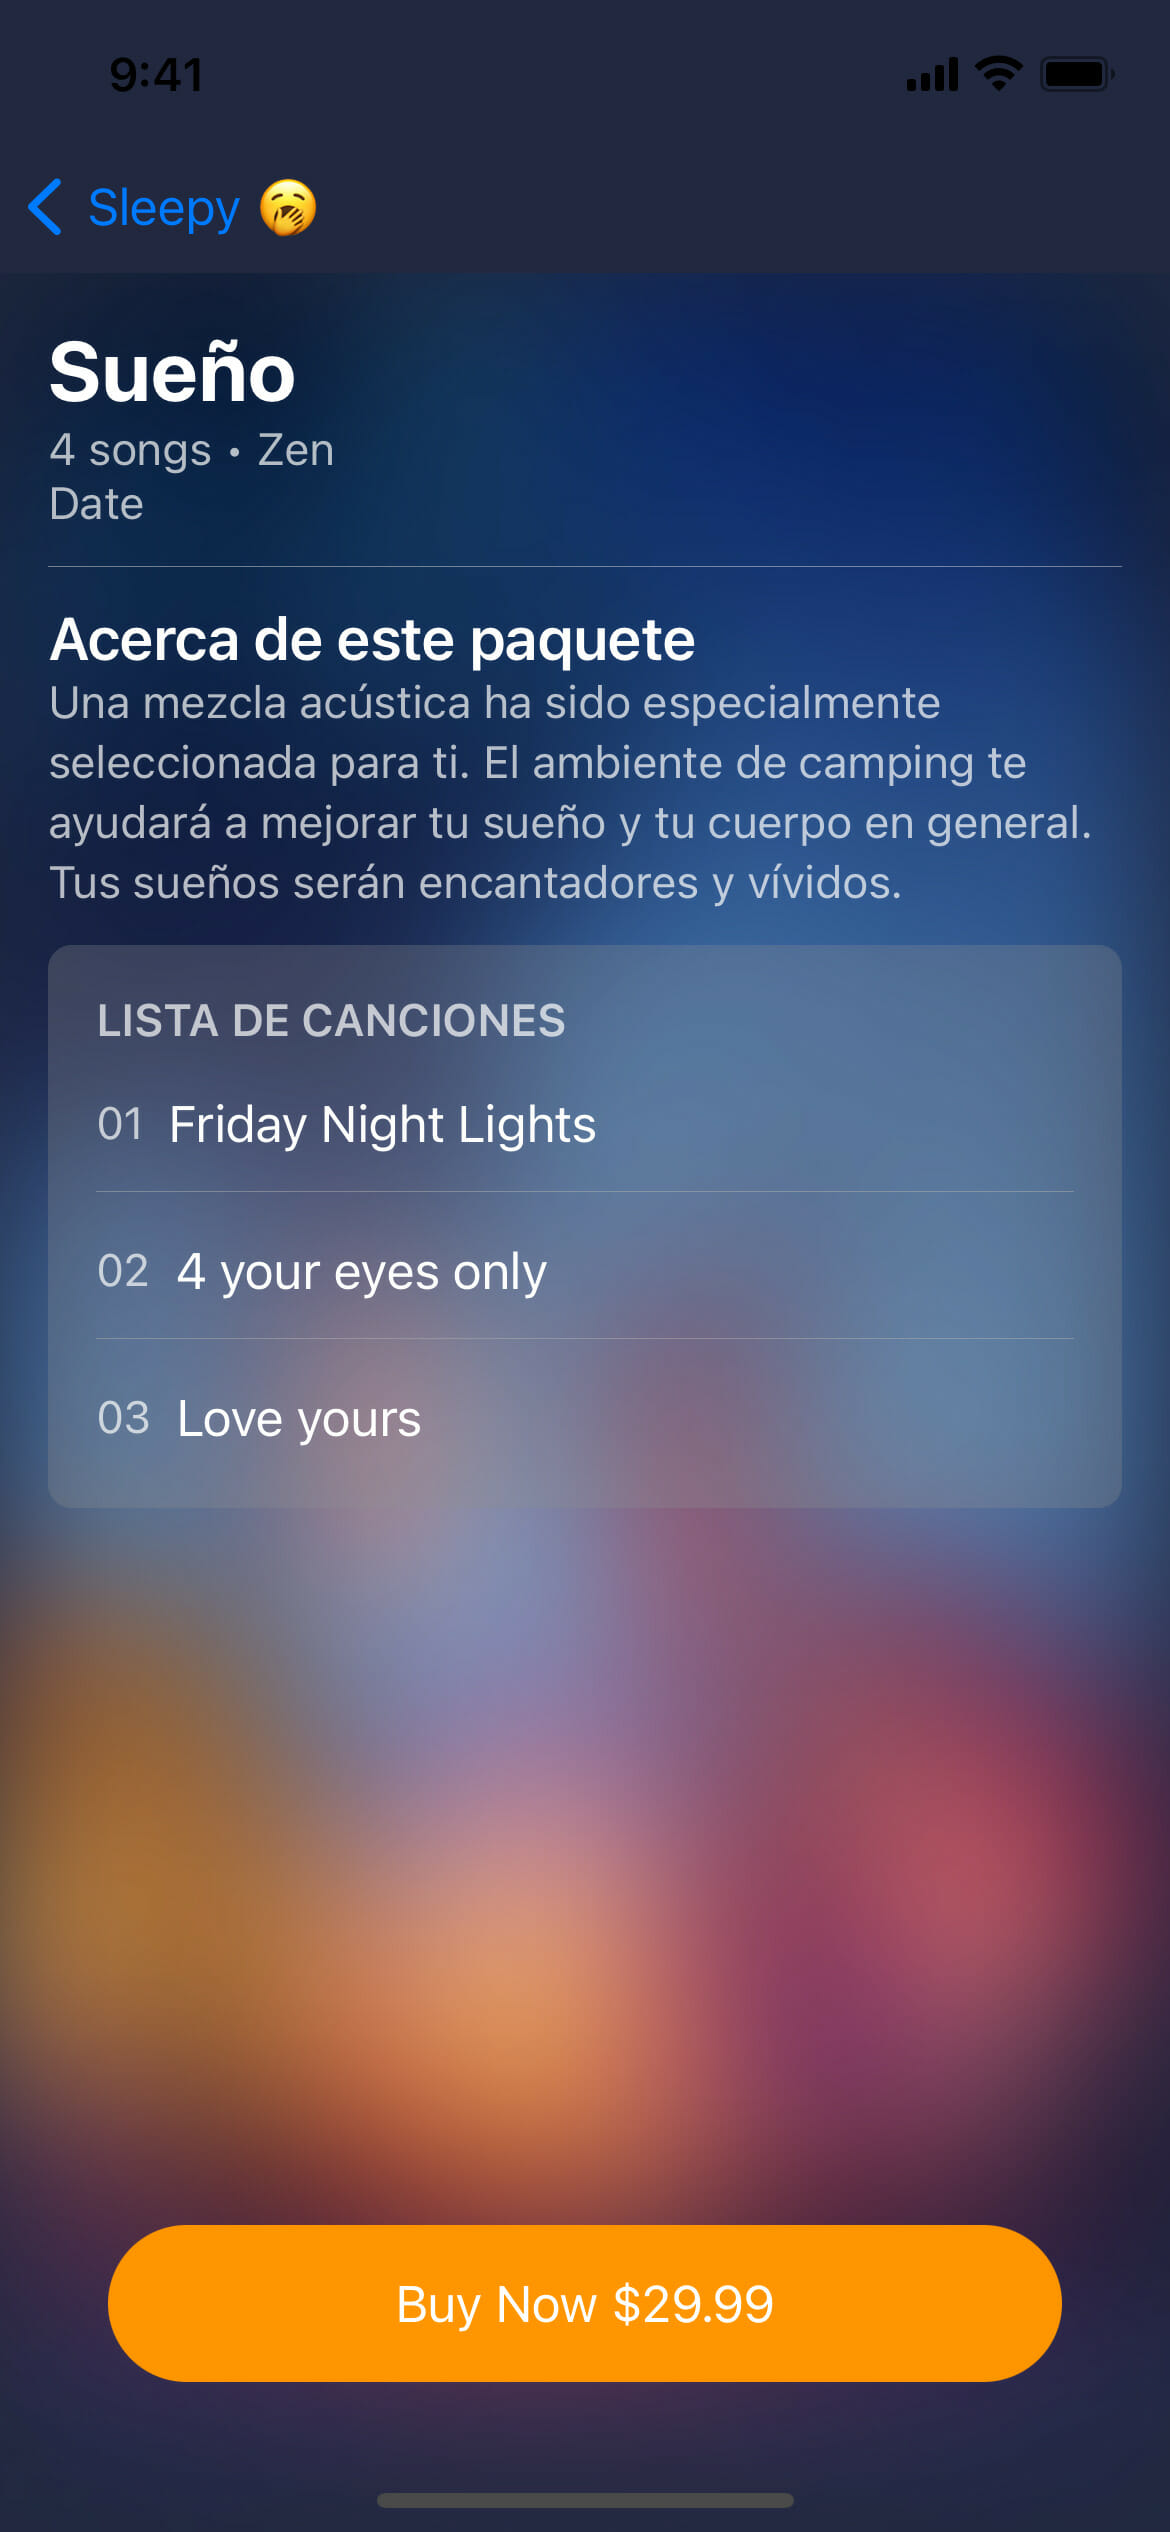
"about1" = "An acoustic mix has been specially selected for you. The camping atmosphere will help you improve your sleep and your body as a whole. Your dreams will be delightful and vivid.";Code language: Swift (swift)
iOS already gives us a hassle-free way to display these strings using their keys for easy localization. NSLocalizedString returns a localized version of a string from the default table, which Xcode autogenerates when exporting localizations.
Referring back to the programmatic fallback section, the extension function we created makes use of NSLocalizedString using two of the most common implementations.
NSLocalizedString(key, comment):keyfor a string in the default table, andcommenthelps give context to a translator as to how the string is used within the application.NSLocalizedString(key, tableName, bundle, value, comment): This signature becomes useful when you want to split your strings files into smaller, manageable sizes. This is especially important when you are working on a very large app and you don’t want to have all your localizable strings in one.Localizable.strings****file.NSLocalizedString(key, comment)only readsLocalizable.stringsfile by default. In this signature:tableNameis the name of the table containing the key-value pairs.bundleis a directory in the file system that groups executable code and related resources together in one place. We often just useBundle.mainhere.valueis the string you want to default to in case no string was found for thekeyprovided.
With this newfound knowledge, let us localize for Spanish and Hebrew and use the localize() extension function we have already created in the programmatic fallback section.
/*
Localizable.strings
*/

/* Titles of Sleep albums */
"slumber" = "תְנוּמָה";
"white.noise" = "רעש לבן";
"soothing" = "הַרגָעָה";
"paino" = "פְּסַנְתֵר";
"wind" = "רוּחַ";

/* Categories of Sleep albums */
"cold.fusion" = "זן";
"zen" = "מוֹעִיל";
"instrumental" = "טִבעִי";

/* About Sleep albums */
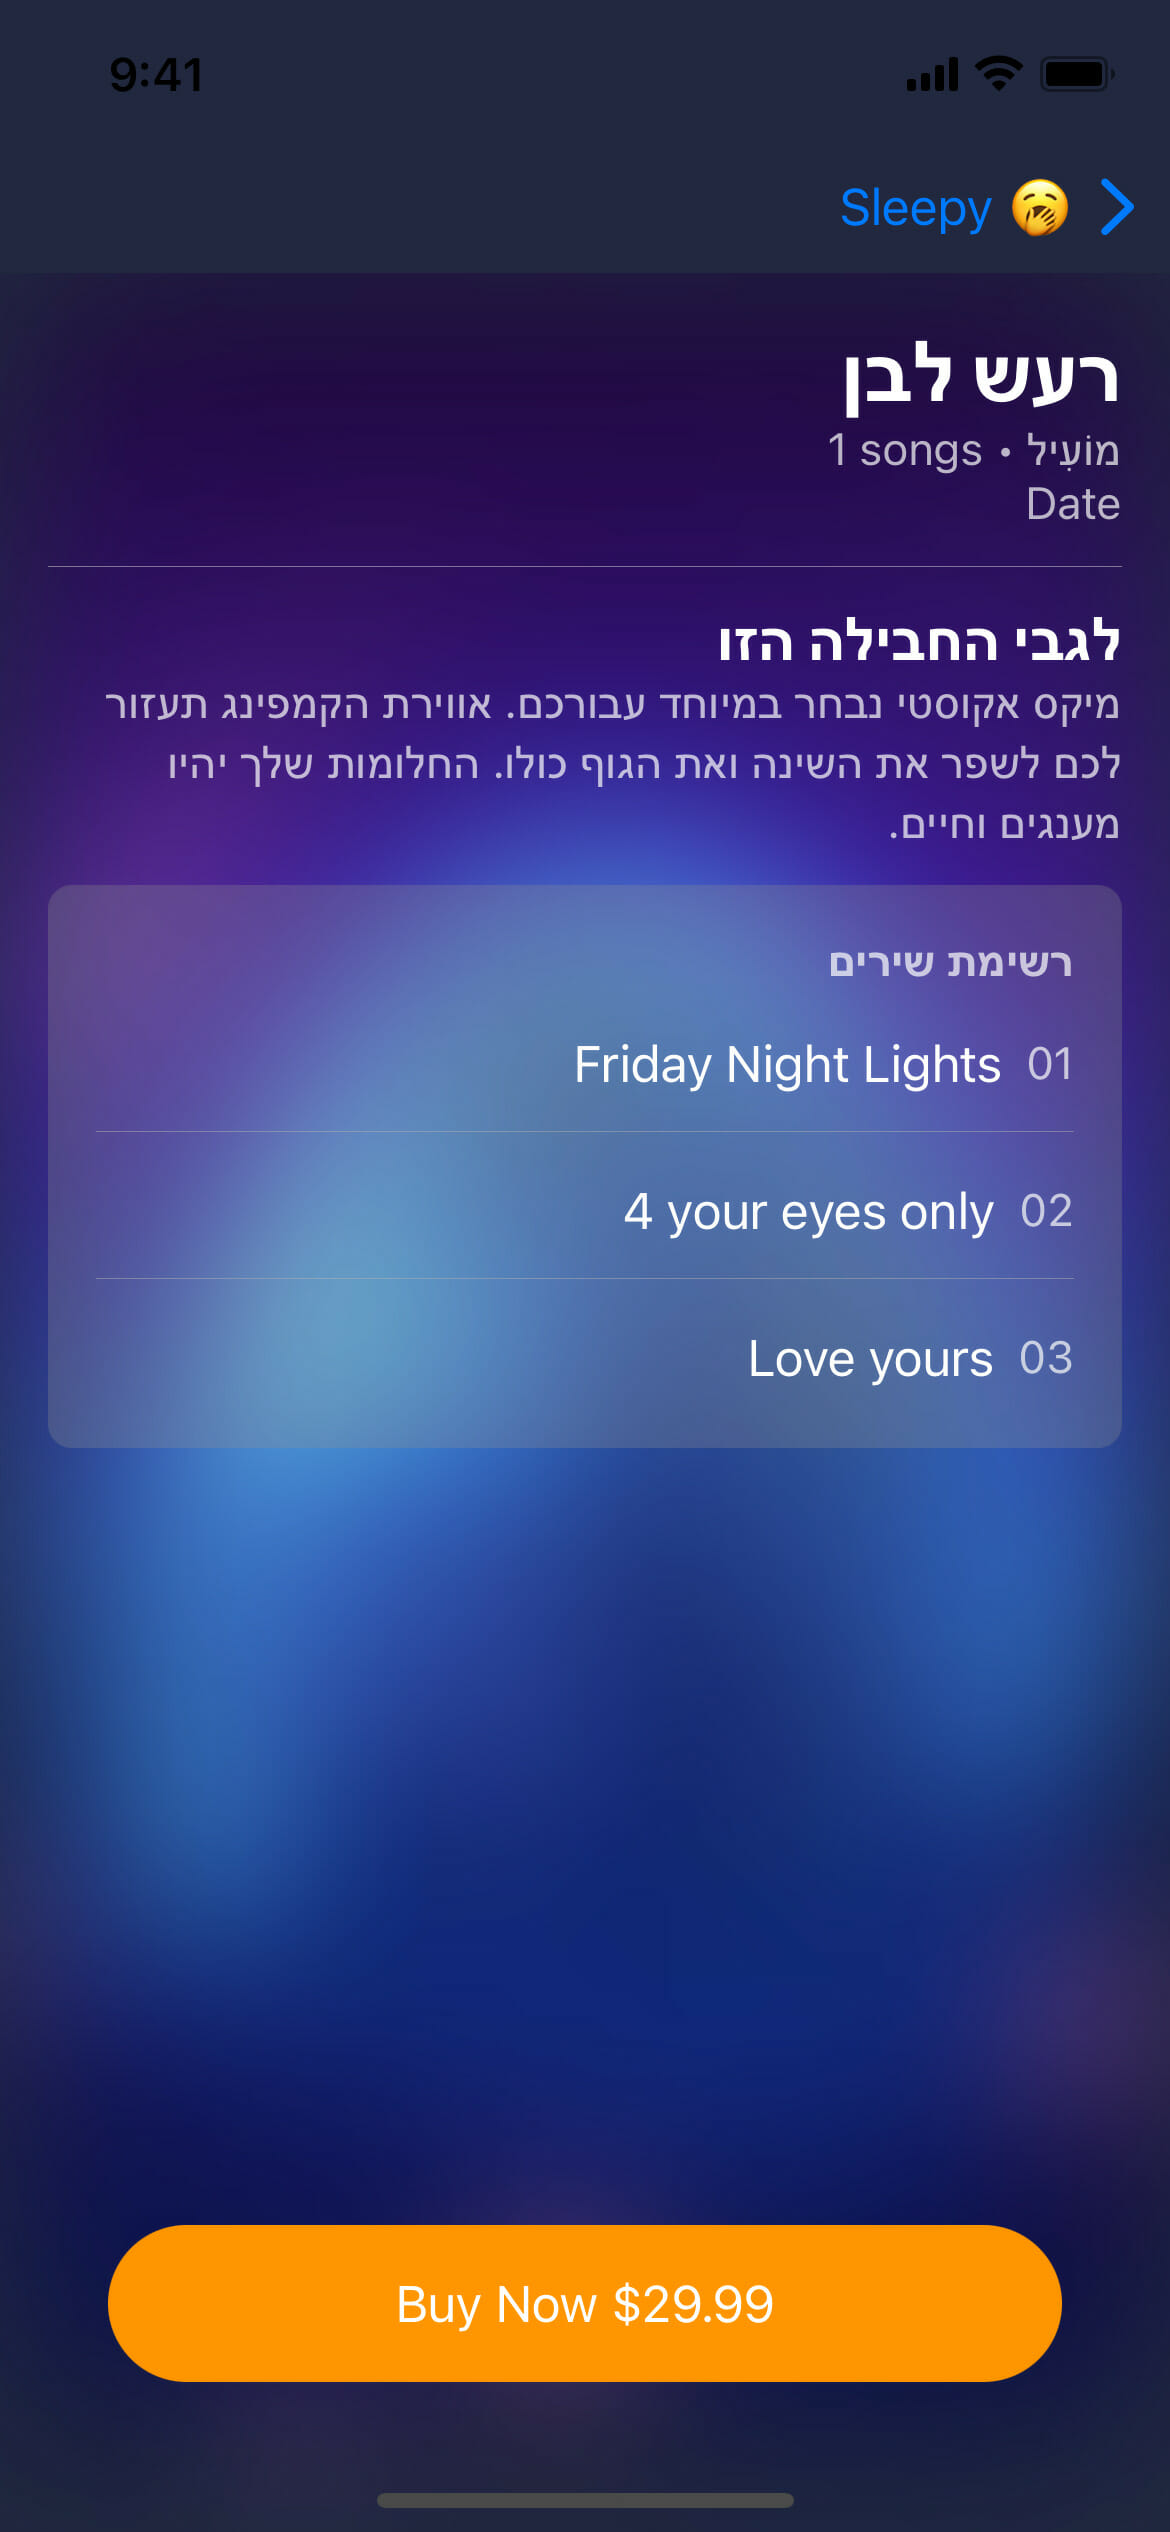
"about.acoustic" = "מיקס אקוסטי נבחר במיוחד עבורכם. אווירת הקמפינג תעזור לכם לשפר את השינה ואת הגוף כולו. החלומות שלך יהיו מענגים וחיים.";
Code language: Swift (swift)
We’ll localize the songs data in Utils.swift using the extension function. This will localize the strings and fallback to a default language if no translation is found.
/*
Utils.swift
*/

SleepData(
    image: "image1",
    title: "slumber".localize(),
    numberOfSongs: 4,
    category: "zen".localize(),
    songs: ["Friday Night Lights", "4 your eyes only", "Love yours"],
    about: "about.acoustic".localize())Code language: Swift (swift)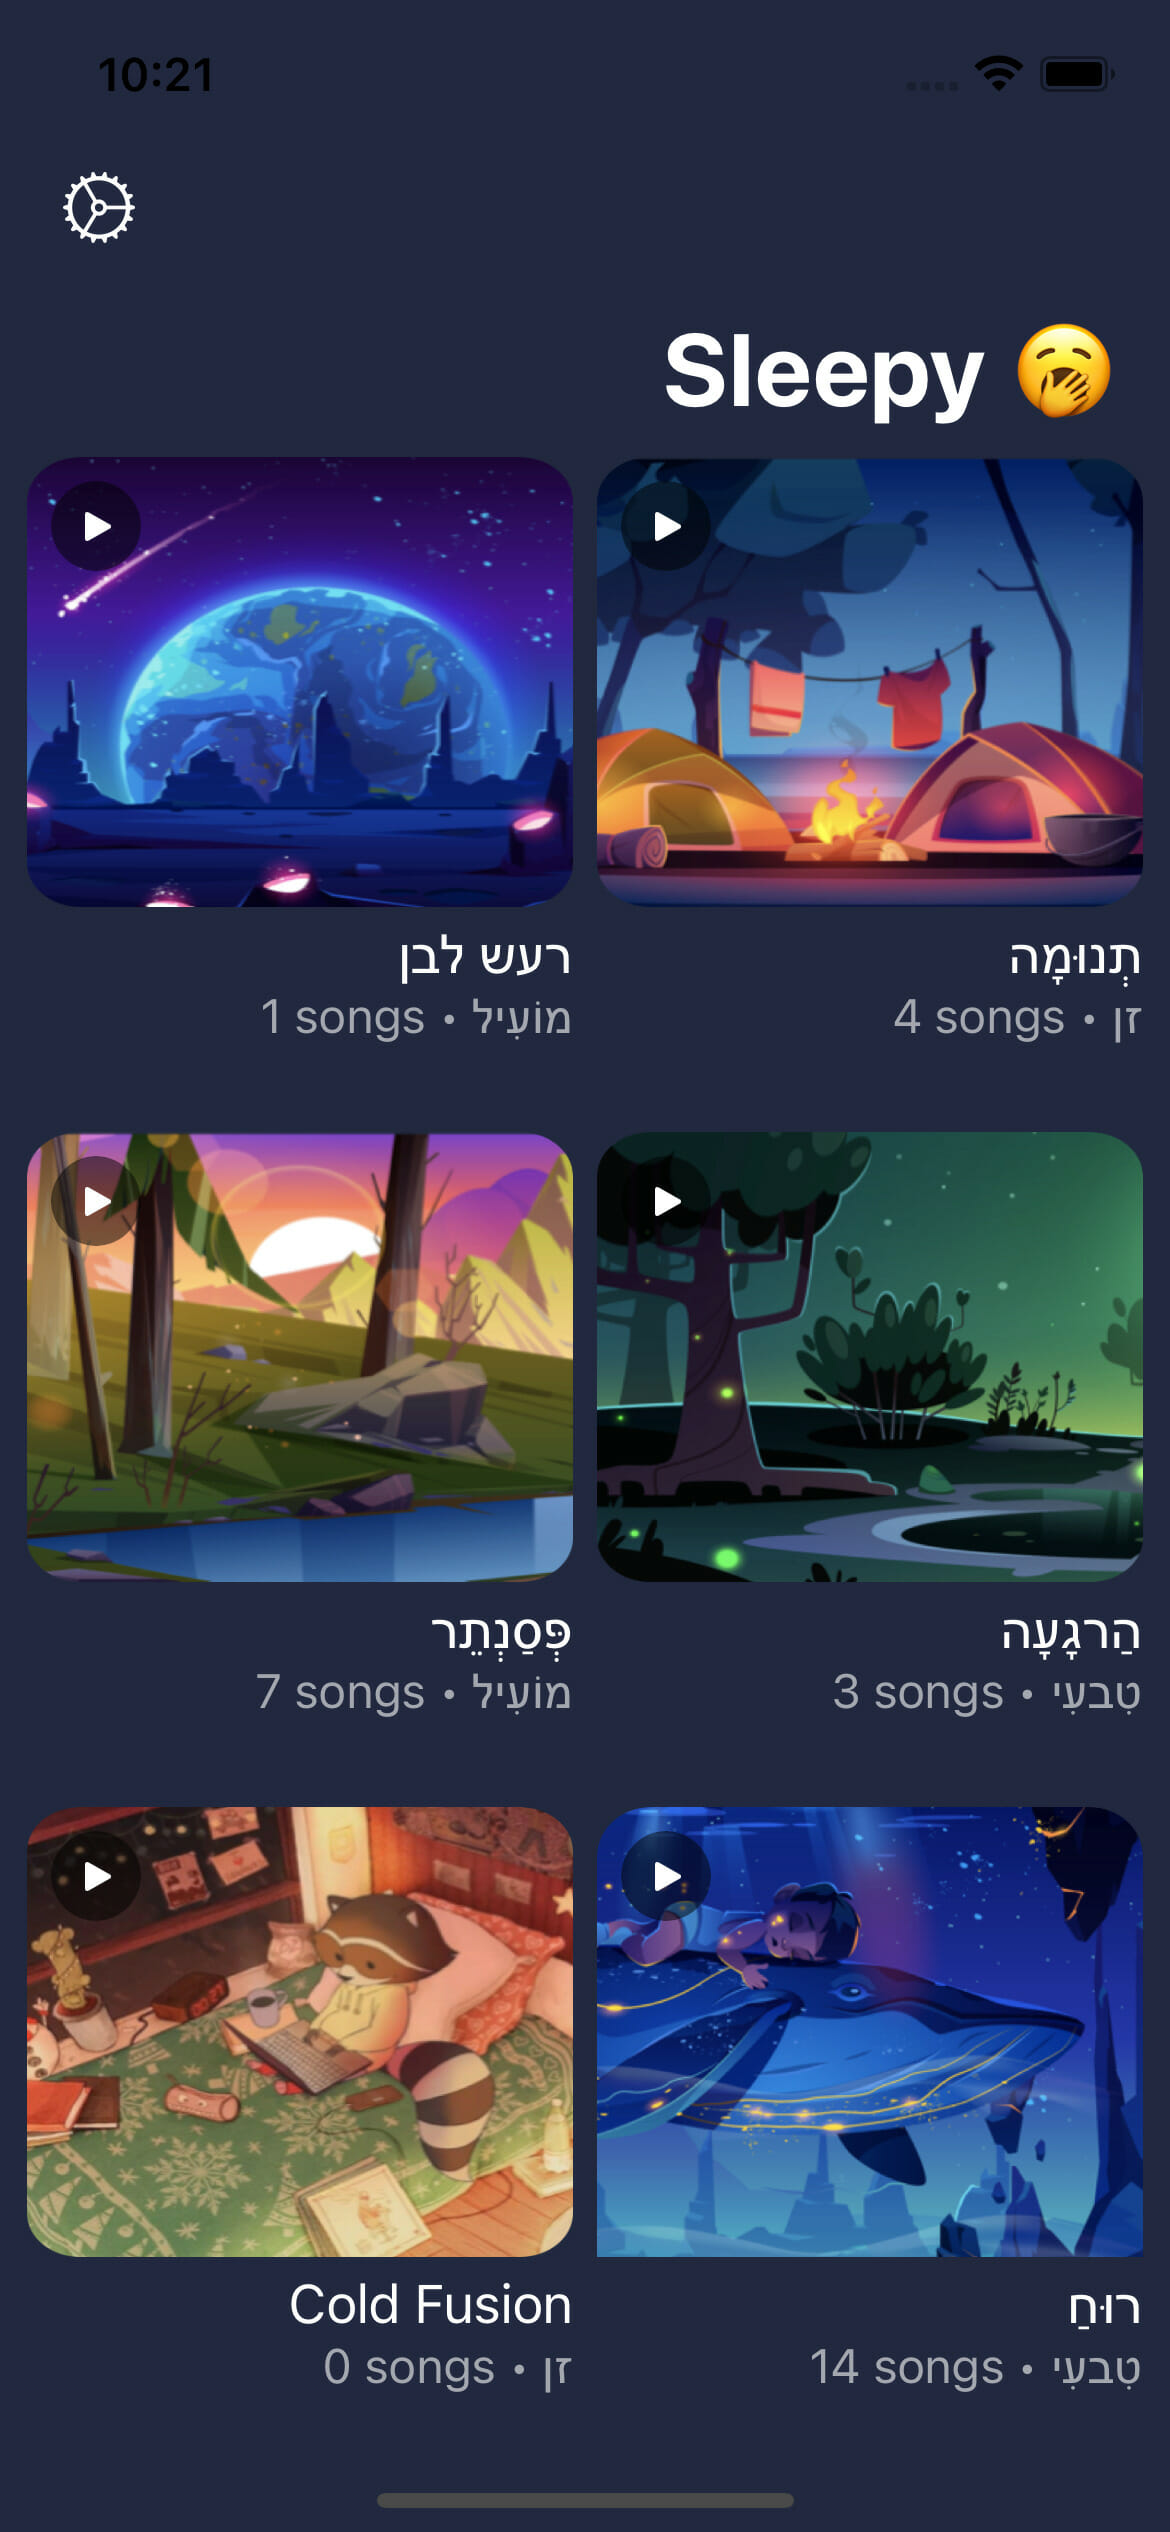
🗒 Note » There is no translation for title6 which is Cold Fusion in English, so we fell back on english to translate that string.
How do I work with the user’s preferred system locale?
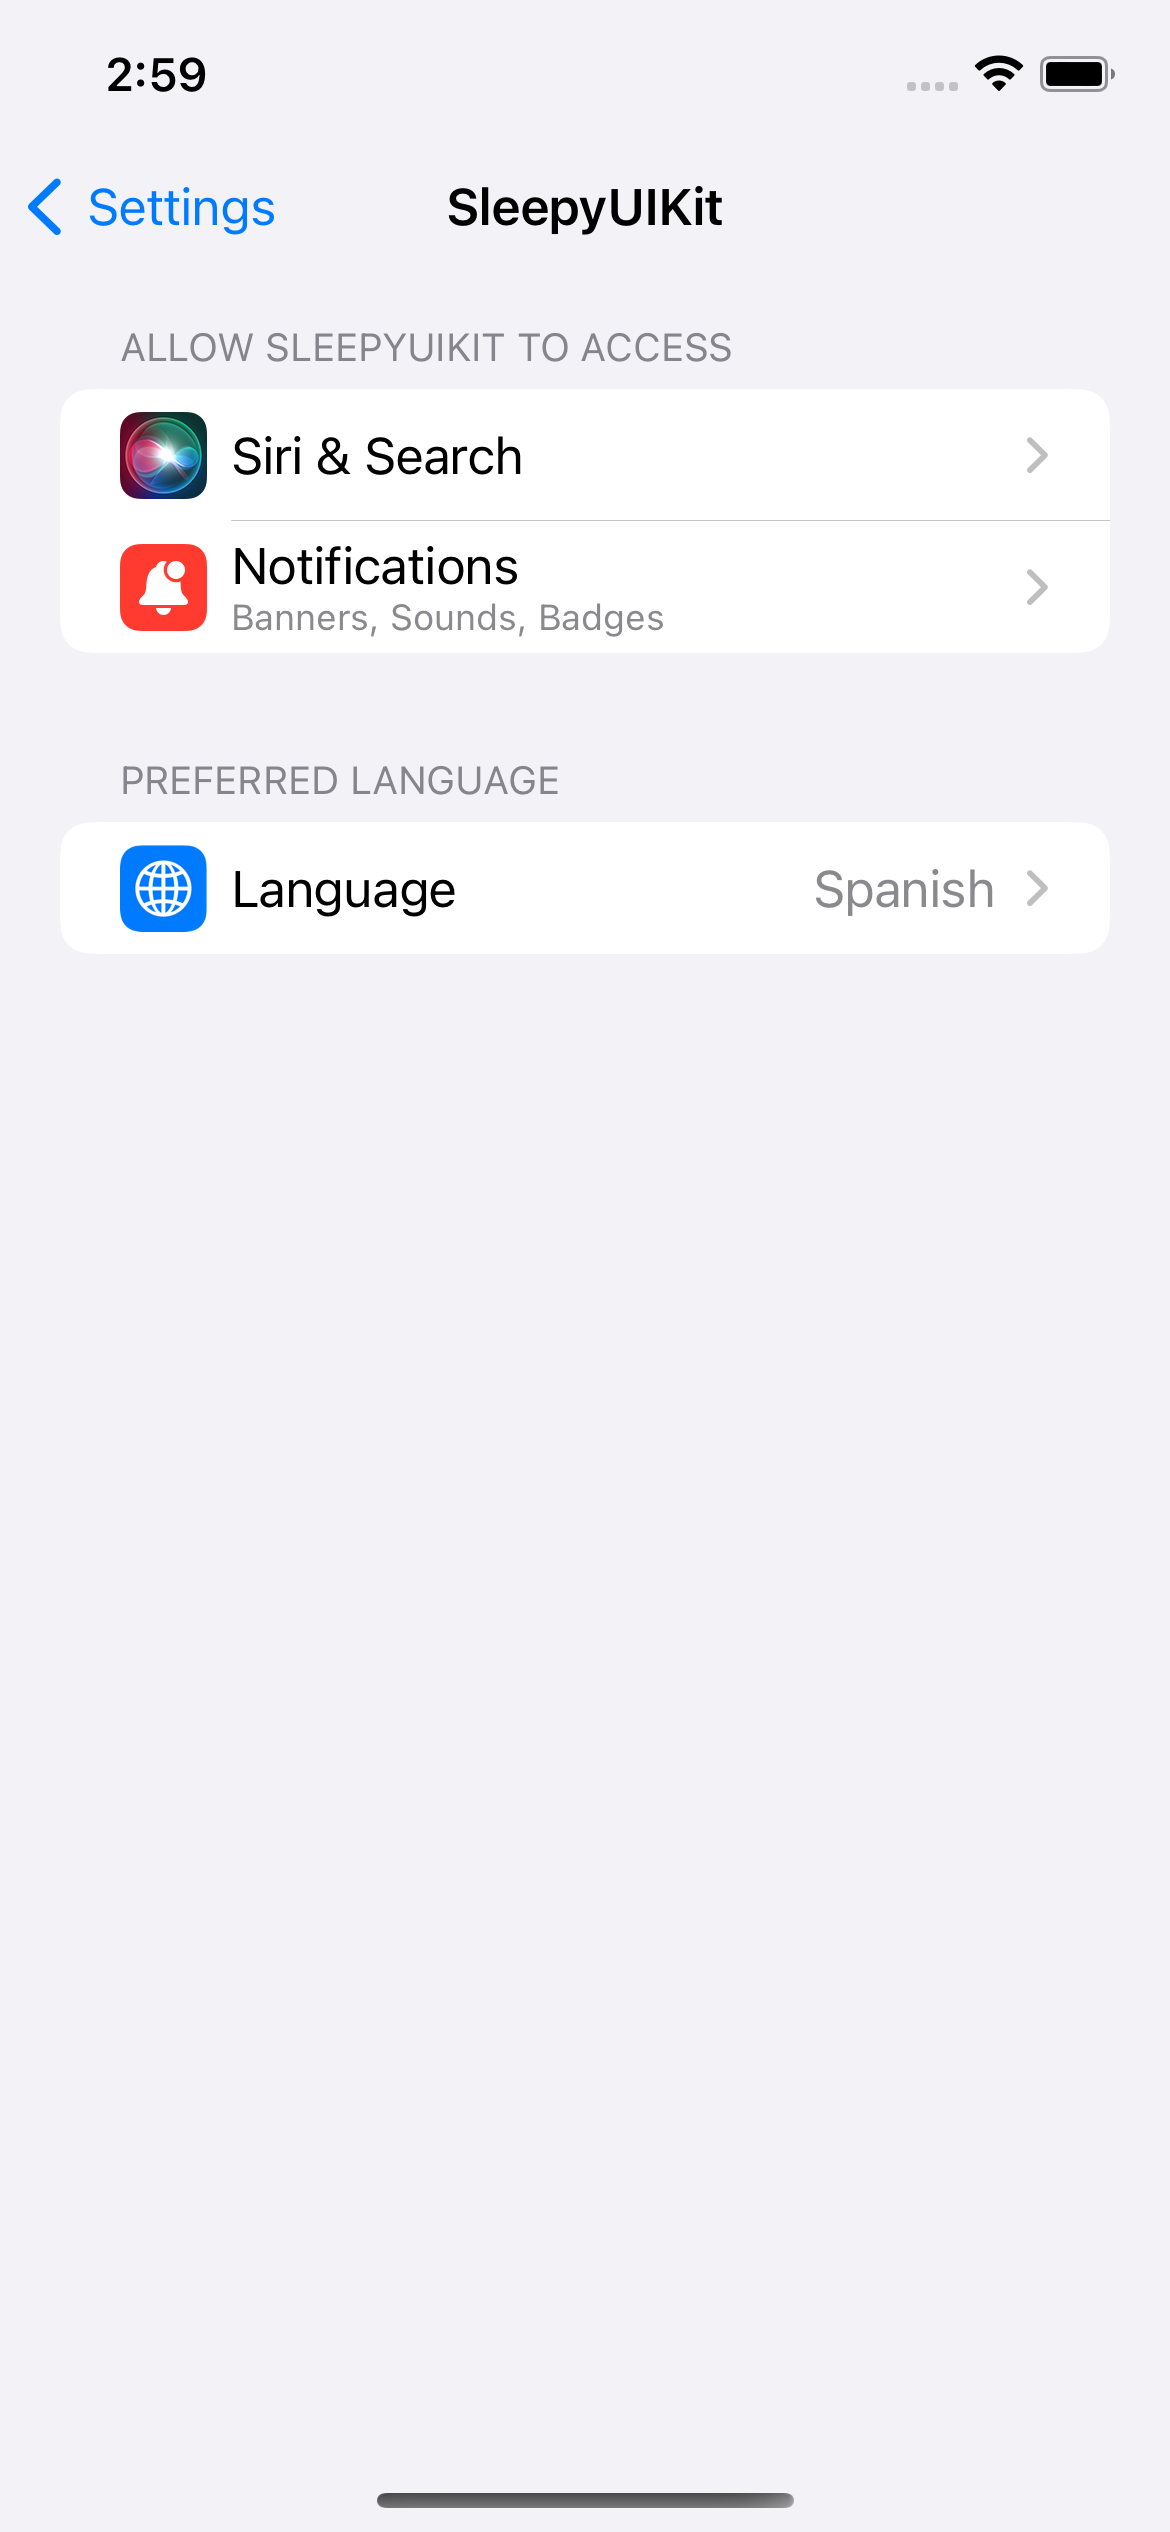
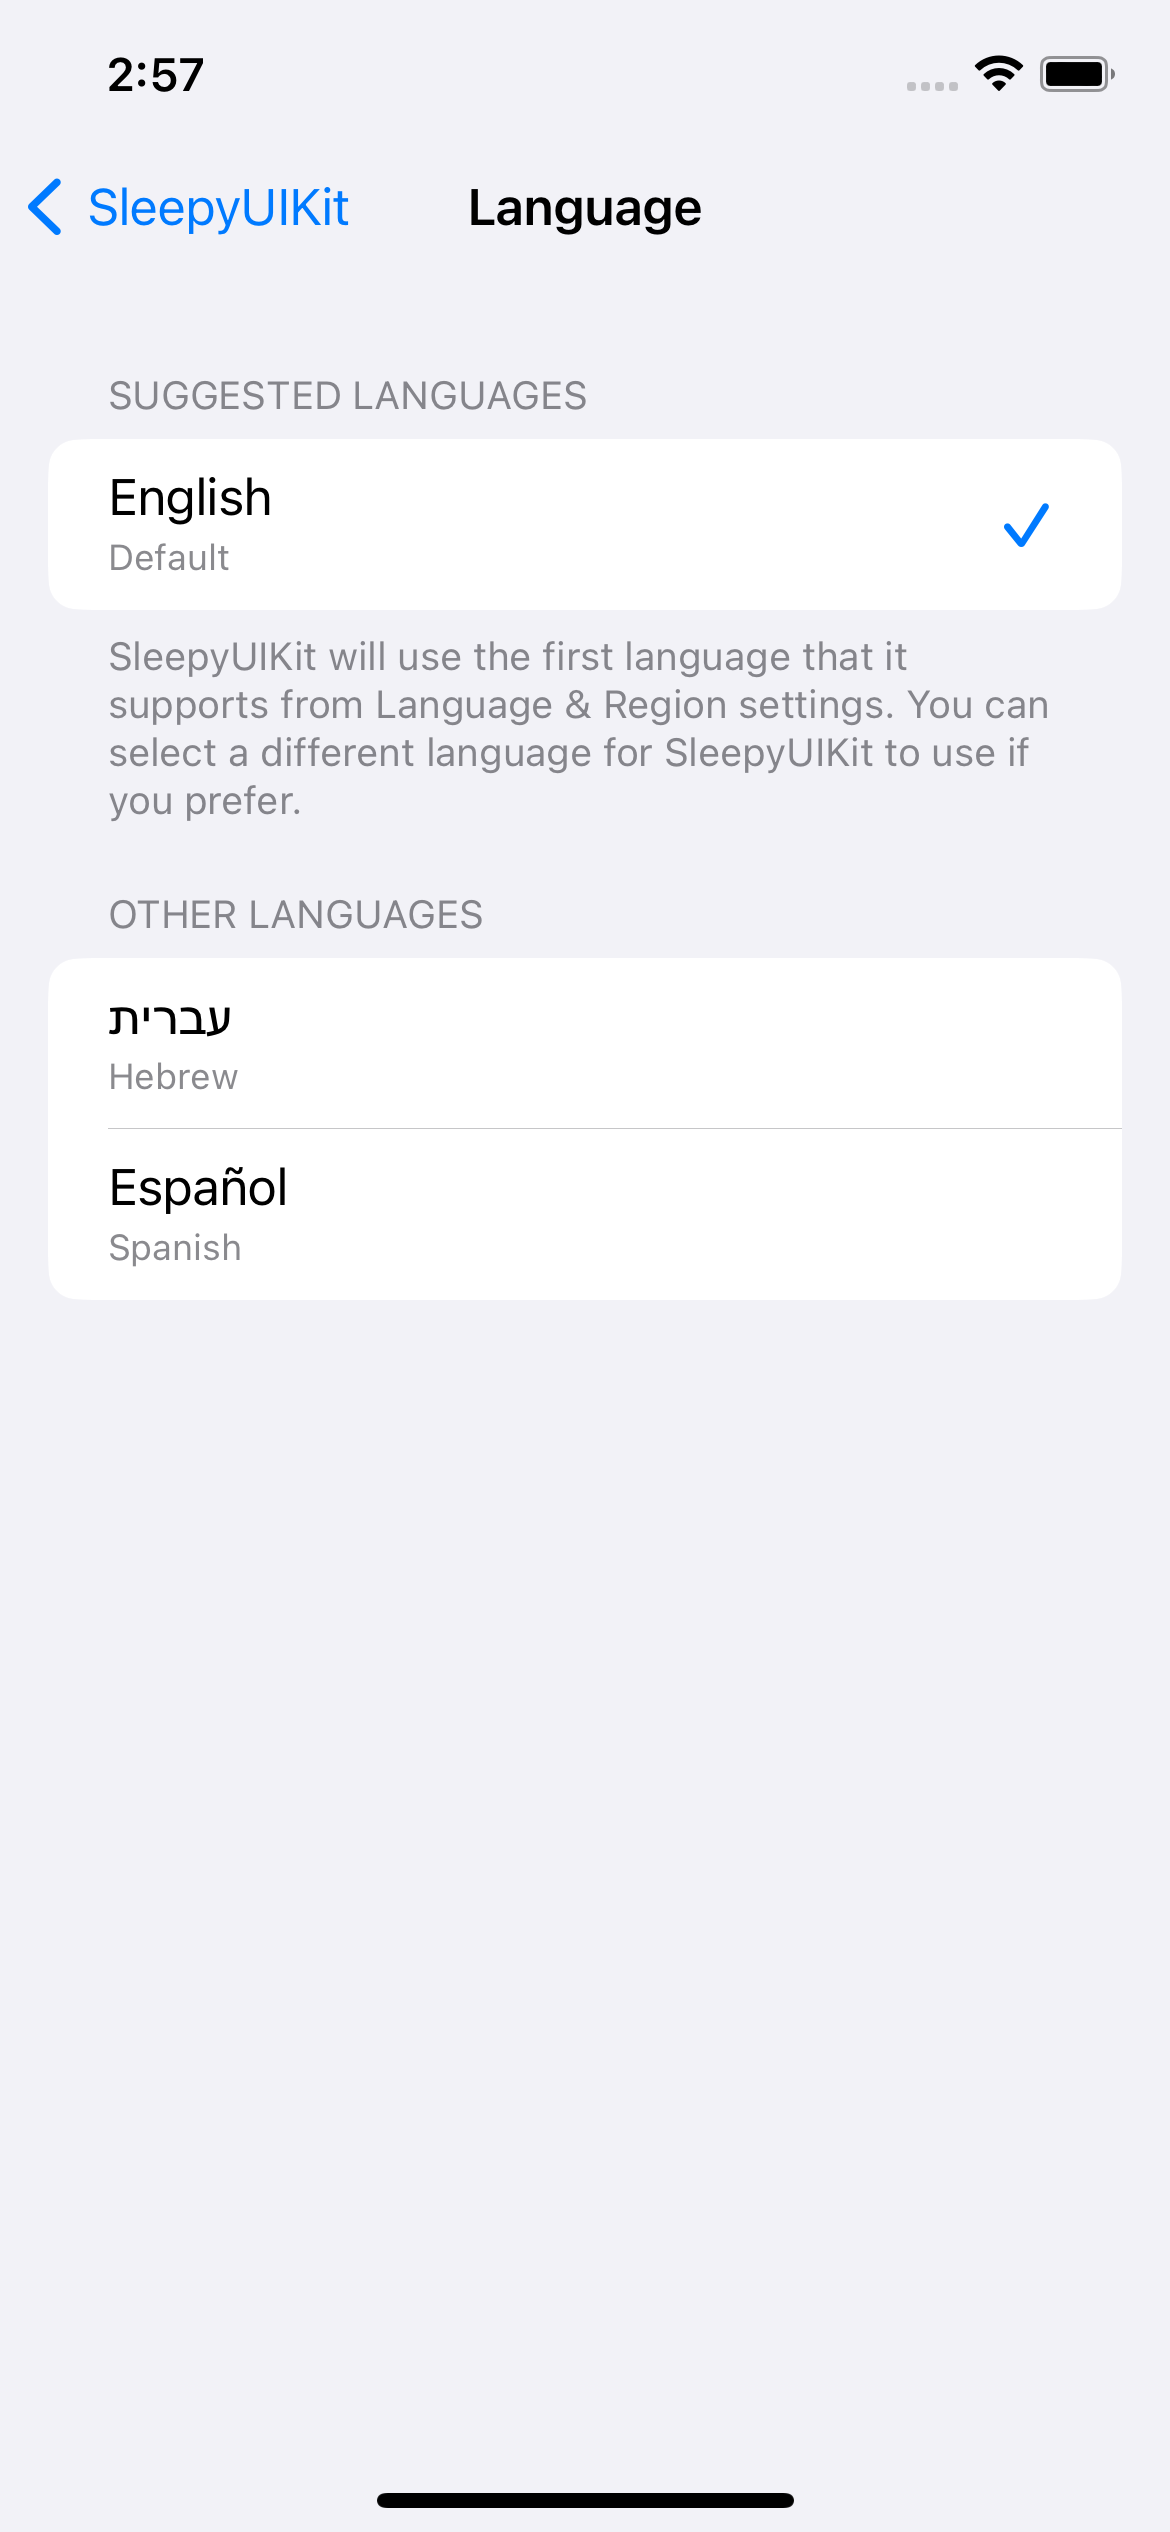
The iOS system automatically handles switching locales of applications when the app supports the current locale, e.g. if the phone’s language setting is Hebrew, I’ll see the Hebrew version of the app. If the language is switched to Spanish, the iOS system will change the app version to Spanish. If the language is changed to one that doesn’t have a localization, the base language is used for the application.
In-app locale switching
It’s best to let the OS handle the user’s preferred locale, and to have your apps adapt to it. In fact, Apple warns against apps switching the locale themselves: All programmatic approaches can lead to unforeseen changes and might not work after an iOS update. The preferred way to handle this is to programmatically open the Preferred Language settings for your app so users can change the settings themselves.
This is the code snippet that opens your app’s settings for the user to change the language. Use this at any appropriate part of your app, e.g in Sleepy we can use this in the menu on the home screen.
if let settingsURL = URL(string: UIApplication.openSettingsURLString) {
    UIApplication.shared.open(settingsURL, options: [:], completionHandler: nil)
}Code language: Swift (swift)
Programmatic Language Switching
Even though it is not recommended by Apple, use cases differ and changing the locale via code might be what you need. iOS saves the locale in a user default with the key AppleLanguages and changing this will update the application’s locale. The catch is that the app has to be reopened to see the change. We’ll use a notification to prompt the user to reopen the application. You can choose to show an alert or sheet that explains why the user needs to reopen the application after changing the language. The best user experience to go around this can differ so we leave you to make your own decision. We will use notifications for our app, Sleepy.
/*
ViewController.swift
*/

private func setLangauge(languageCode: String, language: String) {
     let alert = UIAlertController(title: nil, message: "changing.language".localize(), preferredStyle: .alert)

      alert.addAction(UIAlertAction(title: "exit.sleepy".localize() , style: .default, handler: { [weak self](_) in
						// Update app's language with the language code
            UserDefaults.standard.set([languageCode], forKey: "AppleLanguages")
            UserDefaults.standard.synchronize()

            self?.closeApplicationWithNotification(language: language)
    }))

		 // Show change language alert to user
     self.present(alert, animated: true, completion: nil)
}

 private func closeApplicationWithNotification(language: String) {
     let content = UNMutableNotificationContent()
     content.title = "Language changed to \(language)"
     content.body = "Tap to reopen the application"
     content.sound = UNNotificationSound.default

     let trigger = UNTimeIntervalNotificationTrigger(timeInterval: 0.5, repeats: false)
     let identifier = "sleepy"
     let request = UNNotificationRequest.init(identifier: identifier, content: content, trigger: trigger)
     let center = UNUserNotificationCenter.current()
     center.add(request)

     exit(EXIT_SUCCESS)
}Code language: JavaScript (javascript)
These two functions will help us change the locale of our application and send a notification to the user to tap on it to open the application. The function closeApplicationWithNotification is optional and the user experience of reopening the application should be handled as you see fit. We use exit(EXIT_SUCCESS) to close the application to relaunch for localization changes to fully apply to the application e.g Hebrew switches to Right to Left.
🔗 Resource » Check out How do I programmatically quit my iOS application? in the official Apple docs.
Let’s look at how we use our functions can be used in our application. We’ll have a menu display the supported languages and selecting one will change the app language.
/*
ViewController.swift
*/

func configureActionItemMenu() {
    let menuItems = [
         UIAction(title: "English", handler: { [weak   self] (_) in
             self?.setLangauge(languageCode: "en", language: "English")
        }),
         UIAction(title: "Hebrew",handler: { [weak   self] (_) in
             self?.setLangauge(languageCode: "he", language: "Hebrew")
        }),
         UIAction(title: "Spanish", handler: { [weak   self] (_) in
         self?.setLangauge(languageCode: "es", language: "Spanish")
        })
    ]

    let languageMenu = UIMenu(
			title: "choose.language".localize(),
			image: nil,
			identifier: nil,
			options: [],
			children: menuItems
		)

    navigationItem.rightBarButtonItem = UIBarButtonItem(
			title: "choose.language".localize(),
			image: UIImage(systemName: "gear"),
			primaryAction: nil,
			menu: languageMenu
		)
    navigationItem.rightBarButtonItem?.tintColor = .white
}Code language: Swift (swift)How do I work with dynamic values in my translation strings?
Interpolation is one of the most common use cases for strings, so what happens when you want to use it with localized strings? Once again, we’ll build on our extensions to make interpolation easy and clean throughout our project.
/*
Utils.swift
SleepyUIKit
*/

extension String {
    // ...

    func localizeFormat(args: [CVarArg], comment: String = "") -> String {
        return self.localizeStringFormat(key: self, comment: comment, args: args)
    }

    func localizeStringFormat(key: String, comment: String = "", args: CVarArg... ) -> String {
        let format = NSLocalizedString(key, comment: comment)
        let result = withVaList(args) {
            (NSString(format: format, locale: NSLocale.current, arguments: $0) as String)
        }
        return result
    }
}Code language: Swift (swift)
Add the following localizations in Localizable.strings to be used in interpolation. String specifiers are special characters that indicate the type an interpolation parameter should be. You can add a single or multiple specifiers to the same string interpolation. A full list of all the specifiers available to us can be found here.
"sleep.points" = "%1lu Sleep Points"; // Number interpolation
"hello.user" = "Hello %1$@"; // String interpolation
"share" = "Share %1lu song to %2$@"; // Multiple interpolationsCode language: Swift (swift)
Now in our code we can use these strings together with the extension functions. Number formatting will be tackled more in-depth later in the article.
// Output assumes English (en-US) is the active locale

someLabel.text = "sleep.points".localizeFormat(args: [3000])
// => 3,000 Sleep Points

someLabel.text = "hello.user".localizeFormat(args: ["John"])
// => Hello John

someLabel.text = "share".localizeFormat(args: [1, "Norris"])
// => Share 1 song to NorrisCode language: Swift (swift)
How do I work with localized plural strings?
Currently, with our app, we display “Songs” even if the Sleep Album has just 1 “Song”. Plurals help to manage situations like this to make sure your app is following the right grammatical rules for every language. Xcode uses .stringsdict file to generate localizations for plurals, let’s create one so we can fix the pluralization issues in the app.
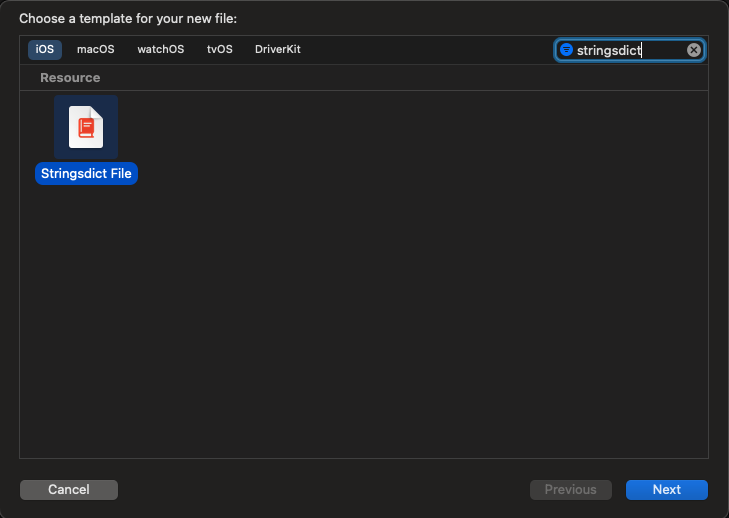
Let’s create .stringsdict by going to File ➞ New ➞ File or just tap Ctrl+N or Cmd+N. Search for “stringsdict” and you will see Strings File in the Resource pane. Click on Next and follow the prompts to create a file.
Click on the newly created Localizable.stringsdict file and click on Localize in the Inspector. On the alert that appears, click Localize to create the localization file for English. In the Inspector, check all the other supported localizations for your application under the Localization section to create localization strings for those languages.
<!-- Localizable(English).stringsdict -->

<?xml version="1.0" encoding="UTF-8"?>
<!DOCTYPE plist PUBLIC "-//Apple//DTD PLIST 1.0//EN" "http://www.apple.com/DTDs/PropertyList-1.0.dtd">
<plist version="1.0">
<dict>
	<key>songs</key> <!-- Localized String Key -->
	<dict>
		<key>NSStringLocalizedFormatKey</key>
		<string>%#@songsCount@</string>
		<key>songsCount</key> <!-- Variable -->
		<dict>
			<key>NSStringFormatSpecTypeKey</key>
			<string>NSStringPluralRuleType</string>
			<key>NSStringFormatValueTypeKey</key>
			<string>d</string>
			<key>zero</key>
			<string>No Songs</string>
			<key>one</key>
			<string>%d Song</string>
			<key>other</key>
			<string>%d Songs</string>
		</dict>
	</dict>
</dict>
</plist>Code language: Swift (swift)
Let’s go through it step by step.
- Localized String Key : the key to be used in NSLocalizedString.
NSStringLocalizedFormatKey- The text to be localized ie.
%#@songsCount@. - Variables should be defined in the format,
%#@and followed by@. - Only define variables for parameters where there are plurals.
- The text to be localized ie.
- Variable : the rules that apply to a specific variable. You create one for every variable you defined in
NSStringLocalizedFormatKeyie.songsCount. NSStringFormatSpecTypeKey: the rule for processing the parameter. It’s already set toNSStringPluralRuleTypeso we can leave it as is.NSStringFormatValueTypeKey: the format of the parameter like d for integer or f for double. For the full list, you can look into Apple’s string format specifiers.- CLDR Language Plural Rules : You can choose different plural rules like
zero,one,two,few,many, andother. For some languages like English, you only need to configure two rules,oneandother. Other languages have only a single plural rule and some languages have more than two. A detailed guide is provided by here.
Let’s make changes to our code to properly format plurals. Great news: We don’t need to create a new extension function to handle this, localizeFormat already handles plurals.
someLabel.text = "songs".localizeFormat(args: [1])Code language: Swift (swift)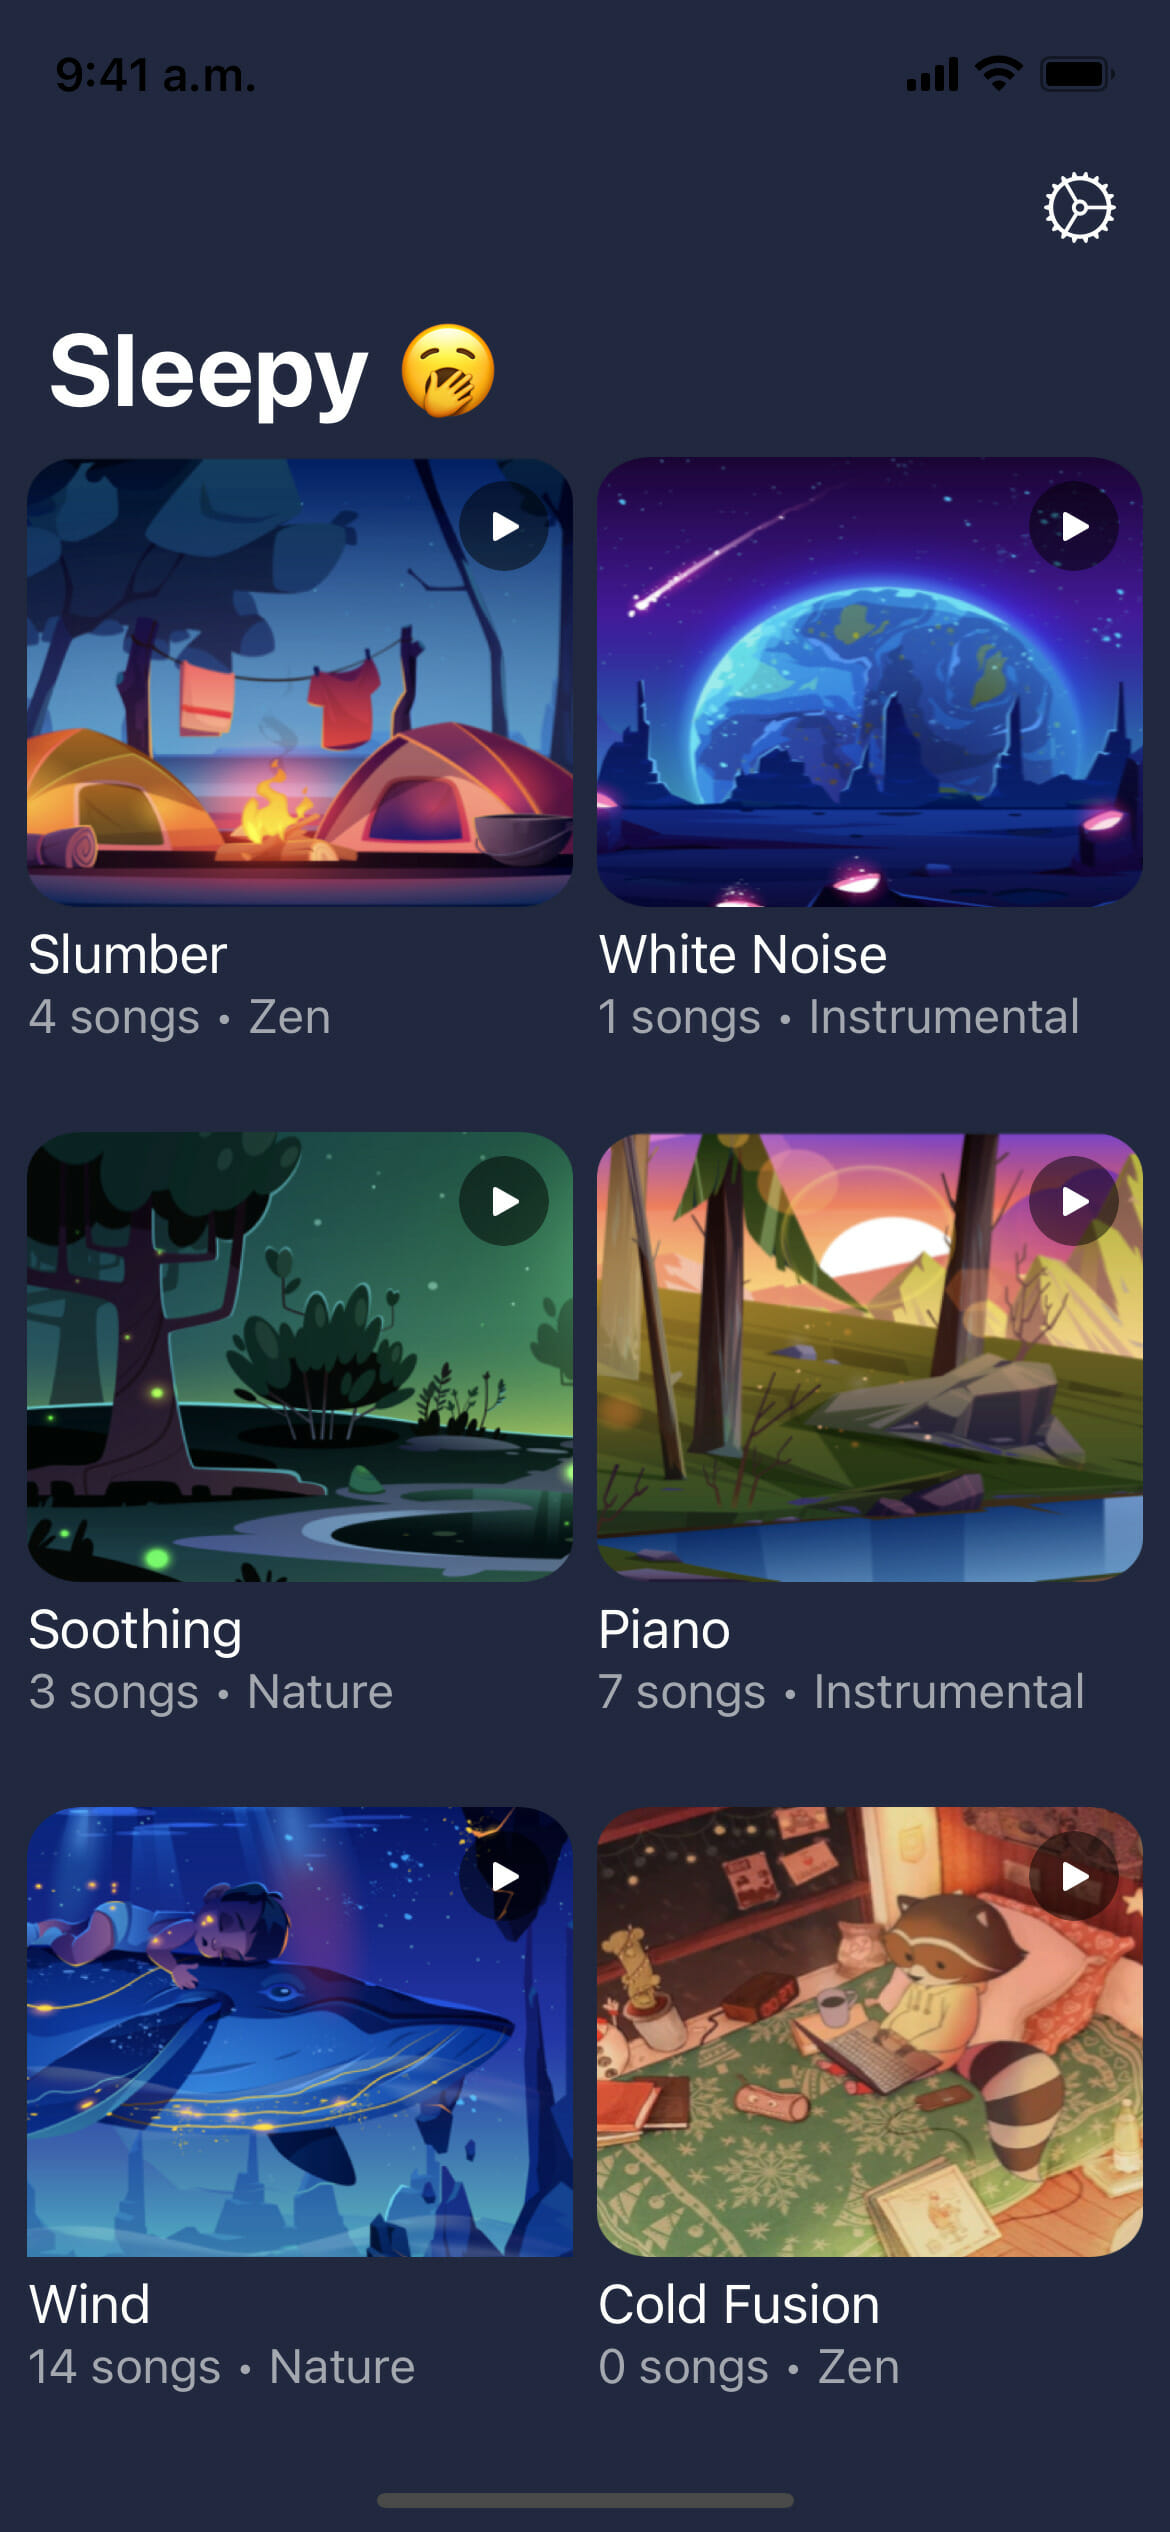
The song text before and after pluralization
How do I localize numbers?
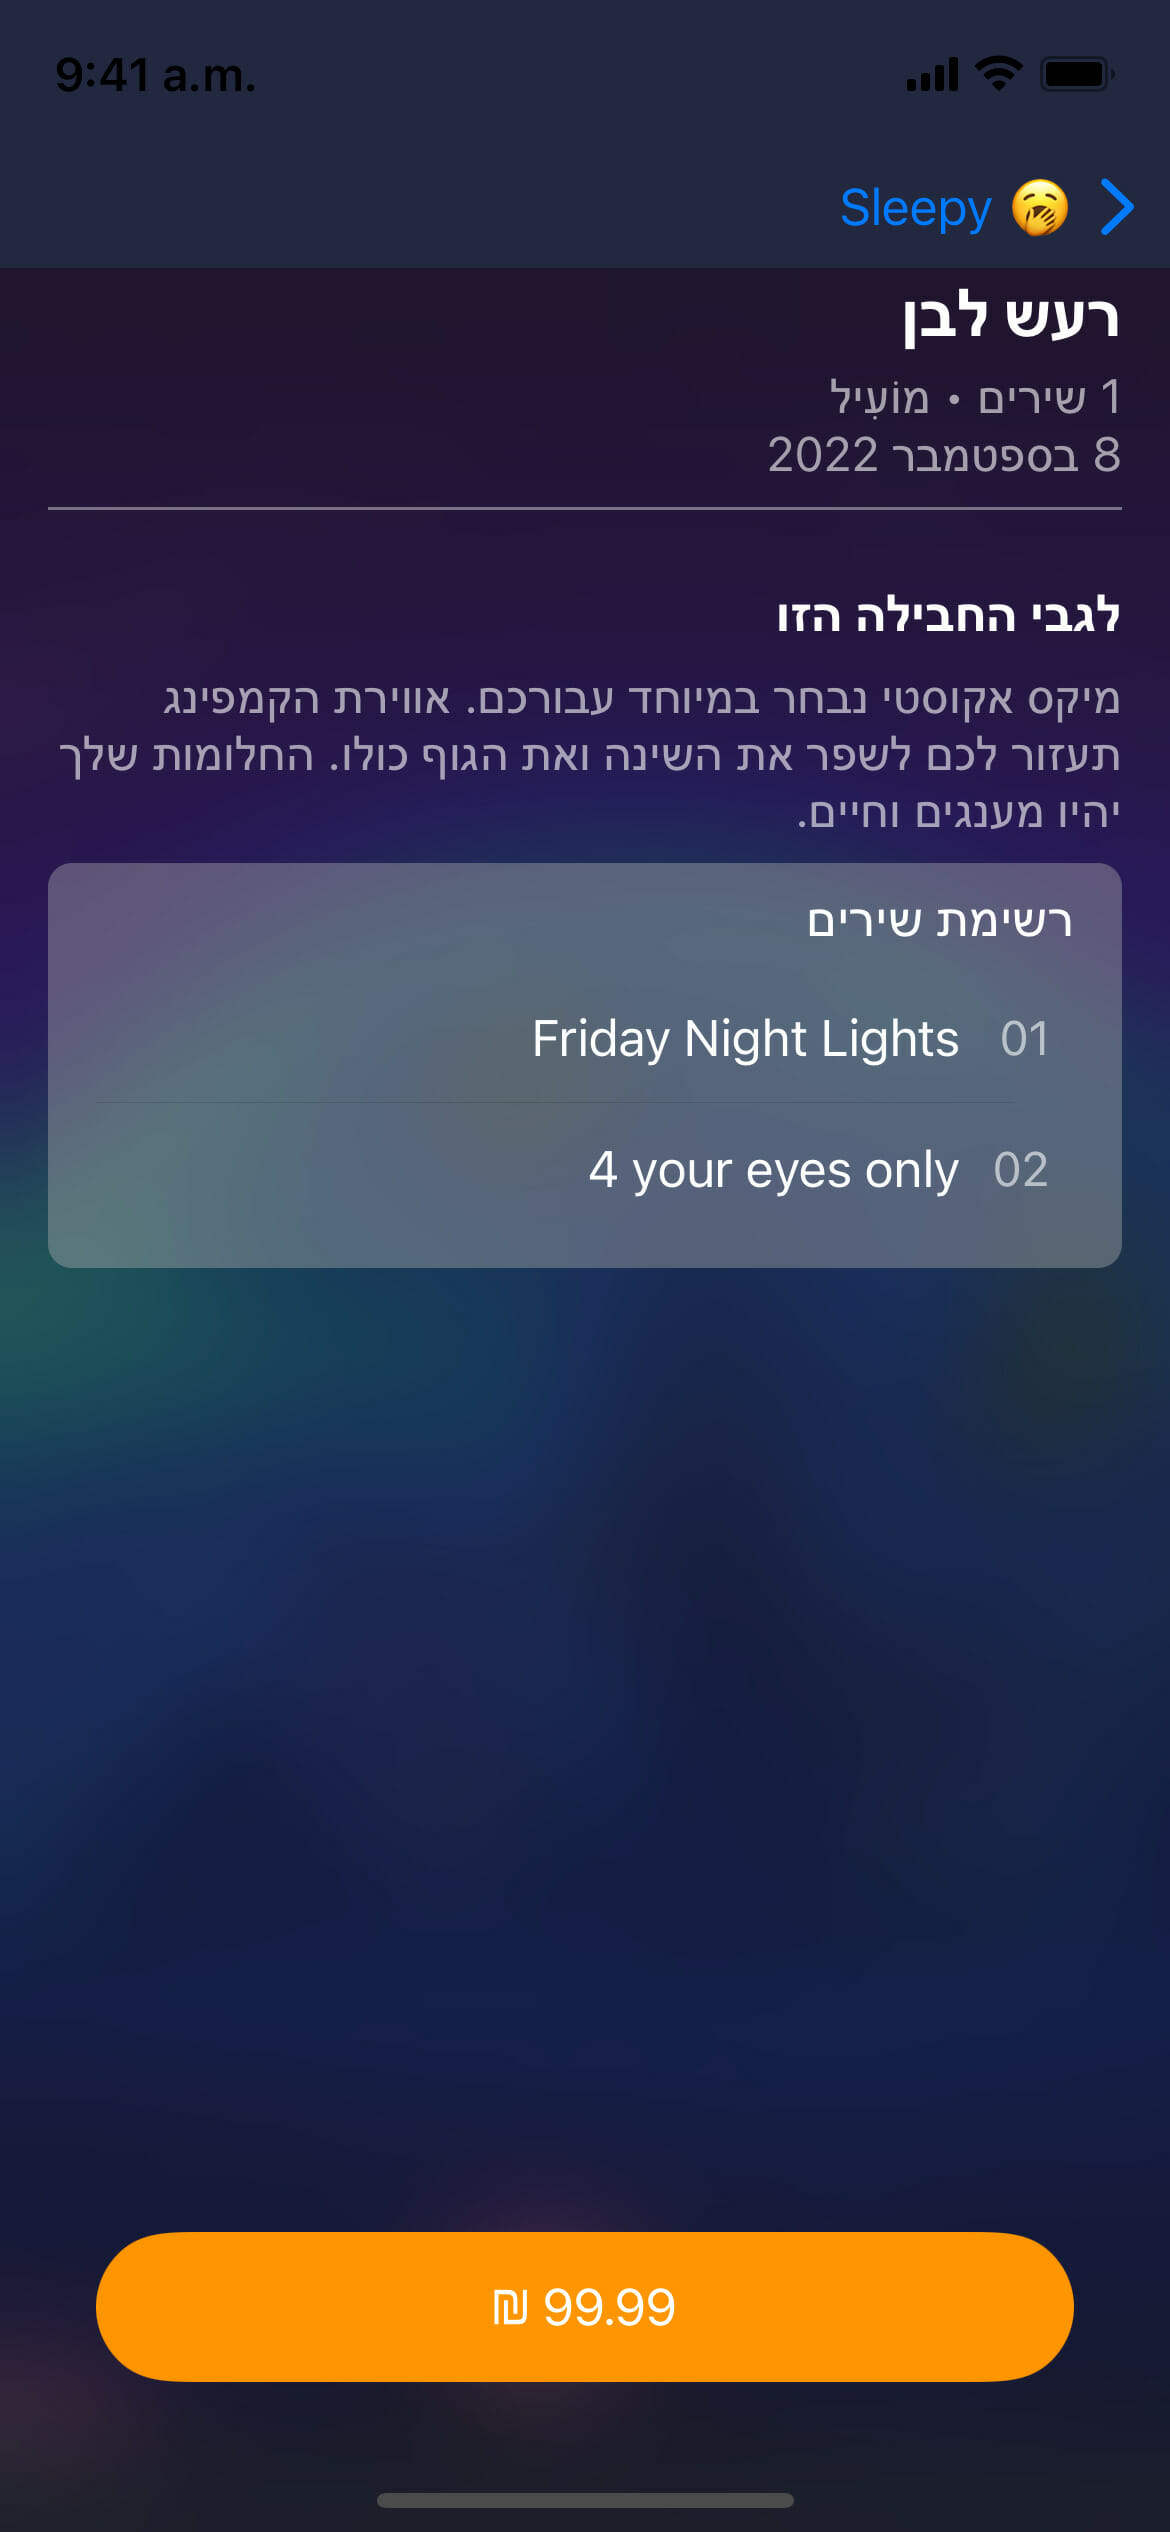
Formatting numbers is one aspect of localization that is often forgotten, as not all languages format numbers the same way. iOS provides a NumberFormatter that takes care of handling formatting for different locales. What has been missing from our app is displaying the price of the albums and we’ll use this as an opportunity to utilize NumberFormatter.
/*
SleepDetailViewController.swift
*/
let numberFormatter = NumberFormatter()
numberFormatter.numberStyle = .currency
priceButton.setTitle(numberFormatter.string(from: 99.99), for: .normal)Code language: Swift (swift)
Run the application with App Language as Hebrew and App Region as Israel.

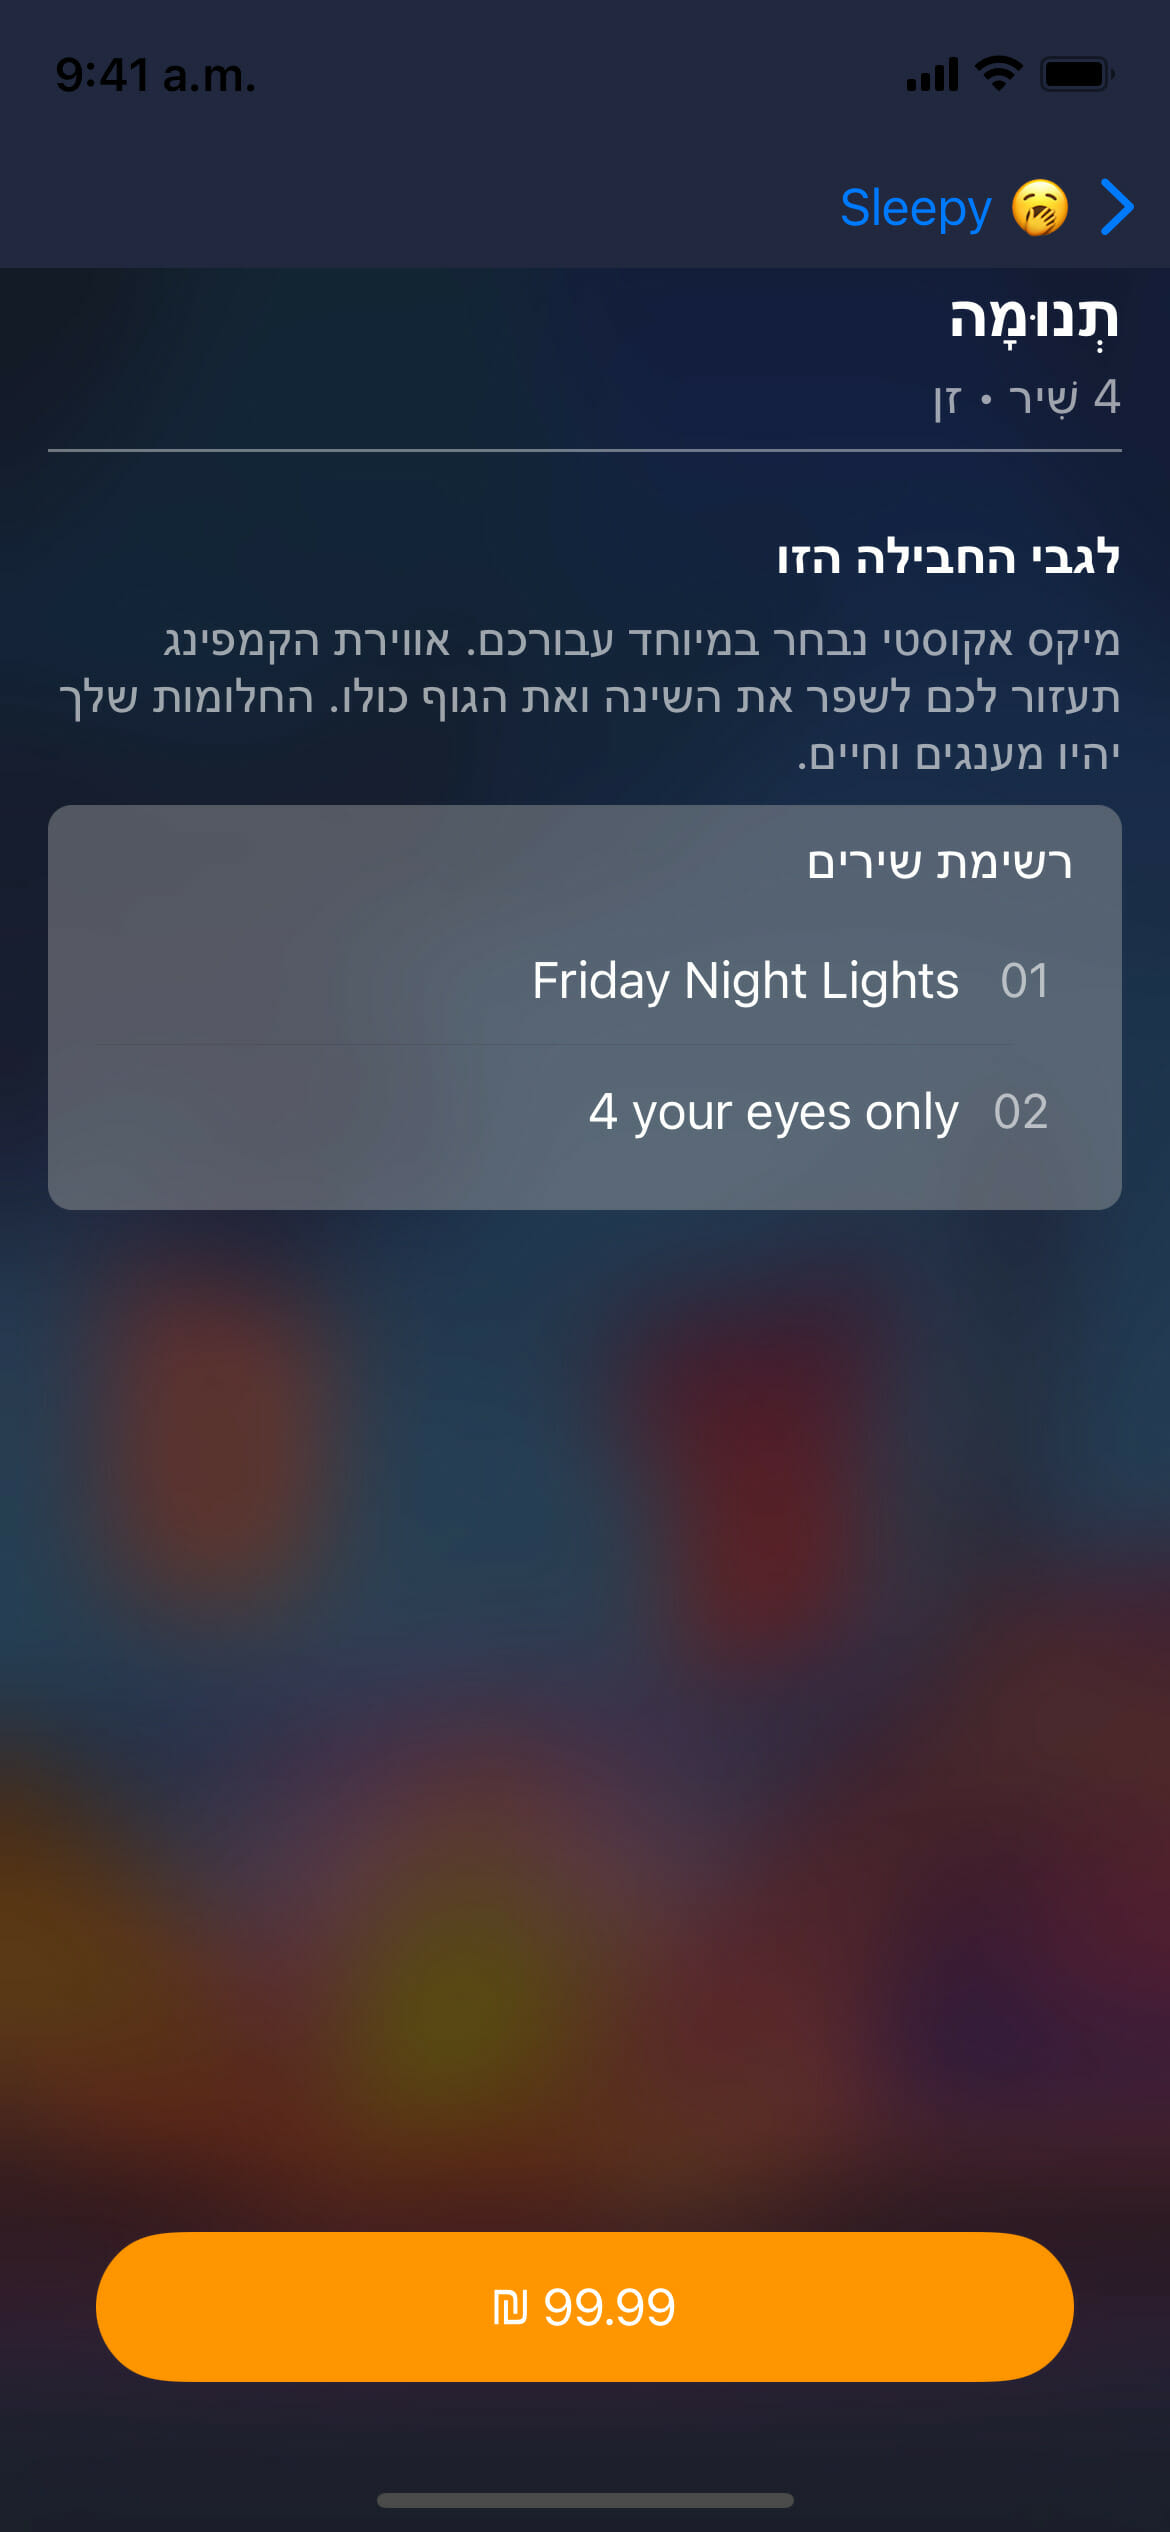
Another common use case for number formatting is for decimals. The numberFormatter.numberStyle = .currency format style correctly displays numbers to fit the locale of the user, e.g. 123456789 will be $123,456,789.00 for English, US (en-US) and 1.234.567.899,00 for Spanish, Spain (es-ES).
✋Heads up » Number formats are region specific. The user’s locale is used by default but you can specify the locale of a number with numberFormatter.locale = Locale(identifier: "en-US") to avoid any surprises, e.g. using 123456789 will be $123,456,789.00 for en-US and ₹1,234,567,899.00 for en-IN.
🔗 Resource » NumberFormatter can do a lot more than just currency localization, check the full list of styles from the documentation.
How do I localize dates?
It is good practice to show dates in the locale of your users. The DateFormatter class makes this easy. Let’s show the current date whenever an album is opened.
🔗 Resource » DateFormatter has a lot more to offer, go through the documentation to delve deeper.
/*
	SleepDetailViewController.swift
*/

let dateformatter = DateFormatter()
dateformatter.dateStyle = .long
dateLabel.text = dateformatter.string(from: Date())Code language: Swift (swift)
We’ve learned how to localize our application while addressing the most common issues with localization. Let’s now shift our attention to how to do localization with SwiftUI.
How do I localize my SwiftUI views?
SwiftUI is a declarative modern framework that helps build applications on all Apple platforms. SwiftUI has great localization support and requires less effort. Text, the most common SwiftUI view already comes pre-built with support for LocalizedStringKey, which means passing the key of your localized strings will just work. The setup for localization is the same as in UIKit, so go ahead and follow the same steps to set up.
Let’s use a common view in SwiftUI, Text, to demonstrate this. Let’s copy the storyboard localization strings into Localizable.strings since there is no storyboard in SwiftUI.
/*
Localizable.strings
*/
"list.of.songs" = "LIST OF SONGS";
"about.this.pack" = "About this pack";Code language: Swift (swift)
/*
SleepDetailView.swift
*/
Text("about.this.pack")
.font(.title3)
.fontWeight(.semibold)
.foregroundColor(.white)Code language: Swift (swift)About pack is localized in both Hebrew and Spanish by just passing the key of the localized string.
SwiftUI Translated Previews
With the power of SwiftUI previews, you can preview localization by indicating the locale as an environment. Previews show by default in Xcode but if yours isn’t showing, the shortcut, Option + Command + Return can be used to toggle it on and off.
/*
SleepDetailView.swift
*/

struct SleepDetailView_Previews: PreviewProvider {
    static var previews: some View {
        Group {
         SleepDetailView(sleeper: SleepData.list.first!)
            .environment(\.locale, .init(identifier: "en"))

         SleepDetailView(sleeper: SleepData.list.first!)
            .environment(\.locale, .init(identifier: "he"))
        }
    }
}Code language: Swift (swift)
Interpolation
Interpolation can be achieved by making a few changes to our Localizable.strings, the key of our strings needs to contain specifiers when we are localizing for SwiftUI.
// UIKit
"hello.user" = "Hello %@";Code language: Swift (swift)
…becomes…
// SwiftUI
"hello.user %@" = "Hello %@";Code language: Swift (swift)
We can then use this in our views.
let user = "Conan"

Text("hello.user \(user)") // Hello Conan
.foregroundColor(.white.opacity(0.7))
.font(.subheadline)Code language: Swift (swift)
Plurals
Plurals in SwiftUI follow the same pattern as it was in UIKit, by using Localizable.stringsdict. The change with SwiftUI is that we have to add the specifiers to the Localized String Key.
<?xml version="1.0" encoding="UTF-8"?>
<!DOCTYPE plist PUBLIC "-//Apple//DTD PLIST 1.0//EN" "http://www.apple.com/DTDs/PropertyList-1.0.dtd">
<plist version="1.0">
<dict>
	<key>songs %d</key> <!-- Localized String Key -->
	<dict>
		<key>NSStringLocalizedFormatKey</key>
		<string>%#@songsCount@</string>
		<key>songsCount</key>
		<dict>
			<key>NSStringFormatSpecTypeKey</key>
			<string>NSStringPluralRuleType</string>
			<key>NSStringFormatValueTypeKey</key>
			<string>d</string>
			<key>zero</key>
			<string>No Songs</string>
			<key>one</key>
			<string>%d Song</string>
			<key>other</key>
			<string>%d Songs</string>
		</dict>
	</dict>
</dict>
</plist>Code language: Swift (swift)
/*
SleeperView.swift
*/
Text("\(5) songs")
.foregroundColor(.white.opacity(0.7))
.font(.subheadline)Code language: Swift (swift)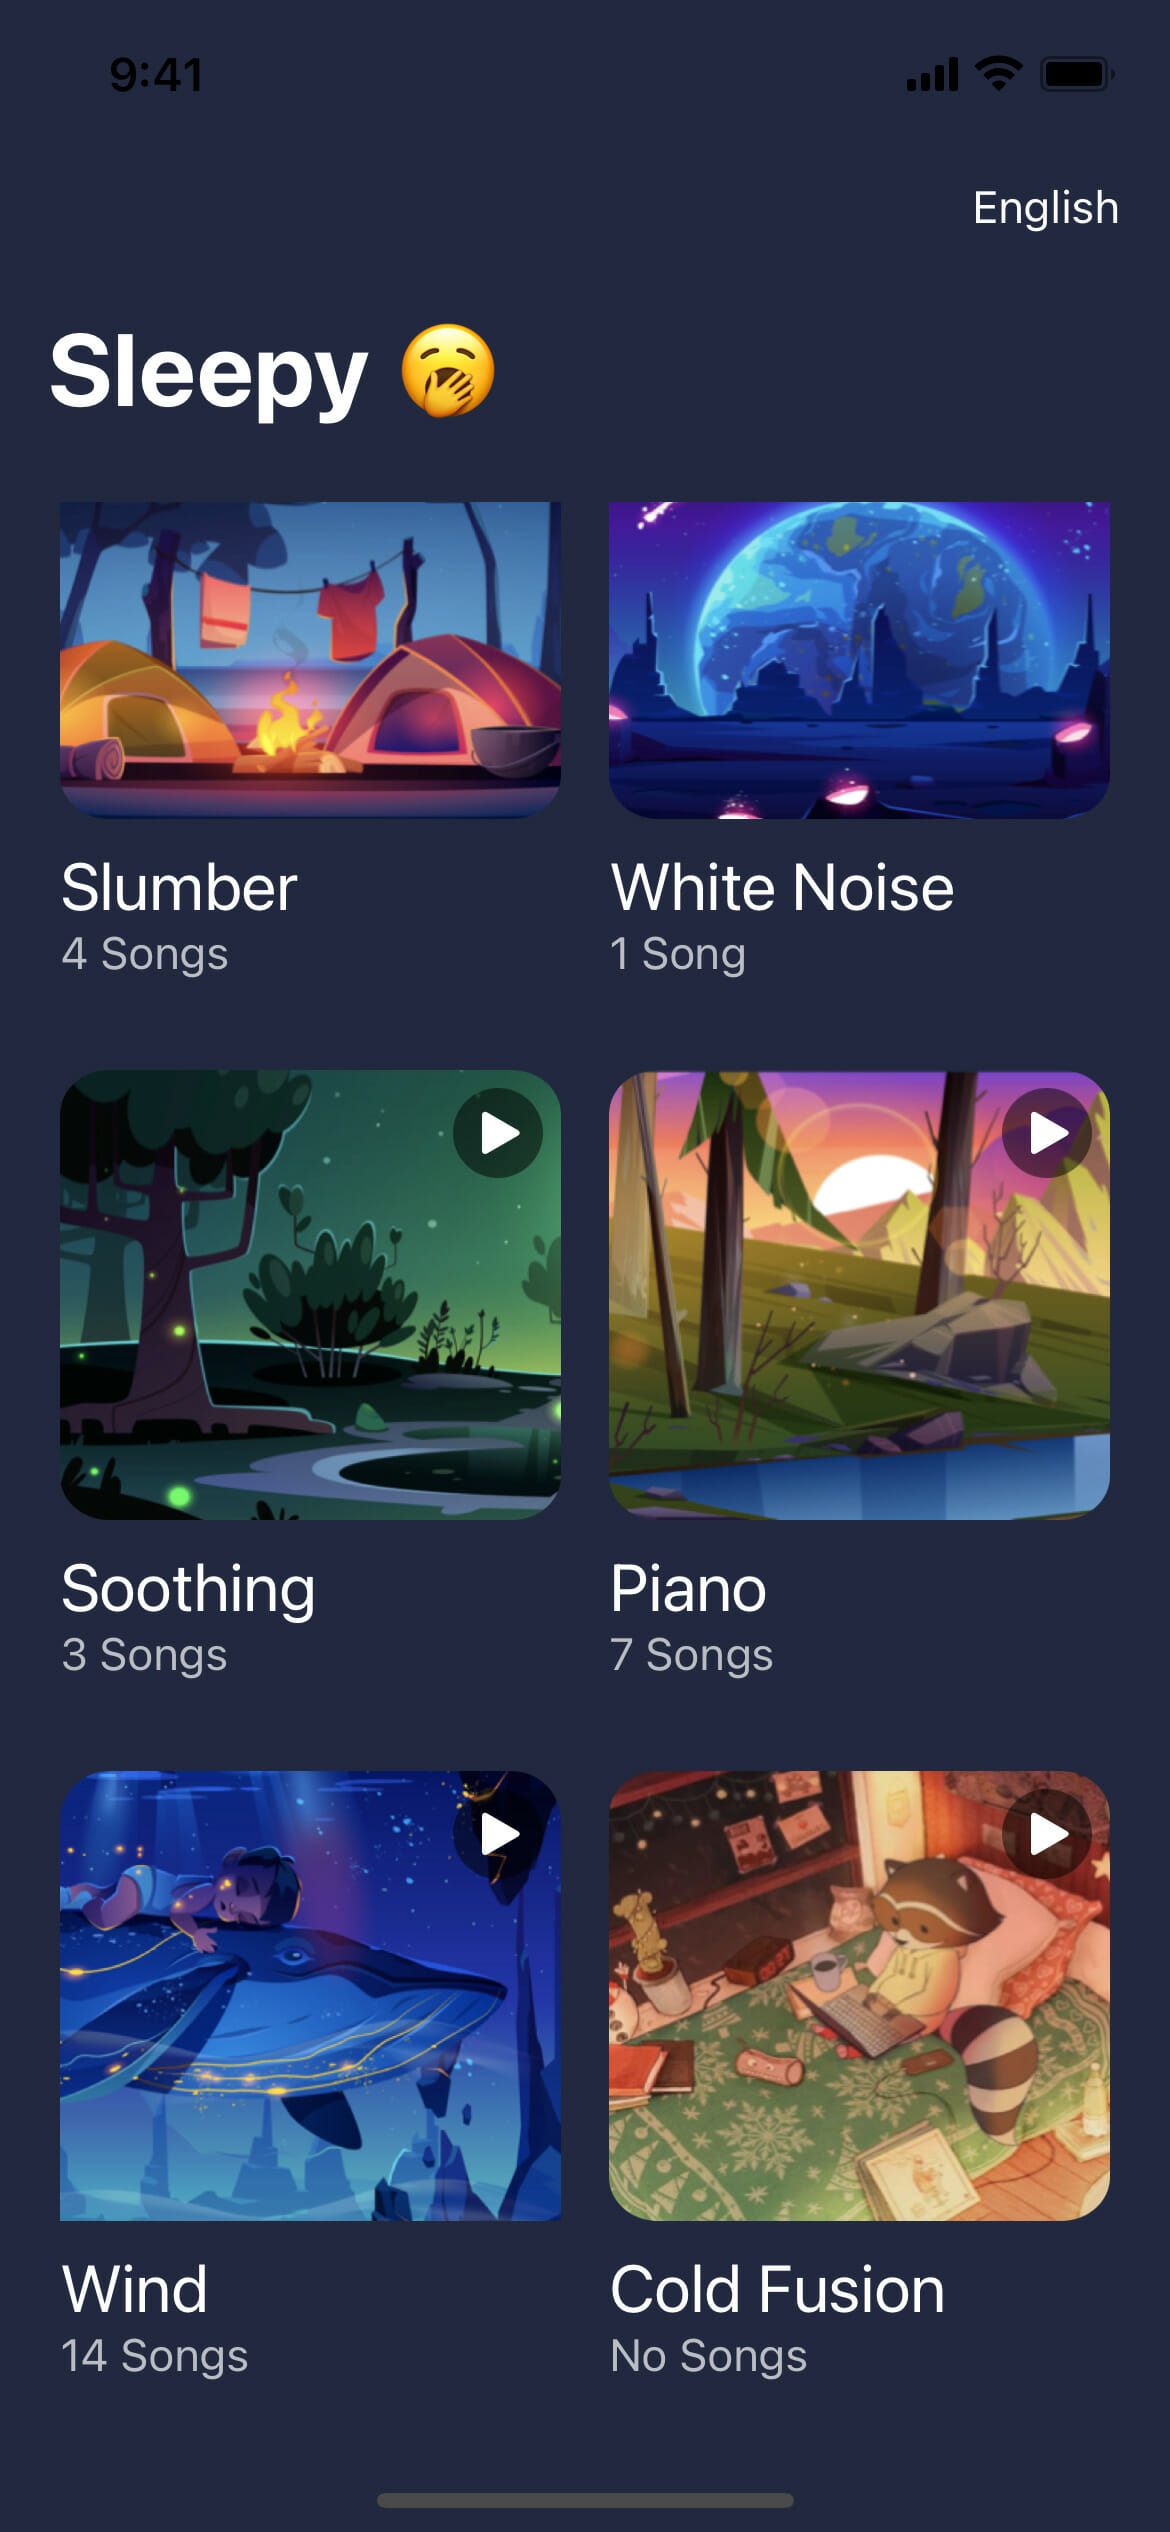
Combining plurals and interpolation
Things might not always be straight forward when building your applications. There can be various combinations of plurals, interpolation, etc. all mixed. Let’s take a look at combining plurals and interpolation.
<!-- Localizable(English).stringsdict -->

<?xml version="1.0" encoding="UTF-8"?>
<!DOCTYPE plist PUBLIC "-//Apple//DTD PLIST 1.0//EN" "http://www.apple.com/DTDs/PropertyList-1.0.dtd">
<plist version="1.0">
<dict>
    <key>%lld songs %@</key>
    <dict>
        <key>NSStringLocalizedFormatKey</key>
        <string>%#@songsCount@</string>
        <key>songsCount</key>
        <dict>
            <key>NSStringFormatSpecTypeKey</key>
            <string>NSStringPluralRuleType</string>
            <key>NSStringFormatValueTypeKey</key>
            <string>d</string>
            <key>zero</key>
            <string>No Songs • %@</string>
            <key>one</key>
            <string>%d Song • %@</string>
            <key>other</key>
            <string>%d Songs • %@</string>
        </dict>
    </dict>
</dict>
</plist>Code language: Swift (swift)
/*
SleepDetailView.swift
*/
Text("\(sleeper.numberOfSongs) songs • \(sleeper.category)")
.foregroundColor(.white.opacity(0.7))
.font(.subheadline)Code language: Swift (swift)Adding comments
We’ve already seen the importance of adding comments when localizing strings. Let’s continue with our best practices here in SwiftUI.
Text("sleepy", comment: "Navigation title")Code language: Swift (swift)Add localization strings for non-text views
For anything other than a text view, initialize the view with text views or add strings for your app to provide localized views. You can localize other views, such as Label or Picker, as they accept a LocalizedStringKey. The easiest way is to pass Text into views that accept it or use the localize() extension function we’ve been using in UIKit.
"sleep.points" = "%1lu Sleep Points";Code language: Swift (swift)navigationTitle(Text("\(3000) sleep.points"))
// => 3000 Sleep PointsCode language: Swift (swift)navigationTitle("sleep.points".localizeFormat(args: [3000]))
// => 3000 Sleep PointsCode language: Swift (swift)Programmatic language switching
We will utilize the same functions from our UIKit example to achieve this in SwiftUI.
/*
ContentView.swift
*/
...
.alert("changing.language", isPresented: $showRestartApplication, actions: {
  Button("exit.sleepy") {
      UserDefaults.standard.set([selectedLanguage.code], forKey: "AppleLanguages")
      UserDefaults.standard.synchronize()
      self.closeApplicationWithNotification(language: selectedLanguage.name)
  }
})Code language: Swift (swift)Wrapping up
Now we are ready to share our wonderful sleep albums with the world. We have learned how to achieve industry-standard levels of localization with both UIKit and SwiftUI. We’ve gone through regular scenarios and complex ones. With this, your applications are ready to conquer international markets.
As easy as this is, Phrase Strings can even make it easier. A specialized software localization platform, Phrase Strings has a powerful web admin console that helps both translators and developers collaborate in the cloud. When you localize iOS apps with Phrase Strings, you can connect to a robust API and a growing number of native integrations with your favorite tools to stay focused on your code.
Check out all of Phrase’s features, and sign up for a free 14-day trial.
If you want to learn even more about iOS internationalization, feel free to check out the following articles:
