Software localization
How to Localize Software at Scale: A Step-by-Step Guide

If our business is lucky enough to make it past its first few years, we often need to address the next hurdle: scaling. In this guide, we take a look at scaling from the perspective of internationalization (i18n) and localization (l10n). We address workflow efficiency and how localization technology can save us time and money as we scale, keeping us competitive through a laser focus on our core offering.
Our minimum viable product (MVP)
Let’s say we’re a fantastic new e-commerce startup called HandiRaft, with a goal of connecting artisans with customers who want to buy bespoke crafts. We’ve decided that our MPV will include iOS and Android apps, and a web app for desktop users. To reduce risk and validate our core offering as quickly as possible, we’ve built our mobile apps with Flutter and our web app with React.
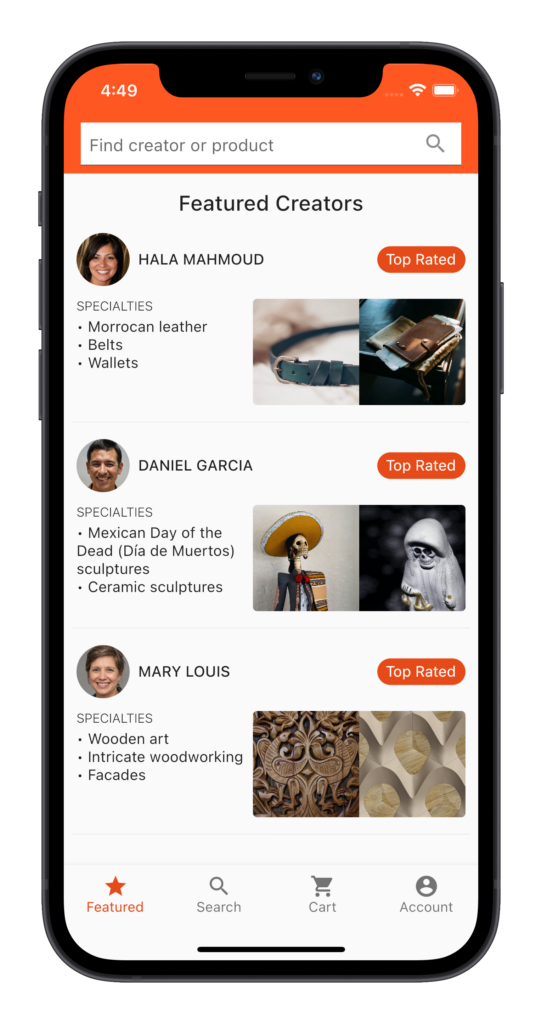
Our Flutter mobile MVP: one codebase for both Android and iOS saves us time and money
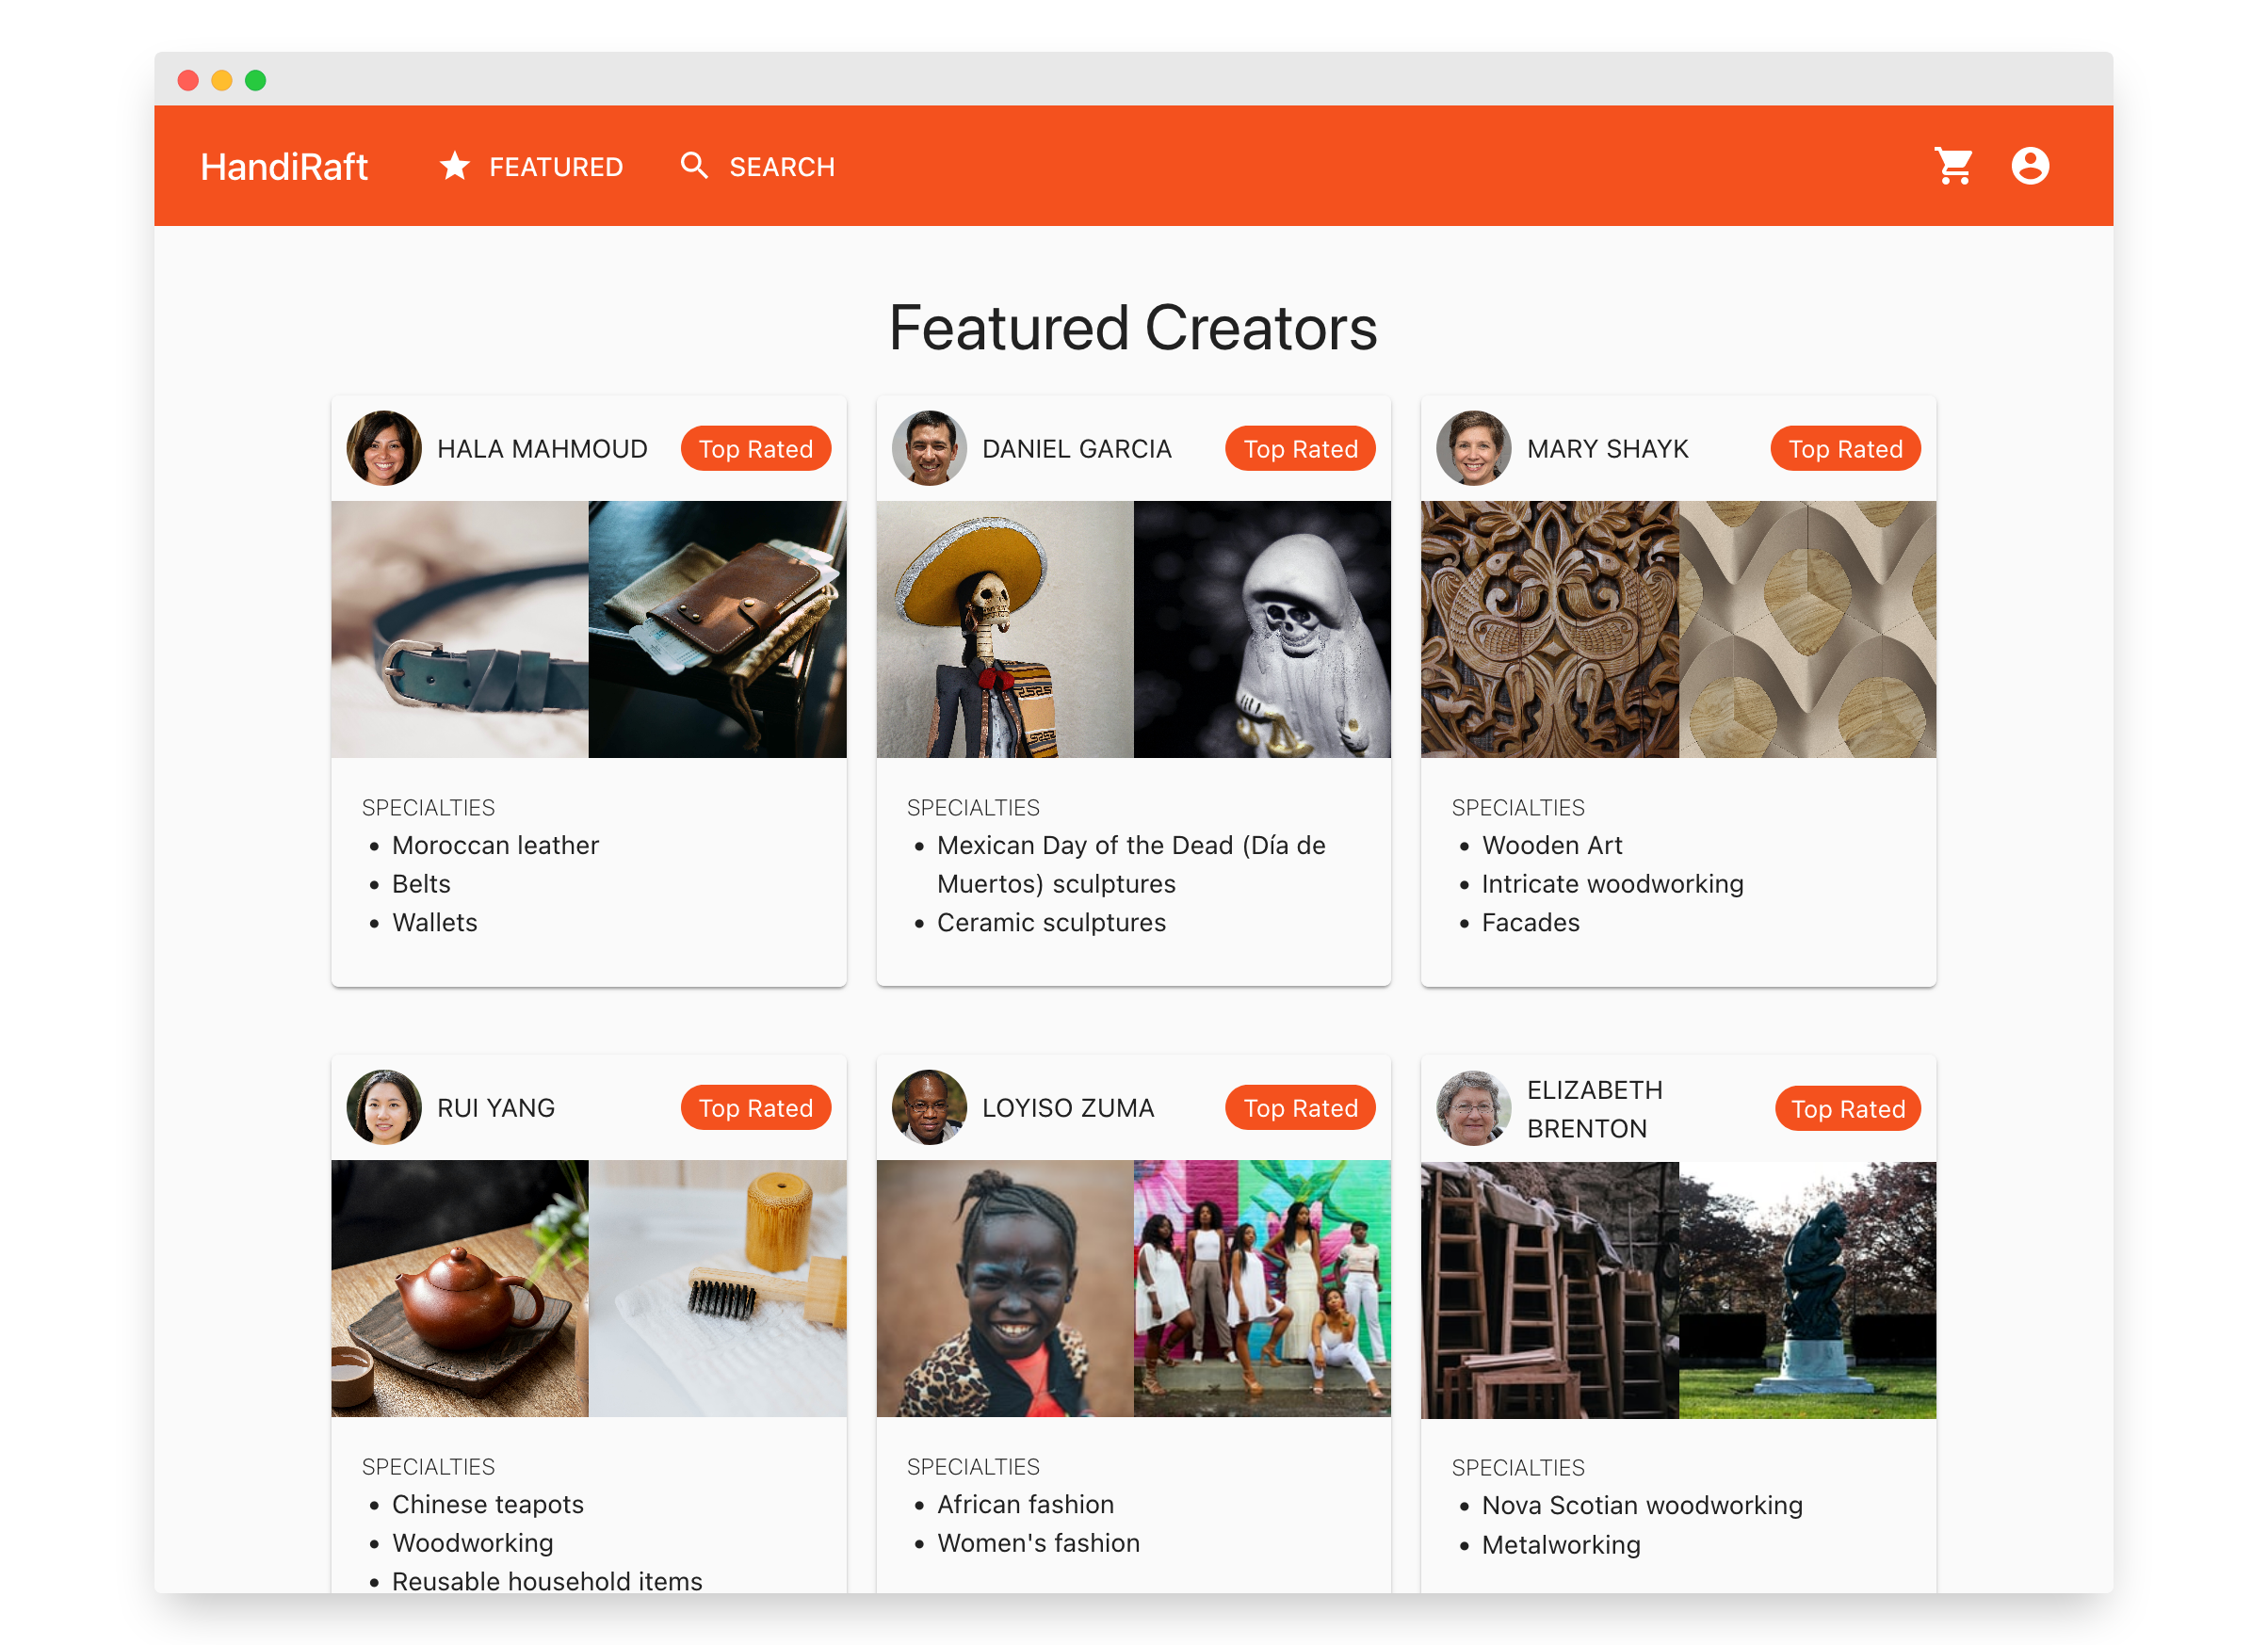
Our desktop MVP with React
An offering like ours has some technical challenges right out of the gate:
- Handling payments, including security, which we can outsource to a service like Stripe.
- Creating an admin panel for creators, which our MVP would include in the web/desktop app, with some roles and permission management for buyers and creators.
- Handling the ecommerce experience, including buyer accounts, the shopping cart, orders, and returns/refunds.
- Ensuring we have excellent customer support, which we can outsource the tech solution for while keeping our support staff in-house for the best customer experience.
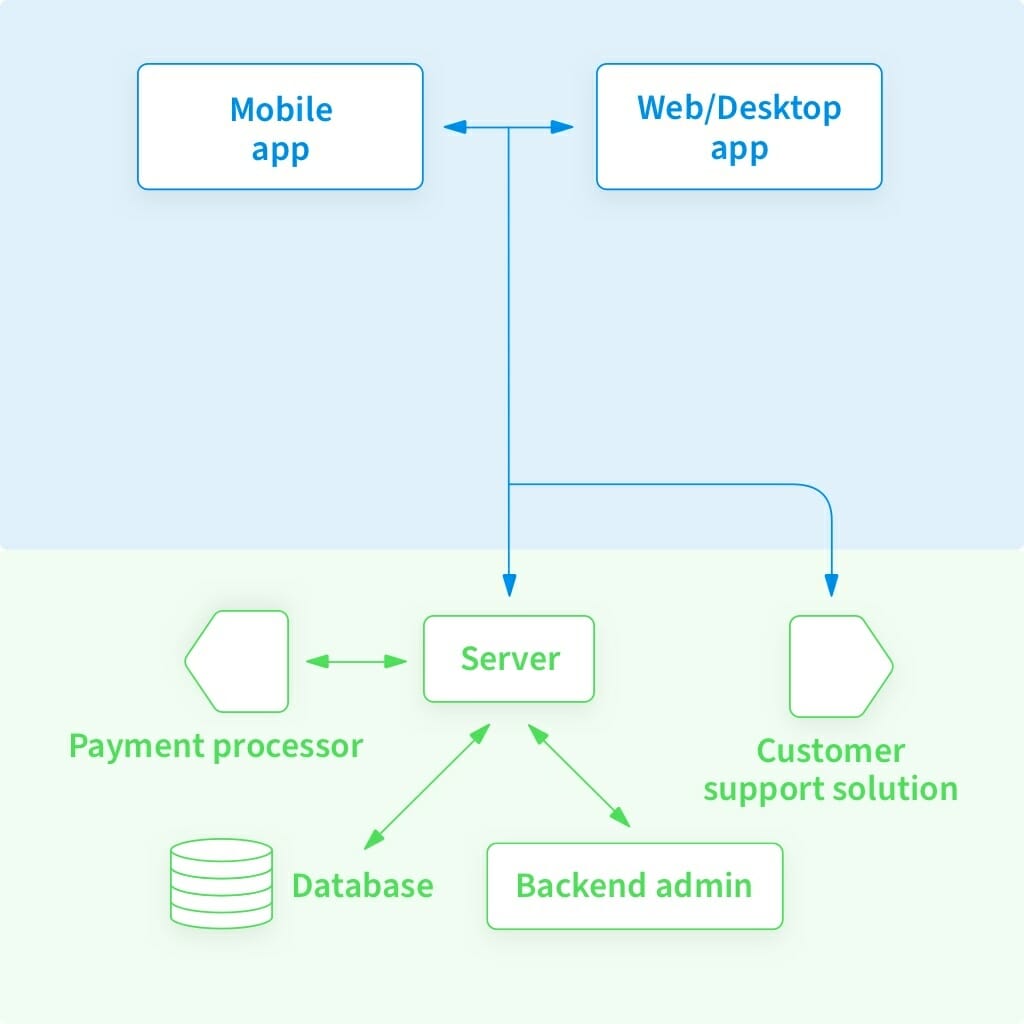
A simplified view of our app architecture
🔗 Resource » You can get the source code for our mocked-up apps from the companion GitHub repos:
Localizing software
Connecting buyers and artisans all over the world means taking a global approach to our offering. At the very least, we need to internationalize our public-facing apps and localize them for our most prominent target markets. This isn’t too difficult with Flutter and React.
🤿 Go deeper » Our Complete Guide to Software Localization goes into much more detail regarding what software localization is, its strategic importance for your business, and best practices for optimizing your localization workflows.
Localizing the mobile app
Flutter includes a robust first-party i18n library, and it can kickstart our mobile app i18n in a hurry. Here’s the skinny:
- We have localization ARB files, one per supported locale.
- We wire up the i18n library to our app and use its built-in code generation to load translation strings from these ARB files, instead of hard-coding them in our UI.
.
└── lib/
    ├── l10n/
    │   ├── app_en.arb # English translations
    │   ├── app_ar.arb # Arabic translations
    │   └── ...        # etc.
    │
    ├── main.dart      # Connects the Flutter localizations package
    │                  # to our app
    │
    └── widgets/
        ├── creator_card.dart # Widgets import localization packages;
        │                     # resolve and use current locale
        │                     # translation strings
        │
        └── ...               # etc.
Here’s what our main.dart file looks like:
import 'package:flutter/material.dart';
import 'package:flutter_localizations/flutter_localizations.dart';
import 'package:flutter_gen/gen_l10n/app_localizations.dart';
import 'pages/home_page.dart';
void main() {
  runApp(const MyApp());
}
class MyApp extends StatelessWidget {
  const MyApp({Key? key}) : super(key: key);
  @override
  Widget build(BuildContext context) {
    return MaterialApp(
      onGenerateTitle: (context) {
        return AppLocalizations.of(context)!.appTitle;
      },
      localizationsDelegates: const [
        AppLocalizations.delegate,
        GlobalMaterialLocalizations.delegate,
        GlobalWidgetsLocalizations.delegate,
        GlobalCupertinoLocalizations.delegate,
      ],
      supportedLocales: const [
        Locale('en', ''),
        Locale('ar', ''),
      ],
      theme: ThemeData(
        primarySwatch: Colors.deepOrange,
      ),
      home: const HomePage(),
    );
  }
}
🔗 Resource » The full code of this app is under the flutter_app directory of our companion GitHub repo.
Our translation .arb files are basically JSON.
{
  "appTitle": "HandiCraft",
  "featuredCreators": "Featured Creators",
  "searchPlaceholder": "Find creator or product",
  "topRated": "Top Rated",
  "featured": "Featured",
  "search": "Search",
  "cart": "Cart",
  "account": "Account",
  // ...
}
{
  "appTitle": "هانديكرافت",
  "featuredCreators": "الحرفيين المميزين",
  "searchPlaceholder": "ابحث عن حرفي أو منتج",
  "topRated": "الأعلى تقييمًا",
  "featured": "متميز",
  "search": "بحث",
  "cart": "عربة التسوق",
  "account": "الحساب",
  // ...
}
Our widgets use prebuilt localization libraries to translate their UI:
import 'package:flutter/material.dart';
import 'package:flutter_gen/gen_l10n/app_localizations.dart';
BottomNavigationBar makeBottomNavBar(BuildContext context) {
  var theme = Theme.of(context);
  // Ensures that translations matching the currently active
  // locale are loaded
  var t = AppLocalizations.of(context)!;
  return BottomNavigationBar(
    type: BottomNavigationBarType.fixed,
    selectedItemColor: theme.primaryColorDark,
    selectedFontSize: 13,
    unselectedFontSize: 13,
    items: [
      BottomNavigationBarItem(
        label: t.featured,          // Pulls translation
        icon: const Icon(Icons.star),
      ),
      BottomNavigationBarItem(
        label: t.search,            // Pulls translation
        icon: const Icon(Icons.search),
      ),
      // ...
    ],
  );
}
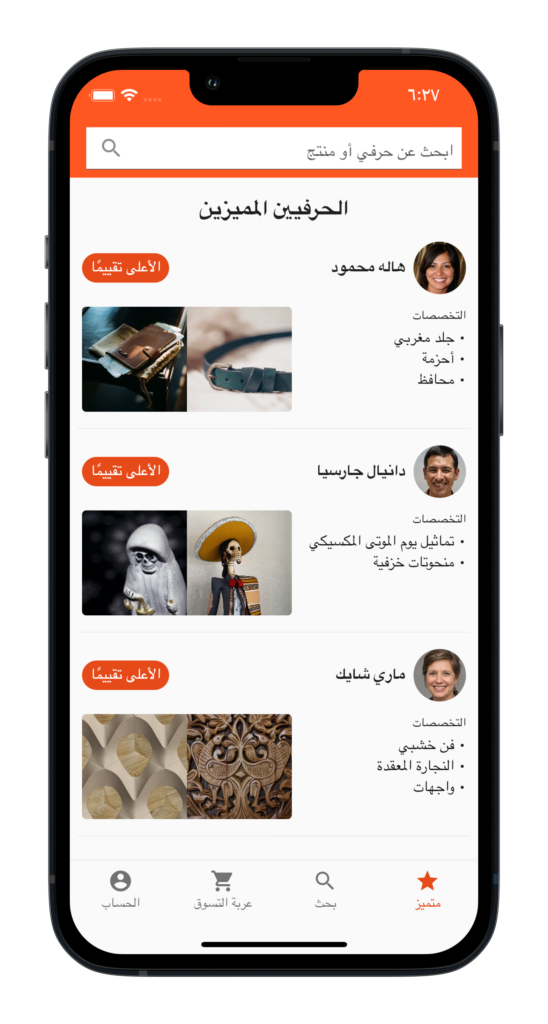
Our mobile app localized in Arabic
🤿 Go deeper » A Guide to Flutter Localization goes into localizing an app with the Flutter localization package in much more detail.
Localizing the web/desktop app
React doesn’t offer i18n out of the box, but the very popular i18next library has an excellent React integration we can use. The localization process is similar to our mobile app: We move our hard-coded UI strings to per-locale translation files and load the translation file corresponding to the active locale.
.
├── public/
│   ├── index.html
│   └── locales/
│       ├── en/
│       │   └── translation.json # English translations
│       ├── ar/
│       │   └── translaton.json  # Arabic translations
│       │
│       └── ...                  # etc.
└── src/
    ├── index.js                 # Loads i18n.js to initialize it
    ├── services/
    │   └── i18n.js              # Bootstraps our i18n library
    └── features/
        ├── Creators/
        │   └── CreatorCard.js   # Imports i18n library and uses/
        │                        # current locale translation
        │                        # strings
        │
        └── ...                  # etc.
Our i18n bootstrap file basically initializes the i18next library.
import i18next from "i18next";
import { initReactI18next } from "react-i18next";
import HttpApi from "i18next-http-backend";
i18next
  .use(initReactI18next)
  .use(HttpApi)
  .init({
    debug: true,
    lng: "en",
    interpolation: {
      escapeValue: false,
    },
  });
export default i18next;
🔗 Resource » The full code of this app is under the react_app directory of our companion GitHub repo.
The index.js entry point simply imports the file to init the library.
import React from "react";
import ReactDOM from "react-dom";
import "./services/i18n";
import App from "./App";
ReactDOM.render(
  <React.StrictMode>
    {/* We use React Suspense to show a loading message
        while our translation file downloads */}
    <React.Suspense fallback="Loading...">
      <App />
    </React.Suspense>
  </React.StrictMode>,
  document.getElementById("root")
);
i18next will automatically load our translation files from the URI /locales/{locale}/translation.json. These translation files look a lot like our Flutter ARB files.
{
  "appTitle": "HandiCraft",
  "featuredCreators": "Featured Creators",
  "searchPlaceholder": "Find creator or product",
  "topRated": "Top Rated",
  "featured": "Featured",
  "search": "Search",
  "cart": "Cart",
  "account": "Account",
  "copyright": "Copyright",
  // ...
}
{
  "appTitle": "هانديكرافت",
  "featuredCreators": "الحرفيين المميزين",
  "searchPlaceholder": "ابحث عن حرفي أو منتج",
  "topRated": "الأعلى تقييمًا",
  "featured": "متميز",
  "search": "بحث",
  "cart": "عربة التسوق",
  "account": "الحساب",
  "copyright": "حقوق النشر",
  // ...
}
Our React components then just import the i18next instance and use it to display UI strings translated in the active locale.
// MUI framework: Material components for React
import {
  Card,
  CardContent,
  Typography,
  // ...
} from "@mui/material";
// Imports the initialized i18next instance
import { useTranslation } from "react-i18next";
export default function CreatorCard(props) {
  const { t } = useTranslation();
  return (
    <Card>
      {/* ... */}
      <CardContent>
        <Typography>
          // Pulls translation for active locale
          {t("specialties")}
        </Typography>
        {/* ... */}
      </CardContent>
    </Card>
  );
}
🤿 Go deeper » We cover localizing React apps with i18next in a lot of detail in our Guide to React Localization with i18next.
Et voilà. It takes a little bit of work, but the payoff is reaching a wider global audience.
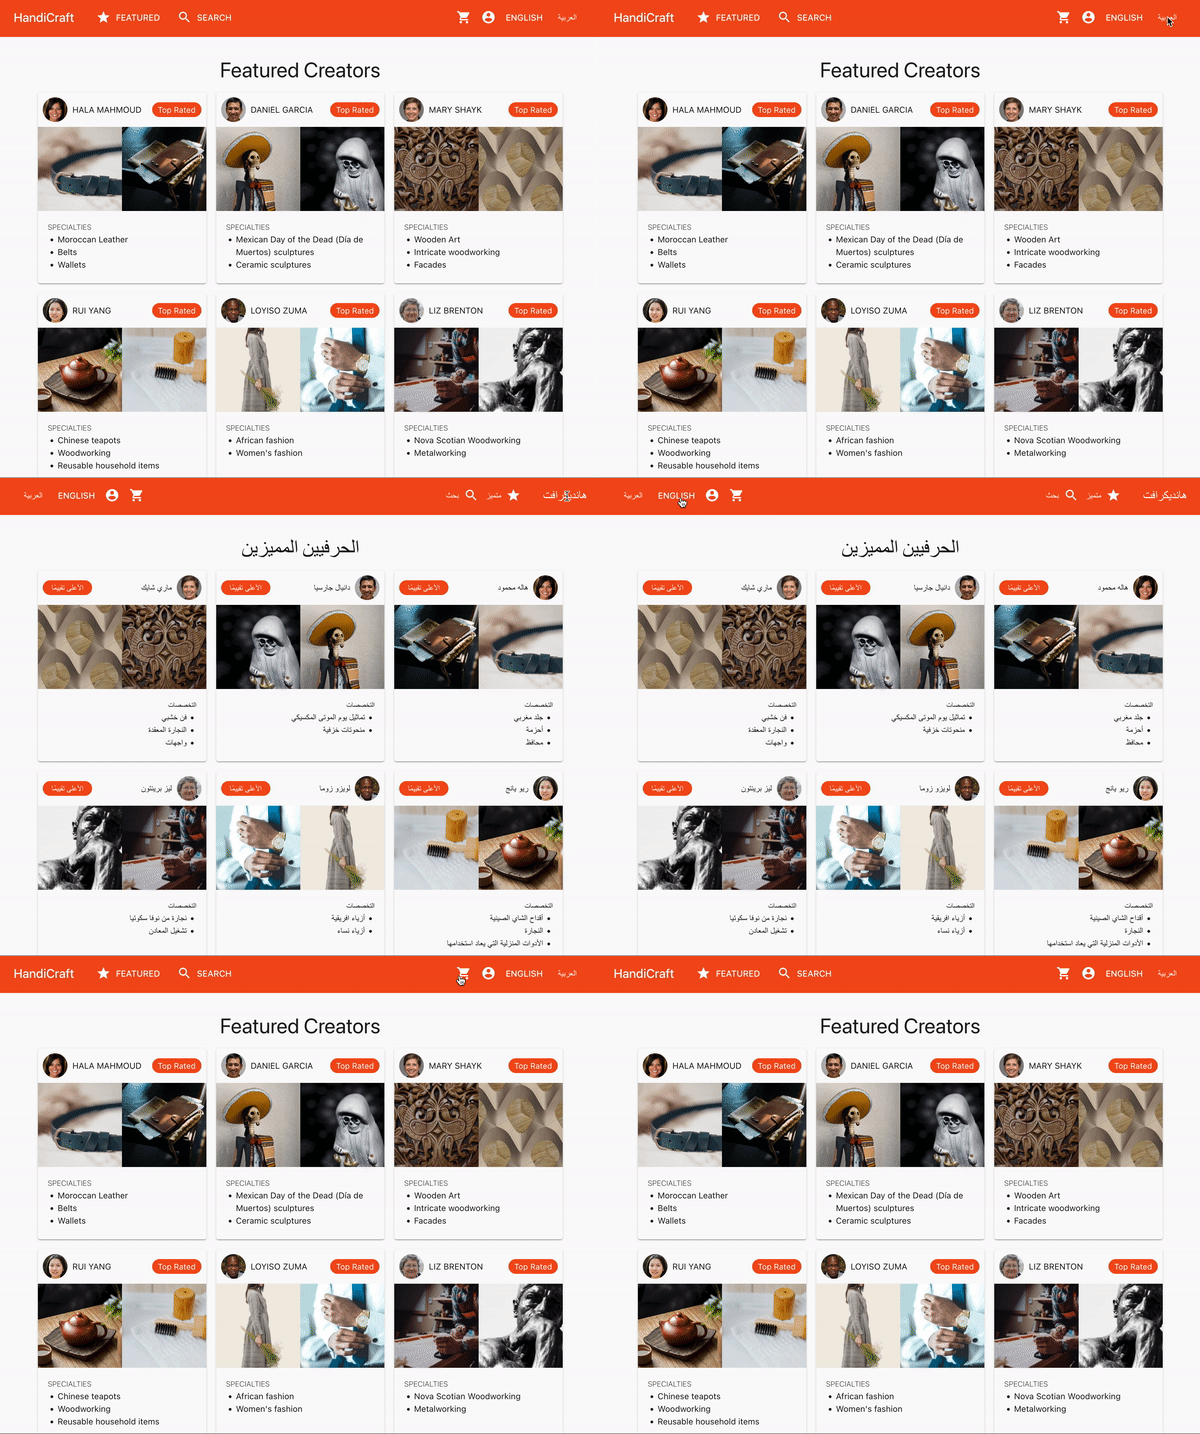
Our localized desktop app
Scaling issues: analyzing our localization solution
We’ve been able to localize our app into multiple languages, and our buyer and creator base has grown dramatically. In fact, we’ve secured some good funding and we’re ready to scale up our offering and go deeper into the UX and the value we can provide to our community. There’s a lot to tackle, including localization.
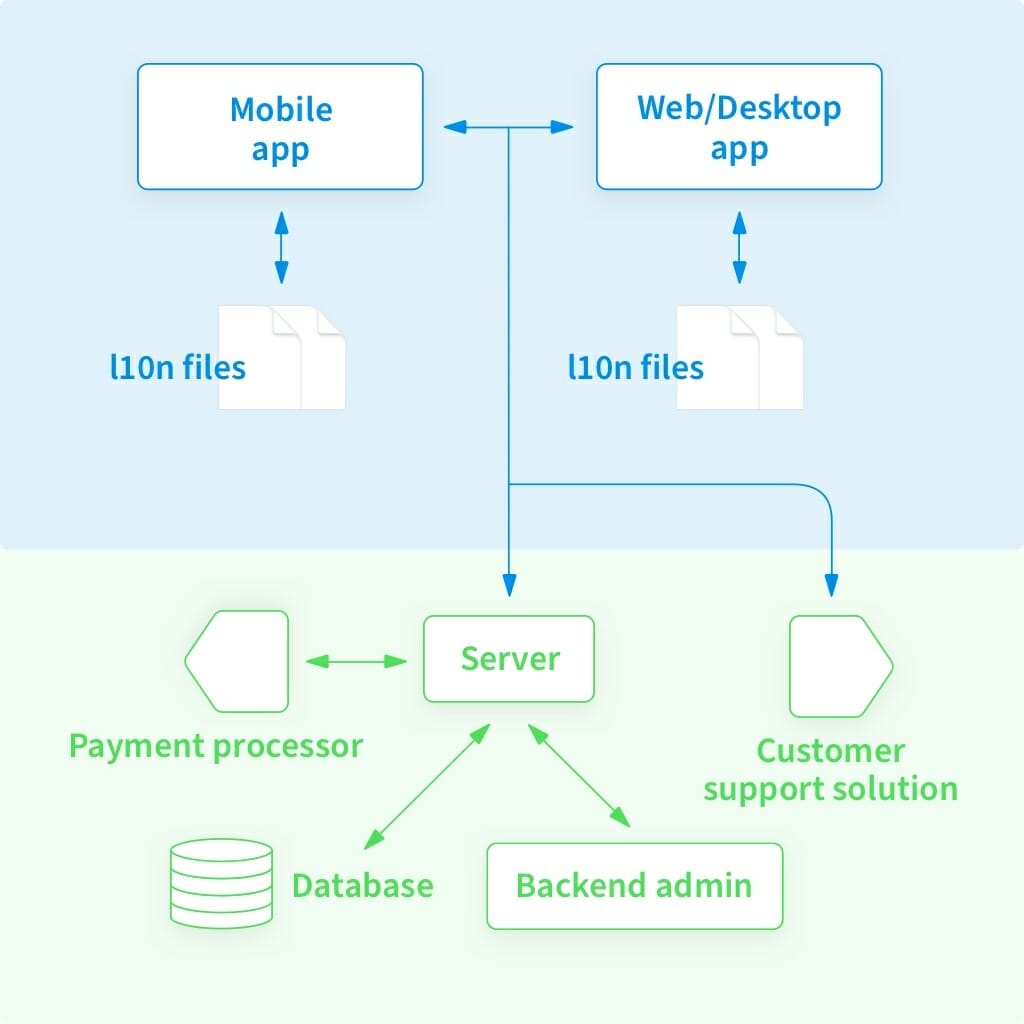
Our current architecture, including localization
While our current i18n/l10n solution has kept us light on our feet, our product teams may start to complain about annoyingly inefficient workflows with the ever-increasing volume of content and languages being added:
- Translators have to manage text files that travel back and forth to developers to integrate into app codebases.
- Designers have to communicate screen updates to both developers and translators.
- Developers find they often need to provide screenshots to translators to give them context around new translation strings.
- Translators have to manage duplicate strings in the same app, and duplication across apps.
- Translations add complexity to managing feature flags, branches, and versions for our apps.
To solve these issues, we consider building our own localization admin backend. However, our very expensive engineering time would then be spread between this new backend and our much-needed updates across our public-facing apps. We would also have to maintain this backend in the future, which is time, effort, and attention that could be better spent on broadening and refining our core offering.
Taking the plunge: a software localization platform to the rescue
Lucky for us, others have done the hard work of clearing the workflow bottlenecks we face when we scale our localization. These software localization platforms provide a slew of localization tech services: from syncing translations and web consoles for translators to all kinds of automation and integration.
By outsourcing our localization tech to a localization platform, we can focus on our core offering, ensuring that our time and effort are directed to providing the best product for our customers. We’re a bit biased, but we think Phrase Strings is one of the best software localization platforms on the market, so we’ll go ahead and use it in this tutorial.
🗒 Note » For brevity, we will largely cover connecting our Flutter app to Phrase Strings. The steps for connecting our React app are almost identical. We will also focus on setting up Phrase Strings, GitHub syncing, and managing translation duplication. There are Phrase solutions for all the problems we listed above.
Project setup
If you don’t have an organization in Phrase Strings set up yet, you can get a free trial so you can jump in and play around with it yourself. Once we have access, we can create two projects: one for our Flutter app and one for our React app.


Connecting the Phrase CLI
To begin syncing our translations between our apps and our Phrase projects, we need to initialize the projects using the Phrase command line interface (CLI). Installing the CLI is straightforward, and you can easily find instructions to do so for your operating system of choice. I’m on macOS, and I’ll use the Homebrew package manager to install the Phrase CLI from my command line:
# Add Phrase Homebrew repository
$ brew tap phrase/brewed
# Install Phrase CLI
$ brew install phrase
Once the CLI is installed, we can use it to connect each of our projects. For example, we can connect our Flutter project by navigating to its root directory in the command line and running the following command.
$ phrase init
At this point, we’re asked for an access token.


.phrase.yml config file that connects our app to the Phrase project, and will ask us if we want to perform an upload (push) of our translation files up to Phrase. Let’s do so by entering y and pressing Enter.
Our translations should now be up on the Phrase console, and we can see them if we navigate to Projects ➞ flutter-handiraft ➞ Languages and then click on a language.

The translator experience
At this point, the power of a software localization platform should start becoming apparent. Our translators can utilize the Phrase web interface—they can search, filter, add, remove, update, see changes, verify/unverify, and even do team management using a job assignment interface—all while our developers are busy working on core e-commerce functionality for our customers. We’ve saved countless design and engineering hours by not rolling our own console for translators, and given translators a platform that is designed and built for their workflows.
Connecting developers and translators
When developers add a new feature, they just have to phrase push their new translation keys from the command line. The translators take it from there, and once their translations are polished and ready, they can notify the developers, who perform a phrase pull and get back to writing the creative code they love. No need for exchanging and manually merging translation files. In fact, because the Phrase CLI supports all major operating systems, we can automate to our heart’s content. From an engineering perspective, localization becomes a simple step in our DevOps flow.
GitHub sync and continuous localization
As developers, we’re used to tight, cyclical build cycles that aim for continuous integration and continuous delivery. Localization can seamlessly be part of this through repository syncing: when we push a commit to a certain branch, Phrase can react by refreshing its translations, and our translators can get to localizing immediately. Let’s set this up for HandiRaft.
✋🏽 Heads up » We need to connect our apps to Phrase with .phrase.yml files in our Flutter and React apps to make GitHub sync work. The phrase init command we ran earlier took care of this for us.
🗒 Note » We’re covering GitHub sync here, but Phrase can sync with Bitbucket and GitLab repos as well.
Generating a GitHub access token
The first thing we need to do to connect GitHub to our Phrase projects is generate an access token from GitHub. Once we’ve logged into our GitHub account, we can click our profile picture near the top-right of the screen and go to Settings ➞ Developer settings ➞ Personal access tokens ➞ Generate new token. This will open the New personal access token screen, and we can get our spicy new token from there.

Clicking the Generate token button will give us a token we can copy to a safe place. Said token in hand (or in clipboard), we can head back to Phrase, log in, and head to Projects ➞ flutter-handicraft ➞ Project settings ➞ GitHub Sync.

.phrase.yml config via the Validate Configuration button, and clicking Save, we’re ready to sync our Phrase translations with our GitHub repo.
By default, our translators would have to manually pull translation updates from our GitHub repo by going to Languages ➞ GitHub Sync ➞ Import from GitHub.

Auto-importing using a webhook
Manual import can be exactly what your team needs. However, we can automate the import by adding a webhook to our GitHub repo that triggers whenever our chosen branch gets a new commit pushed to it. The webhook can then automatically import translations from our repo to our Phrase project.
To enable auto-import, we need to head back to our Project settings ➞ GitHub Sync, then check the Enable auto-import from GitHub. This will reveal a Generate payload URL button worthy of good clicking.


Continuous integration, continuous localization
With auto importing in place, we can now simply work in our normal Git flow and ensure that our translators get the latest translation keys as soon as they’re ready for them to translate. From an engineering perspective, translation becomes part of our continuous integration flow:
- We work on a new feature, adding and updating translations in the source language (say English).
- As soon as the feature starts taking shape, we push a commit to the branch that we registered with the Phrase projects.
- Translators automatically receive the new translation keys in their Phrase project and use Phrase to efficiently translate our new feature to all our supported locales.
- When they’re done, translators export a pull request (PR) to GitHub, which we can review and merge.
It’s really that easy. Let’s see it in action. Let’s say we’re adding a social forum section to our offering, where pro and hobbyist artisans can talk about their craft. We’ll have some new strings in our new screens, of course. While we develop, we add these strings to our development language, English.
{
  // ...
  "artisanChat": "Artisan chat",
  "createPost": "Create a post",
  "publish": "Publish",
  "rulesOfConduct": "Rules of conduct"
}
We feel that the forum is heading in the right direction, and we want to get our localization team working on it ASAP. So we simply push a commit to the branch connected to our Phrase project, main in this case.
As soon as we do, our new translations are available in Phrase.

This is easily done on the Phrase console by going to Project ➞ Languages ➞ GitHub Sync ➞ Export to GitHub as pull request.


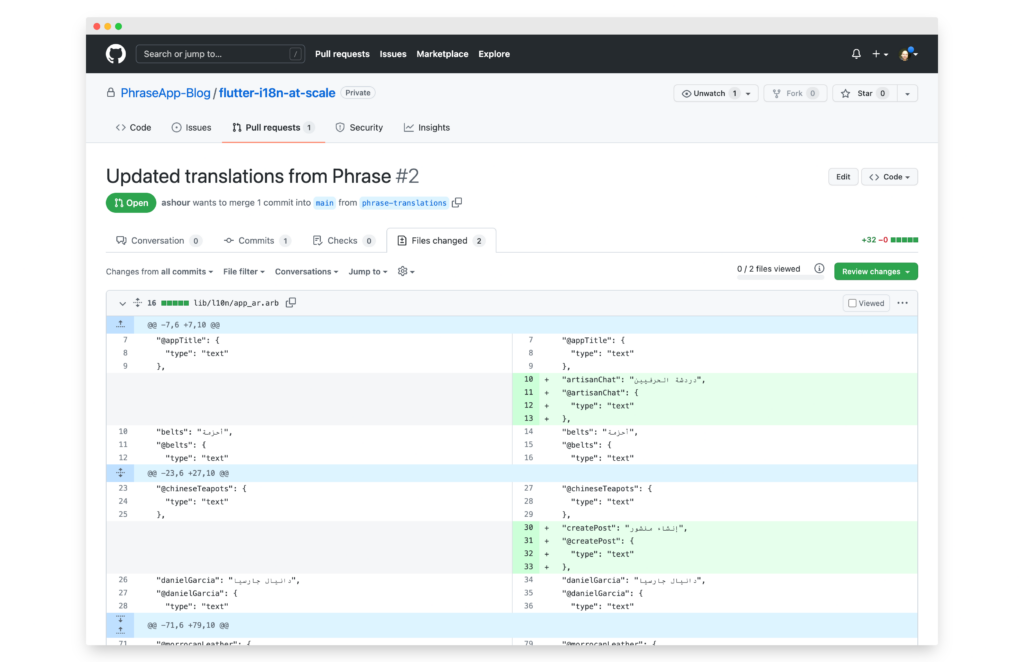
Just like any other PR, we can review and merge it in, making the new translations available to our whole team without us doing anything outside of our normal workflow: Git push, PR, review, merge. Presto.
So Phrase Strings saves our engineering team many precious hours, and headaches, by automating localization integration.

Saving time for translators: translation memory
This tutorial is aimed at developers, but we do want to briefly touch on a few features in Phrase Strings that save translators time.
One issue translators often face is duplicate translations, especially across multiple apps in the same offering. For example, the HandiRaft Flutter and React apps share a lot of the same translation keys.
We can dramatically reduce the amount of effort around duplicate translations across apps by enabling Phrase’s translation memory. After we log into Phrase, we can find it in the sidebar to the left of the screen.
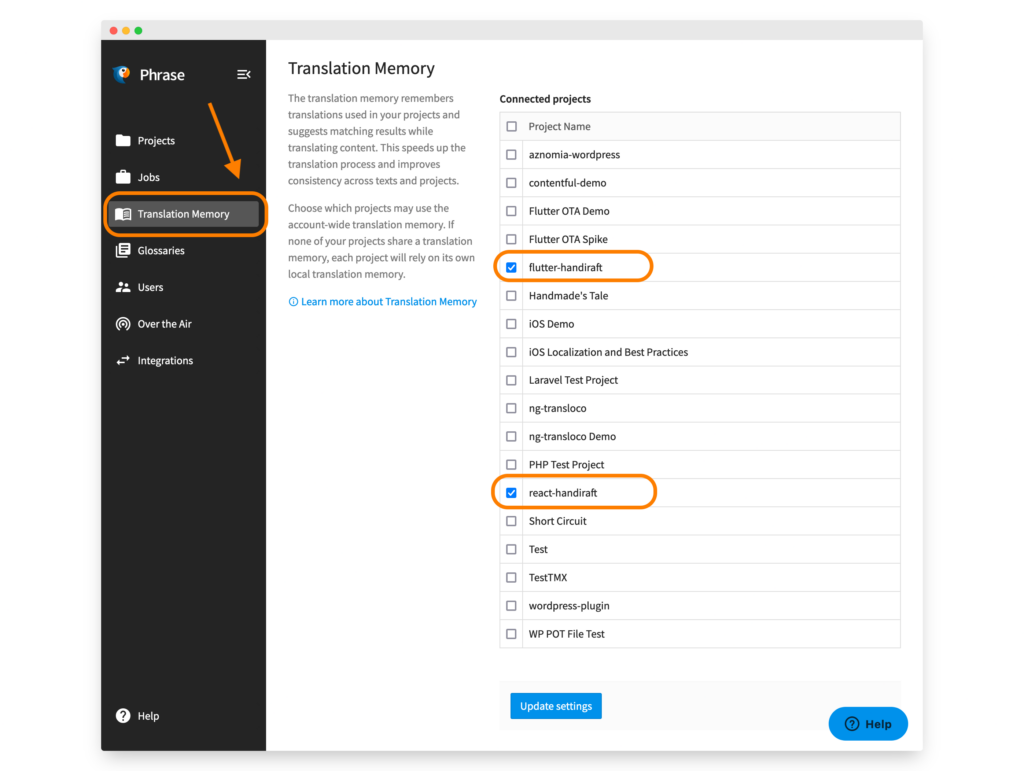
Once on the translation memory page, we just need to select the Phrase projects to connect and then click Update settings. Of course, here we’ll connect our flutter-handiraft and react-handiraft projects.
Our web team has been busy updating our React app to include the social forum feature that the Flutter team started earlier. Of course, the React app’s new translation strings are very similar to ones recently added to the Flutter app.
However, instead of spending time re-translating these strings, our translators can use the enabled translation memory to get automatic autocomplete suggestions and populate their translations with one button, while reviewing them to ensure quality.

- Comments so that translators can collaborate with the translation right in front of them
- See changes in the translation and the ability to revert to earlier versions of a translation
- An in-context editor so translators can translate directly on the interface of web apps
- And much more
Wrapping up our tutorial on how to localize software at scale
Back to my engineering tribe, we’ve covered Phrase’s CLI and GitHub sync, but Phrase is built by developers for developers, so it gives us a lot more goodies:
- Support for almost every translation file format under the sun
- An API we can connect to
- Branching
- Over-the-air (OTA) translations for mobile apps
- And much more
We hope you’ve seen how much a platform like Phrase Strings can save your team time and money as your app scales, allowing you to focus on your core offering while leaving the heavy lifting regarding localization tech to Phrase. Are there topics that we missed here that you would like us to cover? We’d love to hear from you.
Phrase Strings
Take your web or mobile app global without any hassle
Adapt your software, website, or video game for global audiences with the leanest and most realiable software localization platform.


