At Phrase, we want to make localization reliable and straightforward. One possible way of using Phrase as a software developer is by employing our strong API. It allows developers to do a variety of things, such as importing translations from nonstandard files or implementing your own workflow with translations.
We already have Ruby and Go libraries, but to make it even easier to work with our API, we want to support even more programming languages. Unfortunately, developing libraries manually is quite time-consuming, and maintenance effort increases with each language we support. Keeping it all in sync is a further obstacle.
To solve this problem, we decided to describe our API using the OpenAPI Specification (OAS) and generate client libraries automatically for various programming languages all at once with OpenAPI Generator. The OpenAPI Specification (OAS) allows the describing of REST APIs in a standard, programming language-agnostic way, making it possible for both humans and computers to discover and understand the capabilities of a service.
Describing the API is Pretty Straightforward
You can keep everything in one file, but it’s easier to have it split in a logical way.
openapi: 3.0.3
info:
  title: Phrase API Reference
  version: 2.0.0
  description:
    $ref: './intro.md'
  termsOfService: 'https://phrase.com/legal/'
  license:
    name: MIT
    url: https://choosealicense.com/licenses/mit/
servers:
  - url: https://api.phrase.com/v2
security:
  - Token: []
  - Basic: []
components:
  securitySchemes:
    Token:
      type: apiKey
      in: header
      name: Authorization
      description: Enter your token in the format **token TOKEN**
    Basic:
      type: http
      scheme: basic
  headers:
    $ref: "./headers.yaml"
  schemas:
    $ref: "./schemas.yaml#/schemas"
  parameters:
    $ref: "./parameters.yaml"
  responses:
    $ref: "./responses.yaml"
paths:
  $ref: "./paths.yaml"
The ‘info’ section contains all human-readable information. You can have more than one production server, or maybe staging and production, pointed to in the ‘servers’ section. The ‘security’ paragraph contains all authorization methods. ‘Components’ are reusable component definitions so that you don’t have to define the same parts such as headers and responses over and over again. The main part is the ‘paths’ definitions, where we describe our API endpoints. The structure is quite flexible and you can split it as you wish in most parts. There is no strict guideline on how to do it, but the ‘$ref’ keyword lets us point to another part of the document or even to another file. Keep in mind that ‘$ref’ doesn’t work everywhere.
When we describe ‘paths’ we also split it into separate files, e.g.:
"/projects":
  get:
    "$ref": "./paths/projects/index.yaml"
  post:
    "$ref": "./paths/projects/create.yaml"
"/projects/{id}":
  get:
    "$ref": "./paths/projects/show.yaml"
  patch:
    "$ref": "./paths/projects/update.yaml"
  delete:
    "$ref": "./paths/projects/destroy.yaml"
And now we can reuse parts, e.g. in the projects list definition:
---
summary: List projects
description: List all projects the current user has access to.
operationId: projects/list
tags:
- Projects
parameters:
- "$ref": "../../parameters.yaml#/X-PhraseApp-OTP"
- "$ref": "../../parameters.yaml#/page"
- "$ref": "../../parameters.yaml#/per_page"
responses:
  '200':
    description: OK
    content:
      application/json:
        schema:
          type: array
          items:
            "$ref": "../../schemas/project.yaml#/project"
    headers:
      X-Rate-Limit-Limit:
        "$ref": "../../headers.yaml#/X-Rate-Limit-Limit"
      X-Rate-Limit-Remaining:
        "$ref": "../../headers.yaml#/X-Rate-Limit-Remaining"
      X-Rate-Limit-Reset:
        "$ref": "../../headers.yaml#/X-Rate-Limit-Reset"
      Link:
        "$ref": "../../headers.yaml#/Link"
  '400':
    "$ref": "../../responses.yaml#/400"
  '404':
    "$ref": "../../responses.yaml#/404"
  '429':
    "$ref": "../../responses.yaml#/429"
As you can see now, we just point to the reusable definitions, such as project schema or pagination parameters, almost everywhere. If you’re interested in finding out how all the API definitions look, visit the GitHub repository.
It’s time to generate some code
Let’s start with the HTML documentation. One of the most popular tools to accomplish this is the ReDoc. You can use it in many ways, as a React component or docker image, but there is also a CLI which is the best one for us to run on GitHub action. The minimal command to run is:
redoc-cli bundle -o doc/index.html ./main.yaml
in which we just point to where to find definitions and where to put the generated HTML file. Pretty straightforward. You can find the configuration details in ReDoc Readme file. Unfortunately, web performance tools complained a lot about generated pages so we decided to check a few other tools.
Another easy one to use with better page speed rating is RapiDoc. This tool uses a little bit of a different approach. One can use it as a vanila HTML page or JavaScript application, all it needs is the path to the OpenAPI specification JSON file.
For now, it’s not settled yet which tool we will use to generate HTML documentation but there are definitely at least a few decent options to pick from.
Generating libraries is similar in many ways. The approach is the same, pointing to the source and output destination. However, we had some minor problems at the start. First of all, OpenAPI Generator required all definitions to be in one file, so we had to get rid of all `$ref` usage. To do that, we used the ‘swagger-cli’ tool and combined all of it into one file:
swagger-cli bundle -t yaml -w 300 main.yaml > tmp/compiled.yaml
Then, we just use this file to generate a client library. You can pick any supported language but we decided to go with a few most popular like Ruby, Go, and TypeScript.
openapi-generator generate -i tmp/compiled.yaml -g typescript-fetch -o clients/typescript
Keep in mind that generators do not keep the same quality standard, and some even generate broken code, so always inspect the result.
Generate a CLI
There is no CLI generator in OpenAPI Generator, but you can find some well-maintained CLI generators on GitHub. Unfortunately, using them would have been problematic for us because part of our CLI is custom, e.g. pull and push commands utilize few API endpoints to achieve correct results. Since we already have CLI v1 written in Go, it was a natural decision to set up v2 in this language as well. For this purpose, we changed the Go generator template, and instead of the API client library, we generated Cobra files and combined them with custom command definitions. It works together almost the same as generating clients libs and is also pushed to the separated repository.
Make it automatic
Generating code is one thing but making it public is also an important step. To do that we use GitHub action. Every time anything changes in our openapi repository the action kicks in, generating the libraries and pushing it into separated repositories:
name: API CLients
on:
  push:
    branches:
      - master
jobs:
  build-go:
    runs-on: ubuntu-latest
    steps:
      - name: Checkout 🛎️
        uses: actions/checkout@v2
        with:
          persist-credentials: false
      -
        name: Set up Go
        uses: actions/setup-go@v2
        with:
          go-version: 1.14
      - name: Build and Deploy 🚀
        env:
          API_TOKEN_GITHUB: ${{ secrets.API_TOKEN_GITHUB }}
          GITHUB_TOKEN: ${{ secrets.GITHUB_TOKEN }}
        run: |
          go get golang.org/x/tools/cmd/goimports
          npm install
          npm run generate.go
          git clone --depth 1 https://$API_TOKEN_GITHUB@github.com/phrase/phrase-go.git clones/go &> /dev/null
          rsync -a --delete --exclude='.git/' clients/go/ clones/go
          cd clones/go
          goimports -w .
          if [ -n "$(git status --porcelain)" ]; then
          git config --global user.email "support@phrase.com"
          git config --global user.name "Phrase"
          git add .
          git commit --message "Deploying from  phrase/openapi@${GITHUB_SHA::8}"
          git push origin master
          else
          echo "  No changes, skipping."
          fi
That’s why all commits in libs repositories look like ‘Deploying from …’
Here’s the general flow:
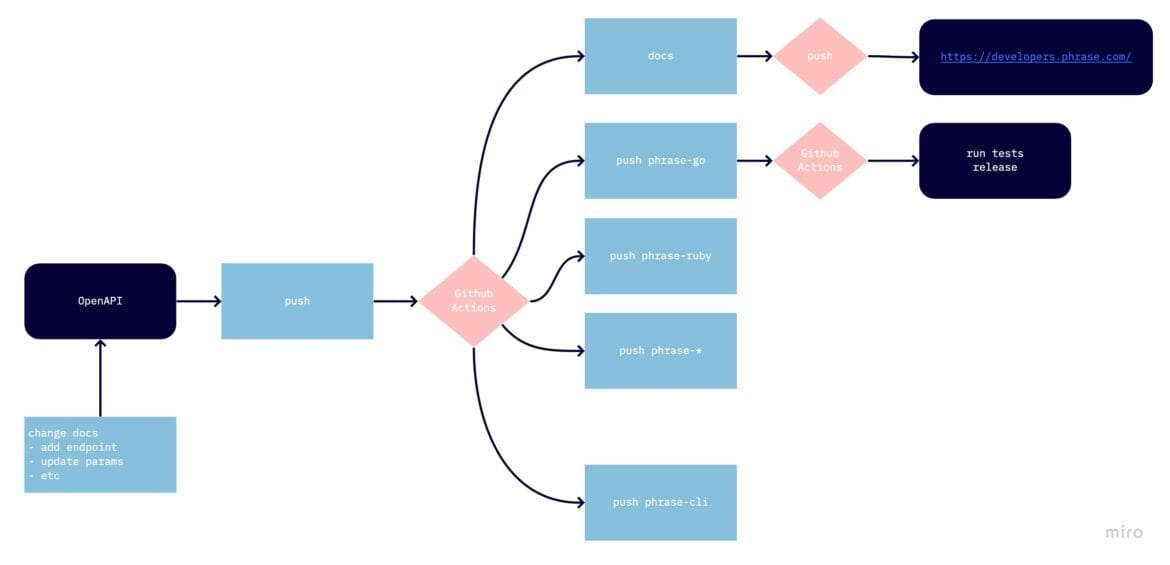
API clients and CLI repositories have their own GitHub action so that when we create a tag in the repository the action is preparing the release and doing steps related to only this repo like publishing a gem to RubyGems.org.
Conclusion
In general, code generation works quite smoothly, but there are some rough edges here and there. The OpenAPI tooling is inconsistent. Some tools do not support the whole OpenAPI v3 standard or depend heavily on vendor extensions. However, it’s nice to have a consistent, repeatable way of generating all API clients at the same time. Keeping it all in sync is a way easier task now. Making it all depend on a single source of truth, which is also an industry standard, makes support far more doable. We really like having a simple toolchain to generate updated versions of the client libraries.


