
In our previous blog posts, we have already talked about how to implement internationalization with Spring Boot and Spring MVC. In this Spring WebFlux tutorial on internationalization, we will create a web application with internationalization and localization support in Spring WebFlux. First, we will go through all basic steps to bring up a simple web application with Spring Boot 2.0 and Spring WebFlux. Furthermore, we will add the necessary configuration to support internationalization and localization. Besides, we will use Thymeleaf as template engine. Hence, we expect the reader has basic knowledge of Maven, Spring Boot, Spring WebFlux, and Thymeleaf.
Project Setup
Let us go over the basics of setting up our project to get things rolling…
Dependency
First of all, we declare our project parent in pom.xml to spring-boot-starter-parent. Then, we add dependencies for Spring WebFlux and Thymeleaf as below:
https://gist.github.com/linhvovn/2424c831ebea5a2e589c306431825c5f#file-spring-boot-parent
<parent>
    <groupId>org.springframework.boot</groupId>
    <artifactId>spring-boot-starter-parent</artifactId>
    <version>2.1.1.RELEASE</version>
    <relativePath/>
</parent>
<dependencies>
    <dependency>
        <groupId>org.springframework.boot</groupId>
        <artifactId>spring-boot-starter-webflux</artifactId>
    </dependency>
    <dependency>
        <groupId>org.thymeleaf</groupId>
        <artifactId>thymeleaf-spring5</artifactId>
    </dependency>
</dependencies>
In fact, the latest Spring Boot version can be found over on Maven Central.
Meanwhile, please note that we use Java 9 in this article. Hence, the declaration is as below:
<plugin>
    <groupId>org.apache.maven.plugins</groupId>
    <artifactId>maven-compiler-plugin</artifactId>
    <configuration>
        <source>9</source>
        <target>9</target>
    </configuration>
</plugin>
Configuration
We create a WebConfig class and decorate it with @Configuration annotation as below:
@Configuration
@EnableWebFlux
public class WebConfig implements ApplicationContextAware, WebFluxConfigurer {
    ApplicationContext context;
    @Override
    public void setApplicationContext(ApplicationContext context) {
        this.context = context;
    }
    //...
}
In the above code, the WebConfig implements the ApplicationContextAware to allow us getting access to the ApplicationContext. Moreover, we also need to implement the WebFluxConfigurer as this will make it possible for us to register our ViewResolver later.
Additionally, we decorate the class with @EnableWebFlux annotation. This will enable the use of annotated controllers and functional endpoints. However, only one @Configuration class should have the @EnableWebFlux annotation.
Using Thymeleaf As Template Engine
Thymeleaf, as a modern server-side Java template engine that emphasizes natural HTML templates, offers a reactive-friendly way to integrate with Spring 5 WebFlux:
//...
     @Bean
    public ITemplateResolver thymeleafTemplateResolver() {
        final SpringResourceTemplateResolver resolver = new SpringResourceTemplateResolver();
        resolver.setApplicationContext(this.context);
        resolver.setPrefix("classpath:views/");
        resolver.setSuffix(".html");
        resolver.setTemplateMode(TemplateMode.HTML);
        resolver.setCacheable(false);
        resolver.setCheckExistence(false);
        return resolver;
    }
    @Bean
    public ISpringWebFluxTemplateEngine thymeleafTemplateEngine() {
        SpringWebFluxTemplateEngine templateEngine = new SpringWebFluxTemplateEngine();
        templateEngine.setTemplateResolver(thymeleafTemplateResolver());
        return templateEngine;
    }
    @Bean
    public ThymeleafReactiveViewResolver thymeleafReactiveViewResolver() {
        ThymeleafReactiveViewResolver viewResolver = new ThymeleafReactiveViewResolver();
        viewResolver.setTemplateEngine(thymeleafTemplateEngine());
        return viewResolver;
    }
    @Override
    public void configureViewResolvers(ViewResolverRegistry registry) {
        registry.viewResolver(thymeleafReactiveViewResolver());
    }
    //...
As we can see here, we need a Template Resolver, a Template Engine, and a View Resolver as the necessary settings.
For instance, we use SpringResourceTemplateResolver as the implementation of Template Resolver. This is where we specify the location of our template files and the file extension. In this article, our templates will be in HTML format.
After that, we assign that Template Resolver to a Template Engine which is the SpringWebFluxTemplateEngine. Similarly, the Template Engine is referred to by a View Resolver which is the ThymeleafReactiveViewResolver here.
Eventually, we register our View Resolver to Spring by overriding the configureViewResolvers method of the interface WebFluxConfigurer.
Next, we can put a sample index.html file under resources/views as our template. The file content is:
<!DOCTYPE html>
<html>
<head>
<meta charset="utf-8">
<title>I18N Spring Webflux</title>
</head>
<body>
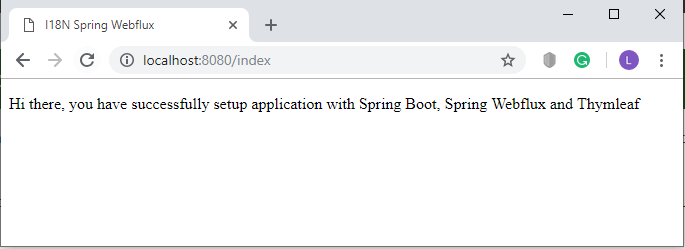
<p>Hi there, you have successfully setup application with Spring Boot, Spring Webflux and Thymleaf</p>
</body>
</html>
Handler and Router
Until here, we can create a WelcomeHandler which will return the index.html template:
@Component
public class WelcomeHandler {
    public Mono<ServerResponse> hello(ServerRequest request) {
        return ServerResponse
                .ok()
                .contentType(MediaType.TEXT_HTML)
                .render("index");
    }
    //...
 }
In Spring WebFlux, we need a Router to route a request to the corresponding handler. Let’s create a WelcomeRouter as below:
@Configuration
public class WelcomeRouter {
	@Bean
	public RouterFunction<ServerResponse> route(WelcomeHandler welcomeHandler) {
		return RouterFunctions
			.route(RequestPredicates.GET("/index")
                                .and(RequestPredicates.accept(MediaType.TEXT_HTML)), welcomeHandler::hello);
  }
}
As a result, the request comes to /index, will be handled by WelcomeHandler.hello method.
Running the Application
At this point, we add below class to be able to run our Spring Boot application:
@SpringBootApplication
public class I18NWebfluxApplication {
    public static void main(String[] args) {
        SpringApplication.run(I18NWebfluxApplication.class, args);
    }
}
Now run our application and access the server at http://localhost:8080/index. We will see the following result:
I18n in Spring WebFlux
We’ve now reached the point at which we can start implementing i18n and l10n…
MessageSource Config
To support multiple languages in our project, we need to declare a message properties file for each of the supported languages.
Let’s add a messages.properties under resources/languages to serve the default language:
label.welcome = Welcome
label.content = This is sample project for Internalization and Localization in Webflux
label.changeLang = Supported languages
label.lang.en = English
label.lang.fr = French
label.lang.cn = Chinese
label.lang.de = German
Additionally, we can add messages_de.properties, messages_fr.properties and messages_zh.properties. This will add the ability to support German, French and Chinese languages.
Meanwhile, we can see that a message properties file contains a set of key-pair values. We will use the key to refer to the desired message in our view later.
Afterward, we need to tell Spring where we put our message properties files. Therefore, we declare a MessageSource bean in our WebConfig as below:
@Bean
public MessageSource messageSource() {
    ResourceBundleMessageSource messageSource = new ResourceBundleMessageSource();
    messageSource.setBasenames("languages/messages");
    messageSource.setDefaultEncoding("UTF-8");
    return messageSource;
}
Custom LocaleContextResolver
There are two implementations of LocaleContextResolver available:
- AcceptHeaderLocaleContextResolver: uses the primary locale specified in the “Accept-Language” header of the HTTP request. This is the default one.
- FixedLocaleContextResolver: always returns a fixed locale and optionally time zone
In this article, we will try to implement a custom LocaleContextResolver. The purpose of it is to resolve the locale from a request parameter:
public class RequestParamLocaleContextResolver implements LocaleContextResolver{
    @Override
    public LocaleContext resolveLocaleContext(ServerWebExchange exchange) {
        Locale targetLocale = Locale.getDefault();
        List<String> referLang = exchange.getRequest().getQueryParams().get("lang");
        if (referLang != null && !referLang.isEmpty()) {
            String lang = referLang.get(0);
            targetLocale = Locale.forLanguageTag(lang);
        }
        return new SimpleLocaleContext(targetLocale);
    }
    //...
}
Furthermore, we need to tell Spring to use our implementation as the LocaleContextResolver. Hence, we add a configuration class which extends the DelegatingWebFluxConfiguration class. Then, we will override the method createLocaleContextResolver to return our custom implementation:
@Configuration
public class LocaleSupportConfig extends DelegatingWebFluxConfiguration {
    @Override
    protected LocaleContextResolver createLocaleContextResolver() {
        return new RequestParamLocaleContextResolver();
    }
}
Welcome Page
Up until here, we have everything ready for the configuration. Let’s create a welcome.html template as below:
<!DOCTYPE html>
<html>
  <head>
    <meta charset="utf-8">
    <title>I18N Spring Webflux</title>
  </head>
  <body>
    <h2 data-th-text="#{label.welcome}"></h2>
    <p data-th-text="#{label.content}"></p>
    <p data-th-text="#{label.changeLang}"></p>
    <ul>
    	<li>
    		<a href="/welcome?lang=en" data-th-text="#{label.lang.en}"></a>
    	</li>
    	<li>
    		<a href="/welcome?lang=de" data-th-text="#{label.lang.de}"></a>
    	</li>
    	<li>
    		<a href="/welcome?lang=fr" data-th-text="#{label.lang.fr}"></a>
    	</li>
    	<li>
    		<a href="/welcome?lang=zh" data-th-text="#{label.lang.cn}"></a>
    	</li>
    </ul>
  </body>
</html>
The above template uses Thymeleaf syntax to render localized messages. Indeed, the real message will be chosen at runtime based on the selected locale.
In addition to this, we also need to update our WelcomeHandler and WelcomeRouter to use this template:
@Component
public class WelcomeHandler {
    public Mono<ServerResponse> hello(ServerRequest request) {
        return ServerResponse
                .ok()
                .contentType(MediaType.TEXT_HTML)
                .render("index");
    }
    public Mono<ServerResponse> welcome(ServerRequest request) {
        return ServerResponse
                .ok()
                .contentType(MediaType.TEXT_HTML)
                .render("welcome");
    }
}
@Configuration
public class WelcomeRouter {
	@Bean
	public RouterFunction<ServerResponse> route(WelcomeHandler welcomeHandler) {
		return RouterFunctions
			.route(RequestPredicates.GET("/index")
                                .and(RequestPredicates.accept(MediaType.TEXT_HTML)), welcomeHandler::hello)
			.andRoute(RequestPredicates.GET("/welcome")
                                .and(RequestPredicates.accept(MediaType.TEXT_HTML)), welcomeHandler::welcome);
	}
}
Testing
Altogether, our project is ready for final testing. Let’s start the application and access http://localhost:8080/welcome:

Then, click on French anchor. What you will see:
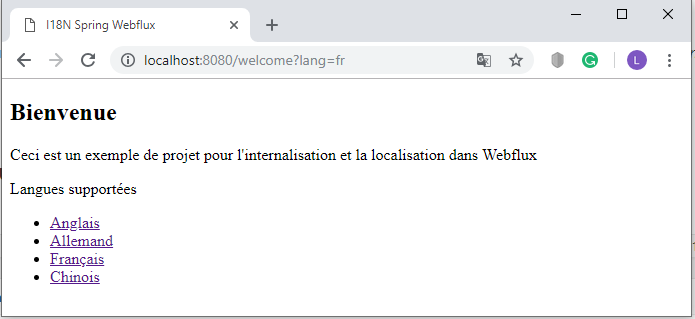
That being the case, we have successfully set up a Spring WebFlux project with I18N support.
Summary
Let’s summarize what we have done in this article.
At first, we have brought up a Spring WebFlux project which uses Thymeleaf as Template Engine. Subsequently, we added internationalization and localization support to the project by using message.properties, MessageResource and LocaleContextResolver.
Regardless of the two available implementations of LocaleContextResolver, we have tried to implement a custom RequestParamLocaleContextResolver. Therefore, we can change the application locale by changing the request parameter.
Finally, we can find the whole implementation of this article on our Github.


