Software localization
A React I18n Experiment with Storybook and i18next

In this step-by-step tutorial, we will learn how to localize a React component in a Storybook-based project. We will introduce you to the i18next library, set up our demo project, localize the component, and add further configurations as needed.
We assume you have prior experience with React, Storybook, and i18next. Otherwise, you can review the excellent official React documentation, go through our own tutorial on React i18next localization, and we will briefly cover Storybook. Let’s begin!
A brief introduction to Storybook and i18next
Storybook is a tool for building app UI components and pages in isolation. It’s open-sourced and helps in UI development, testing, and documentation.
Along with Storybook, we will also use the i18next framework for internationalization written in and for JavaScript applications. It goes beyond what a standard localization tool offers to provide a complete solution. It can also be integrated with popular frontend and backend frameworks/libraries like React, Angular, Vue, Node.js, Deno, PHP, etc.
Now is a good time to introduce you to the other libraries and start with the demo component code.
Libraries we will be using
We will be using the following NPM packages (with the version number in parentheses):
- React (18.1.0)
@storybook/react(6.5.10)- i18next (21.9.1)
- react-i18next (11.18.5)
- i18next-browser-languagedetector (6.1.5)
- storybook-react-i18next (1.1.2)
- TailwindCSS (3.0.24)
Our demo: Pricing plan component
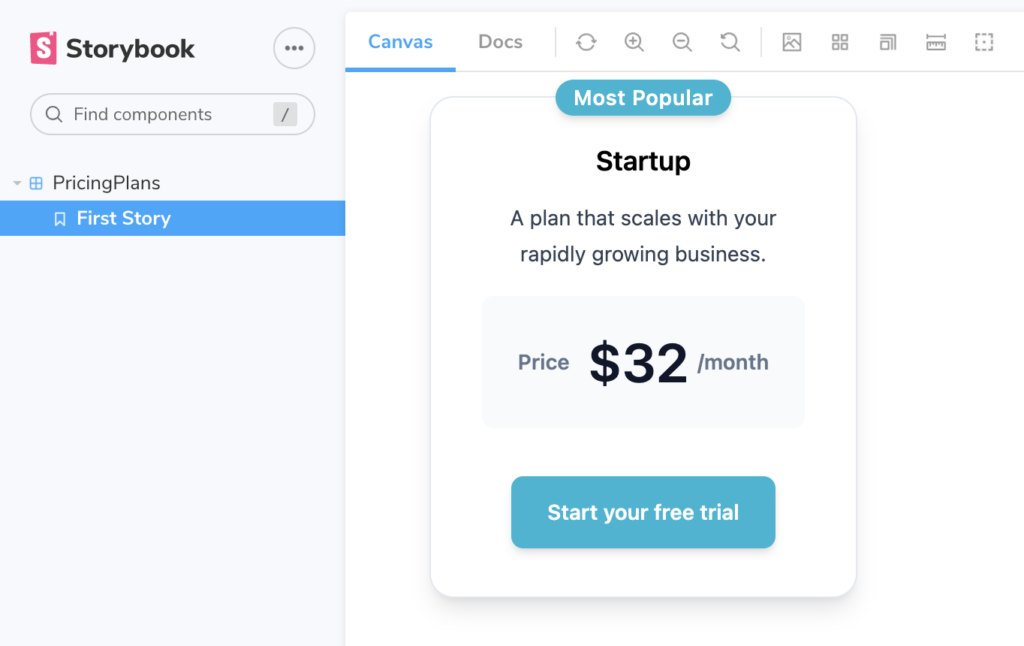
We will be building this small pricing plan component and use Storybook and i18next localization to understand how to write a story for this React component. Here’s what it looks like:

As you can see, it is a card layout with a “Most Popular” tag, plan name, description, pricing, and a CTA button. While in Storybook, we will be able to easily switch between different localization variants of the same card. With that in place, it’s time to start writing some code. Let’s begin!
We will be starting from scratch, so let’s spin off a new React app using the Create React App command:
npx create-react-app pricingplanCode language: JavaScript (javascript)After the new app is created in your favorite directory, let’s remove all the boilerplate code we have inside the App.js file with the following:
// src/App.js
import PricingPlan from './components/PricingPlan';

function App() {
  return (
    <>
      <PricingPlan />
    </>
  );
}

export default App;Code language: JavaScript (javascript)
Here we just want to render the PricingPlan component, which we have imported above. The next obvious thing is to write the JSX for the pricing plan component card. So, we make this PricingPlan.jsx file inside a new /components directory with the following code:
// src/components/PricingPlan.jsx

function PricingPlan() {
  return (

		{/* CSS classes were removed for brevity. */}

    <div>
      <div>
        <div>
          <h3>Startup</h3>

          <p>Most Popular</p>
          <p>A plan that scales with your rapidly growing business.</p>

          <div>
            <p>
              <span>USD</span>
              <span>$32</span>
              <span>/month</span>
            </p>
          </div>

          <a href='#'>Start your free trial</a>
        </div>
      </div>
    </div>
  );
}

export default PricingPlans;Code language: JavaScript (javascript)
🗒️ Note » You can access the full source code (along with the Tailwind CSS class styles) in our repo here.
Next, let’s add Storybook to the mix so that we isolate this component and start writing our first story!
How do I install and setup Storybook?
As we already have our React app running, let’s open a new tab in our terminal window and execute the following command to use the Storybook CLI inside our existing project’s root directory:
npx storybook initCode language: JavaScript (javascript)Storybook CLI will look into our project’s dependencies while it installs and provides us with the best configuration available.
🗒️ Note » If you run NPM version 8.2.0, the CLI will automatically prompt you to run its ‘npm7’ migration on your project. This will add a tiny .npmrc file at the root of your project with legacy-peer-deps=true, so it’s completely safe to proceed with accepting this suggestion. More about this issue can be found on their GitHub.
That should be it for installation. It’s now time to take a look at our Storybook window! Let’s go ahead and run the following command to start Storybook locally in our app:
npm run storybookThis will automatically open a new browser tab/window, and you should see a Storybook window. Good work!
Writing our first story
A story is a function that returns a component’s state with some optionally provided arguments (args). Typically, we write stories in a story file alongside our component file, and this isn’t included in our production bundle. Let’s start by creating a new story file inside the src/components folder and call it PricingPlan.stories.jsx with the following code:
// PricingPlan.stories.jsx

import PricingPlan from './PricingPlan';

export default {
  title: 'PricingPlan',
  component: PricingPlan,
  decorators: [
    (Story) => (
      <div>
        <Story />
      </div>
    ),
  ],
};

export const FirstStory = { };Code language: JavaScript (javascript)
This is called the default export of a story. This metadata controls how Storybook lists your stories and provides information used by add-ons.
Before you start running Storybook, make sure you have imported your CSS styles in the preview.js file:
// .storybook/preview.js

import './../src/index.css';

export const parameters = {
  //...
};Code language: JavaScript (javascript)
Now start the Storybook process to see our pricing plan component on the canvas.

How do I use i18next to localize a React component?
We have successfully created our own story for the component, but now the crucial part is localizing it. We want our component to be rendered in the default user device’s language, say English (‘en’) but also in Spanish (‘es’) in Storybook.
Our app will use the i18next and react-i18next packages. The latter gives us the required components, Hooks, and plugins on top of i18next. Let’s install both of them in our project:
npm install --save i18next react-i18nextCode language: JavaScript (javascript)After the installation, we need to add a configuration file called i18n.js inside our /src folder. This file will bootstrap an i18n instance.
// src/i18n.js

import i18next from "i18next";
import { initReactI18next } from "react-i18next";


// `resources` is where we pass our translation keys for
// both languages.
const resources = {
  en: {
    translation: {
      component_name: "Pricing plan",
    },
  },
  es: {
    translation: {
      component_name: "Plan de precios",
    },
  },
};

i18n
	// We bind the `i18n` instance to an internal store
  .use(initReactI18next)
  .init({
    resources,

		// Making `en` as our default language
    lng: "en",

		// Disabling i18next's escaping of values injected into
    // translation messages at runtime, since React does this
    // for us
    interpolation: {
      escapeValue: false,
    },
    debug: true,
  });

export default i18n;Code language: JavaScript (javascript)
Let’s import this config file into our root index.js:
// src/index.js

import React from 'react';
import ReactDOM from 'react-dom/client';
import './index.css';
import App from './App';

import './i18next';

//...Code language: JavaScript (javascript)
Now we are all ready to use our i18n configurations in the component. For starters, let’s just try to display our component_name using i18next’s t() function of the useTranslation() Hook.
If you check your running app, you should see a new heading, ‘Pricing Plans’ in English, above the pricing plan card.

To see the translation in action, let’s switch the active language to Spanish in our config file:
// src/i18n.js

import i18next from "i18next";
import { initReactI18next } from "react-i18next";

//...

i18n
  .use(initReactI18next)
  .init({
    resources,

    // Active language changed to `es`
    lng: "es",
    interpolation: {
      escapeValue: false,
    },
    debug: true,
  });

export default i18n;Code language: JavaScript (javascript)
When the app reloads, you should see “Planes de precios” as the heading. Fantastic, we just processed our first localization!

Let’s update the code in your component JSX with the t() function:
// src/components/PricingPlan.jsx

function PricingPlan() {
  return (
   <div>

    {/* Container to make its contents centered */}
    <div>

		 {/* Card container */}
     <div>
      <h3>{t('plan_name')}</h3>

      <p>{t('tag_title')}</p>
      <p>{t('plan_description')}</p>

		  {/* Price container */}
      <div>
       <p>
        <span>{t('plan_currency')}</span>
        <span>$32</span>
        <span>/{t('plan_frequency')}</span>
       </p>
      </div>

      {/* CTA Button */}
      <a href='#'> {t('plan_cta')}</a>
     </div>
    </div>
   </div>
  );
}

export default PricingPlans;Code language: JavaScript (javascript)
Now when you try changing the active language from es to en you should see the correct translation file being loaded asynchronously, and that it’s getting the required translation values. While we have now localized our component, we also need to include this in Storybook, where we can manually select the required translation language. Let’s see how.
How do I set up the react-i18next Storybook add-on?
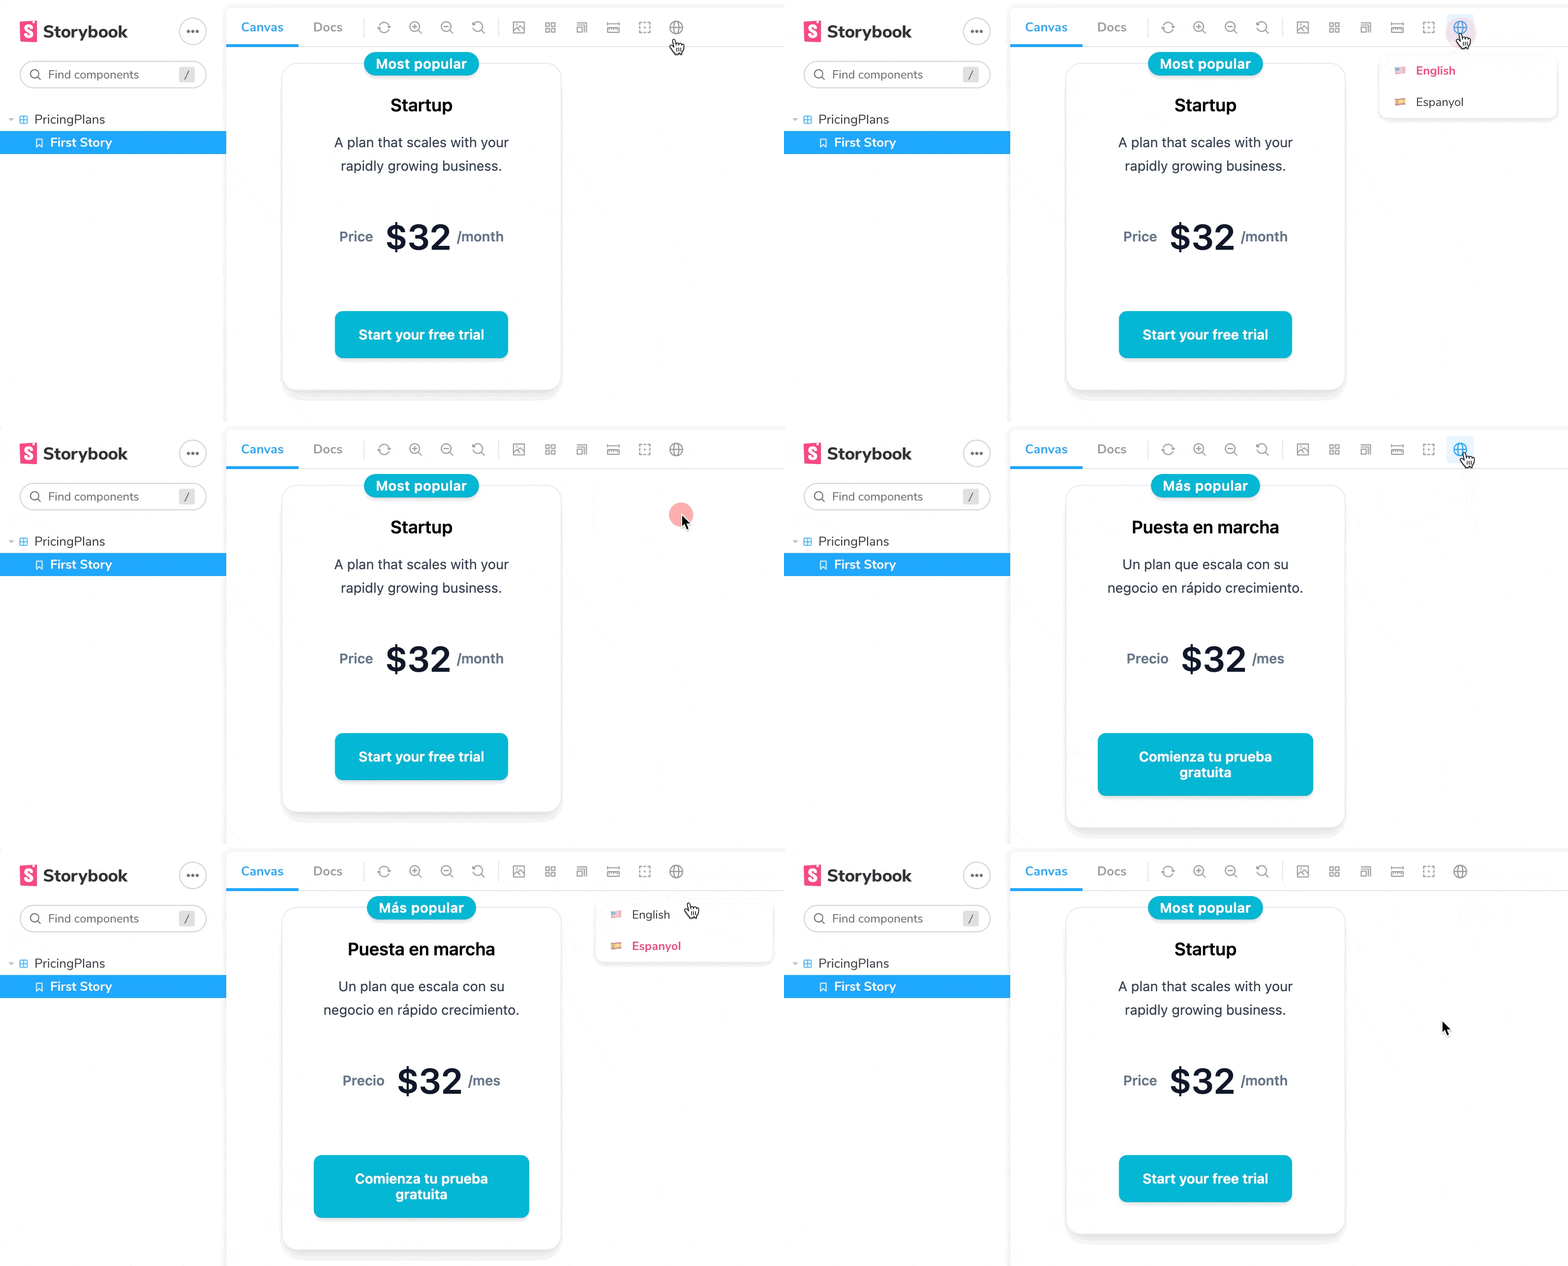
Storybook comes with a good amount of add-ons that unlock advanced features and new workflows as needed. In our app, we will be using the Storybook react-i18next add-on, which allows us to easily add react-i18next support to Storybook. It adds a globe icon in the Storybook toolbar from where we can easily choose a language via a dropdown which we will be able to customize.

Let’s add it to our project:
npm i -D storybook-react-i18nextCode language: JavaScript (javascript)Next, let’s enable this plugin so that Storybook recognizes it and loads when it starts its instance by inserting this in our addons array of the main.js file:
// .storybook/main.js

module.exports = {
 //...
  addons: [
    //...
    'storybook-react-i18next',
  ],
  //...
};Code language: JavaScript (javascript)
Finally, we will need to add some locales and locale parameters along with the exported i18n configuration in the preview.js file:
// .storybook/preview.js

import i18n from './../src/i18next';
import './../src/index.css';

export const parameters = {
  //...,
  i18n,
  locale: 'en',
  locales: {
    en: { title: 'English', left: '🇺🇸' },
    es: { title: 'Espanyol', left: '🇪🇸' },
  },
};Code language: JavaScript (javascript)
Here, locale is what we want our default locale to be, i.e., our default translation will be en for English. On the other hand, locales is an object where we put all the translation languages included in our app. title is the string we want to display in the dropdown. We can add an optional value that will appear left of the title in the dropdown. This is useful when we want to add an emoji flag, for example.
After we have correctly configured the plugin, we are ready to go! Let’s kill the running Storybook server and start it again. When the browser tab opens, you should see a globe icon in the toolbar, and when you click on it, it will show a dropdown with the locales we defined above.

Additional configuration with react-i18next add-on
The react-i18next add-on also provides other ways to configure your locale parameters. We can use full region-based locale strings as keys, given that we have configured our i18n properly to something like this:
// .storybook/preview.js

import i18n from './../src/i18next';
import './../src/index.css';

export const parameters = {
  //...,
  i18n,
  locale: 'en_US',
  locales: {
    en_US: 'English (US)',
    en_GB: 'English (GB)',
    fr_FR: 'Français',
    ja_JP: '日本語',
  },
};Code language: JavaScript (javascript)
We also get the right key value to go alongside the title key:
// .storybook/preview.js

import i18n from './../src/i18next';
import './../src/index.css';

export const parameters = {
  //...,
  i18n,
  locale: "en_US",
  locales: {
    en_US: {title: "English", right: 'US'},
    en_GB: {title: "English", right: 'GB'},
    fr_FR: {title: "Français", right: 'FR'},
    ja_JP: {title: "日本語", right: 'JP'},
  },
};Code language: JavaScript (javascript)
Ready to take localization to the next level?
We truly hope you enjoyed building this project with us and got to learn how useful Storybook’s add-ons can be, and how powerful the i18next package is.
If you’re ready to level up your software localization process, let the Phrase Localization Platform do the heavy lifting.
With its dedicated software localization solution, Phrase Strings, you can manage translation strings for your web or mobile app more easily and efficiently than ever.
With a robust API to automate translation workflows and integrations with GitHub, GitLab, Bitbucket, and other popular software platforms, Phrase Strings can do the heavy lifting for you to stay focused on your code.
Phrase Strings comes with a full-featured strings editor where translators can pick up the content for translation you had pushed. As soon as they’re done with translation, you can pull the translated content back into your project automatically.
As your software grows and you want to scale, our integrated suite lets you connect Phrase Strings with a cutting-edge translation management system (TMS) to fully leverage traditional CAT tools and AI-powered machine translation capabilities.
Check out all Phrase features for developers and see for yourself how they can streamline your software localization workflows from the get-go.

Phrase Strings
Take your web or mobile app global without any hassle
Adapt your software, website, or video game for global audiences with the leanest and most realiable software localization platform.


